By Fred Manzo
Terrain Effects Chart: Movement Point Costs and Fire Modifiers:
 If there is one criticism of Hell’s Highway it would be that its’ Terrain Effects Chart is unnecessarily confusing.
In my opinion, when a game possesses such an information heavy chart it behooves the game developer either to provide an extra special dose of commentary or to break the chart into more easily understandable bits. But this was not done.
So I’ll try my best to untangle it.
First, due to space limitations the chart is divided into two almost identical parts: a left and a right hand section. The only difference between these mirror images being the type of units listed under each portion.
Second, its best to ignore the notes placed in various spare spaces around the main chart. While they contain important information, they also tend to confuse new players who naturally assume anything located at the top of a column involves only the data in that particular column. But they don’t. For example, the statement “C= Combat Mode, T = Travel Mode” while certainly important and definitely correct has nothing in particular to do with the column it heads. The same going for the phase “Movement Points = 3” and the phrase “Direct/Indirect Fire Modifiers” placed above the “German to Exit Intrdctd Hex.” It appears these statements were placed were they were simply to take advantage of a convenient bit of blank paper.
Third, the chart doesn’t specifically mention which unit is being discussed in the column headed “Unit Type.” For example, the first unit on the left hand version of the chart is armor. So are the DRM produced added to an armor unit’s fire number when it shoots out of, say, a woods hex or are they the DRM produced when an armored unit fires into a woods hex? Or are they the DRM generated when firing at an armored unit in a woods terrain? That’s left unmentioned.
But if one looks carefully at Rule 8.1, Rule 8.4, the Player’s Aid Chart and the Terrain Effects Chart itself these problems can be resolved.
Simply put, the Die Roll Modifiers produced by this chart are the DRM added to whichever unit is being fired at after taking into account its type of movement and the terrain it finds itself in.
So, let’s begin at the beginning. Starting with the left version of the chart, player’s should realize a unit’s physical characteristics are listed down the left hand (white) columns and the terrains the unit is occupying is listed in the variously colored blocks across the top of the chart. By cross referring the unit in question and the terrain it’s in (and taking into account which mode of movement the unit finds itself in) players will locate a cell in the chart (green colored) that tells them which DRM to apply when firing AT these targets.
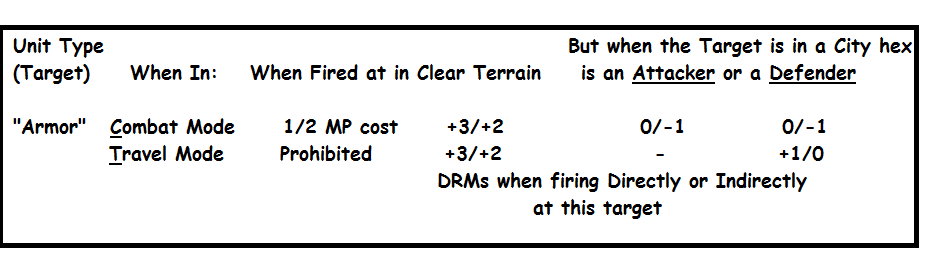
For example, using the first unit type listed on the chart “Armor,” on the C line (for when it’s in Combat mode) if the armored unit is fired at when it is in clear terrain hex, there is a much better change of hitting it, and therefore it’s the type of terrain that will generate the highest DRM. In this case it being +3 DRM if it is fired at Directly and +2 when it is firing at Indirectly. The better the defensive terrain, the smaller the DRM, and the smaller the chance any fire will harm the unit.
That seems simple enough, but what does the column labeled “City – Att and Def” mean? Well remember the chart’s “unit type” is the target, either when firing at the attacker or firing at the defender. So when the target is the attacker in Combat Mode in a city, the DRMs generated are “0” when firing at it Directly and “-1” when firing at it Indirectly. In other words, you are more likely to inflict damage on an armored unit when you fire at it Directly via Close Assault then when you fire at it Indirectly via Artillery when its partially shield by being located in a built up area. Remember, the higher the DRMs the more likely you are to inflict damage.
That is, it’s easier to hit a target when it’s in clear terrain then when it’s in a city. And it’s usually easier to inflict damage when the target is lined up all in a row in Travel Mode then when its spread out in Combat Mode (I.E., the DRM are generally higher when the Mode a target is in makes it easier to hit, that is when it is all lined up in a nice row on a road then when its spread out in Combat Mode, And the DRMs are generally low when the terrain makes it harder to hit anything.
That’s also why the Travel Mode (“T”) line has a dash under the attacker’s column. As per rule 8.1 units in Travel Mode can’t attack, so it can’t be the “Attacker” you are firing at. Therefore, the chart has a dash at that particular intersection.
Unfortunately the chart generates a lot more information than just which DRM to use when firing at some unit Directly or Indirectly, and this only adds to the confusion. The white vertical columns generally cover movement, not combat. So the ½ next to the Combat Mode line above is the cost of entering a clear hex and the “P” below it is trying to explain that Armored units in Travel Mode are limited to road movement only. Although placing this item next to the DRM to use when firing at an armored unit in Travel Mode in Clear terrain certainly can lead to confusion. “How can these kinds of targets be prohibited and still generate DRMs when they occur” being a valid question. In this particular case, what the chart is trying to communicate is that armored units can’t use Travel Mode when solely in clear terrain, hence the “P”, but when their road traverse a clear hex they can be targeted and this kind of target will generate DRMs.
Games Resources:
Player Aids for Hell’s Highway
This downloadable PDF file contains Player Aids that may come in handy when playing Victory Games’ classic board game: Hell’s Highway. The following Player Aids are included in the PDF file:
Player Aid Sheet Contents
- Player Aid #1: Rules Outline
- Player Aid #2: Movement Rules.
- Player Aid #3: Fire Rules – Offensive vs Defensive Fire.
- Player Aid #4: Direct Vs Indirect, Offensive Vs Defensive Fire.
- Player Aid #5: Direct vs. Indirect Fire?
- Player Aid #6: Terrain Effects Chart: Movement Point Costs and Fire Modifiers (as above).
Games Resources