Plan 1919
Wargaming a Big “What-If”
By Paul Comben
 We all know what the reality was. We all know what a certain Adolf Hitler had to say about it: there was no 1919 because of “The Men of 1918.” These men, the last of the imperial leadership of the old Reich as well as the first of its democratic successors, betrayed the nation, and most importantly, its army. The army, so the claim went in speech after speech, had been ready to fight on to a honourable conclusion. Only the failure of the home front prevented that.
During the late summer and early autumn of 1918, it seemed entirely possible, at least for a while, that the war would indeed enter another year. The Germans were retreating, but their front was not broken. The territory given up had come at a significant cost in casualties to the armies of the Entente, and as yet, in no place did those armies stand on German territory. For a while then, it must have seemed entirely possible that the war would go on…until the moment a nation as battered as any still left in the fight finally cried “Enough!”
A british Mark V tank
JFC Fuller, a British general with a talent for innovative military thinking was already planning ahead as the summer turned to autumn. The armies had, or would soon have, new weapons enough to fight a new sort of war. Those weapons and the method that went with them are a feature of this John Gorkowski design – Plan 1919.
The game is predicated upon several assumptions – themselves based on alternative twists in the events of late 1918:
- Imperial Germany defeats the forces of revolution and disillusionment that autumn/winter.
- Although enduring, the Germans have precious little new to bring to a fresh season of campaigning and remain in a fragile operational state.
- The Entente “perfects” its new weaponry and tactics.
- The deciding offensive begins sometime in summer 1919.
 Highlighting the second point just for the moment, it is interesting both in terms of the game and the broader remits of historical study to see where both sides’ solutions to the long years of static warfare eventually led. What becomes apparent in this context is that the Germans, to a not inconsiderable extent, had put themselves up a military cul-de-sac. This particularly applied to their near complete failure to produce a viable tank force. Instead, heavily reliant on the Stosstruppen concept coupled with sophisticated artillery techniques, they possessed no mechanical mobility and were thus, when on the offensive, bound to use up their human resources at a profligate rate. And when that resource was used up, by the middle of summer 1918, they had no alternative in hand.
The Entente, by contrast, produced a solution that their industry was well capable of maintaining, and so ensured that they had a mobility that the Germans could not hope to match. The consequences of this are likely to come screaming out of the Plan 1919 game map.
 This is a major plus for the game, but before looking at the system in detail and what demands it makes of players, I want to get some bothersome concerns dealt with.
In my opinion, the game design is bookended by things I feel (I cannot put it stronger than that given limited play) to be somewhat flawed and/or misconceived.
First, on a modest-sized map, we have a divisional scale simulation. This means that there are a very large number of units on the map, often heaped up in large stacks. It looks very impressive when all setup but it is a chore to work with. Counting up factors in combat can be difficult – things topple, slip and slide; the counters are very thick, which means the stacks themselves go high; and in areas of the map where you have serious numbers on both sides, and may need to flip entire stacks to show entrenched or mobile status, working the game processes is not easy.
 Frankly, I cannot help think the game would have benefited from a different scale or a different concept – maybe corps for the infantry while keeping the armour as is; using air points worked on a scale rather than adding more stuff to the map with the actual air units; perhaps using areas rather than hexes, or simply having larger hexes.
You really need tokens to work the air system as is, given that air units can base on any hex and have a range determined from that hex. Problem is: without marking where they took off from, I plain could not remember where precisely to return units – and in certain circumstances, getting it wrong by just a hex can have notable consequences in terms of what such units can support next time around. I had markers I could use, but alongside the big stacks and map crowding, it just took something away from the sense of game enjoyment.
And while the game is clearly meant to be unfussy in terms of its mechanisms, allowing the different Entente nationalities to stack and fight together struck me as assuming too much. Given how protective Pershing was of his army’s integrity let alone sensibilities elsewhere among the coalition, putting all that to one side made me uncomfortable. Interestingly, wherever I have seen photos and video of other players’ setups, I have not seen any multi-national stacks.
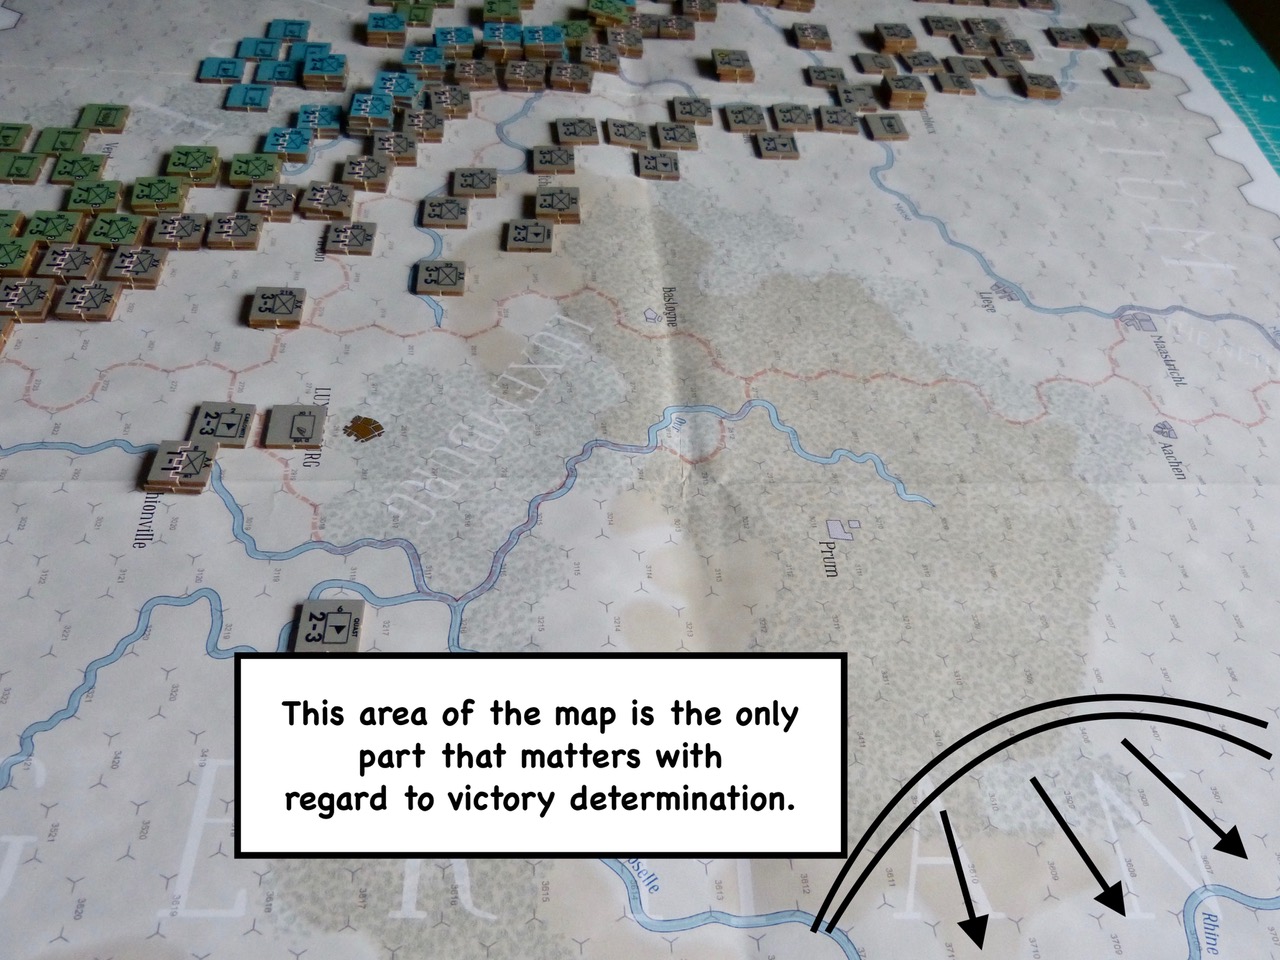 The last thing I will highlight for now is how victory is determined. On the map, along the Rhine, are three flagged locations – whoever holds two of the three wins. That might sound acceptable, but looking at the map and at how close those three locations are to the east/northeast edges, I fear that games might boil down to whether the Germans have any minute contingent of their otherwise massively annihilated army clinging on to these hexes when the time runs out. I should stress I have not got enough experience on the design to confirm this, but it looks like that. And if that is the case, it is too divorced from reality for my preference.
Ironically, the design makes a perfectly cogent case as to how Germany might have hung on for another year or so – essentially military and domestic morale holds up – but then does not bring morale into the assessment of how the 1919 events are playing out on the map. I cannot help but think that defeating Germany by reducing her morale to a big fat zero would have been a better option, and more in keeping with how the game presents its initial argument. Germany losing points for certain locations lost/numbers of units lost/numbers of enemy units in Germany etc. seems a better option to me, especially if Germany might also gain points for enemy units lost or holding particular locations at certain turns in the game.
 I highlight all this not because I want to be as negative as possible regarding the design, but because I genuinely feel a little nuancing here and there would have enhanced the very good movement and combat system the designer has put in place – full of authenticity, validity, and a sense of simple mechanisms working with sophisticated concepts etc. The design has a marvelous sense of asymmetrical challenge – that playing the Germans is not simply about having fewer counters than their enemies. In game form, the fundamental, perhaps inevitable character of the German army works through movement and deployment; the use of air power; what I would call the “pulse” of the design, and numerous other things.
These aspects of the design are well worth getting involved in.
But before looking at this model’s processes in detail, let us take a look at how the game presents the armies of 1919.
Ground forces are represented by: infantry divisions of varying quality, a very small number of cavalry units, heavy and medium tanks, anti-tank ground units (German only), and army headquarters (again, German only). These ground forces are supported by air units of varying roles and capacities – fighters/pursuit formations, ground support bombers, airborne anti-tank, and what are called “contact” units (these feel like the “shoot up the convoy”/”support the lead pursuit elements” type of aircraft.
Artillery is not specifically featured as an element in itself.
If we now switch to some brief profiles of the armies by nationality, interesting differences manifest:
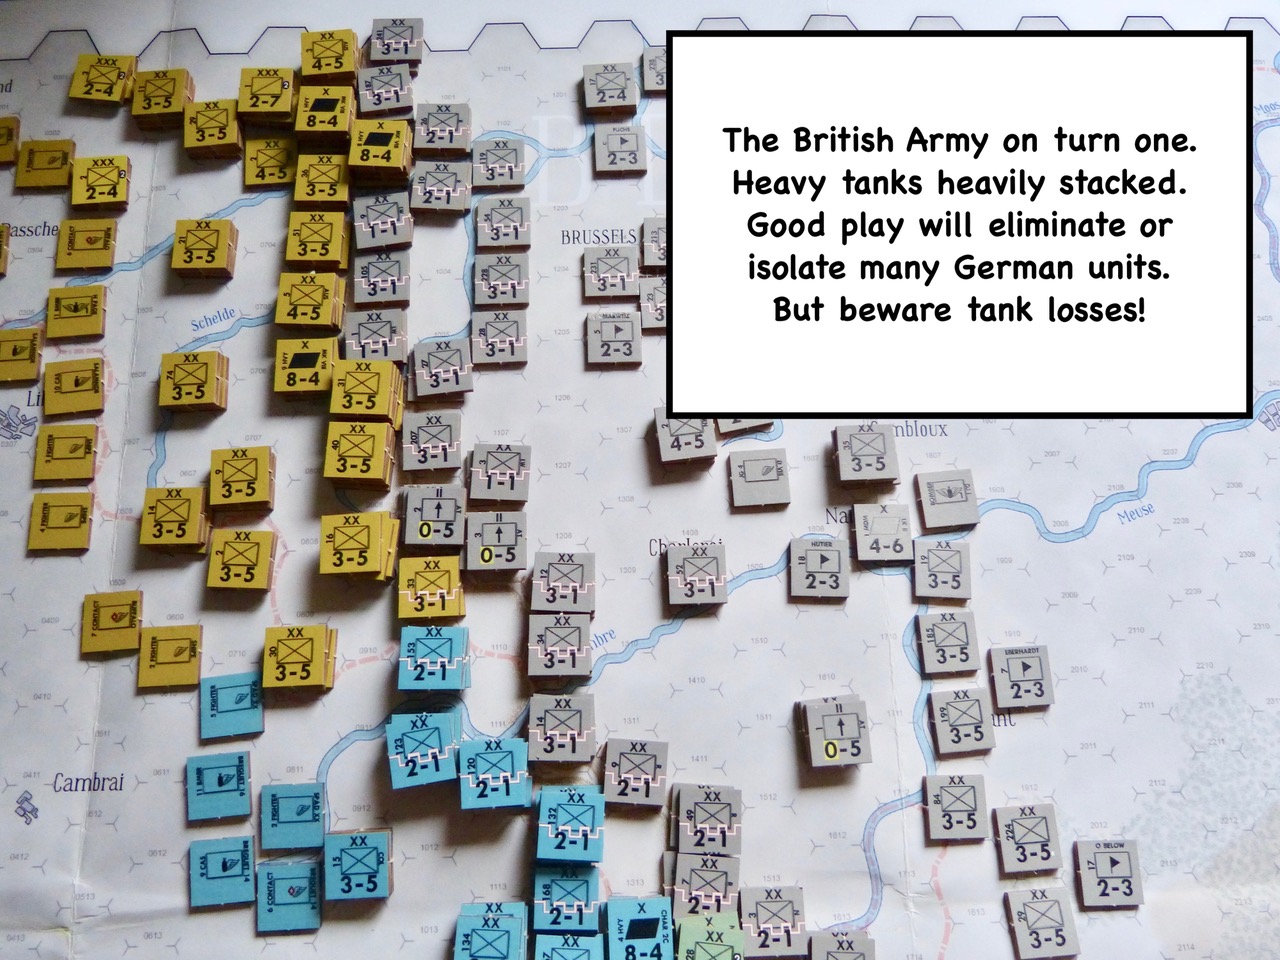
The British army is a dangerous foe. It has a decent amount of average to somewhat better infantry (their combat factor being a 3 or a 4); numerous heavy and medium tank brigades; and buzzing around in the skies above, a goodly amount of diversified air power.
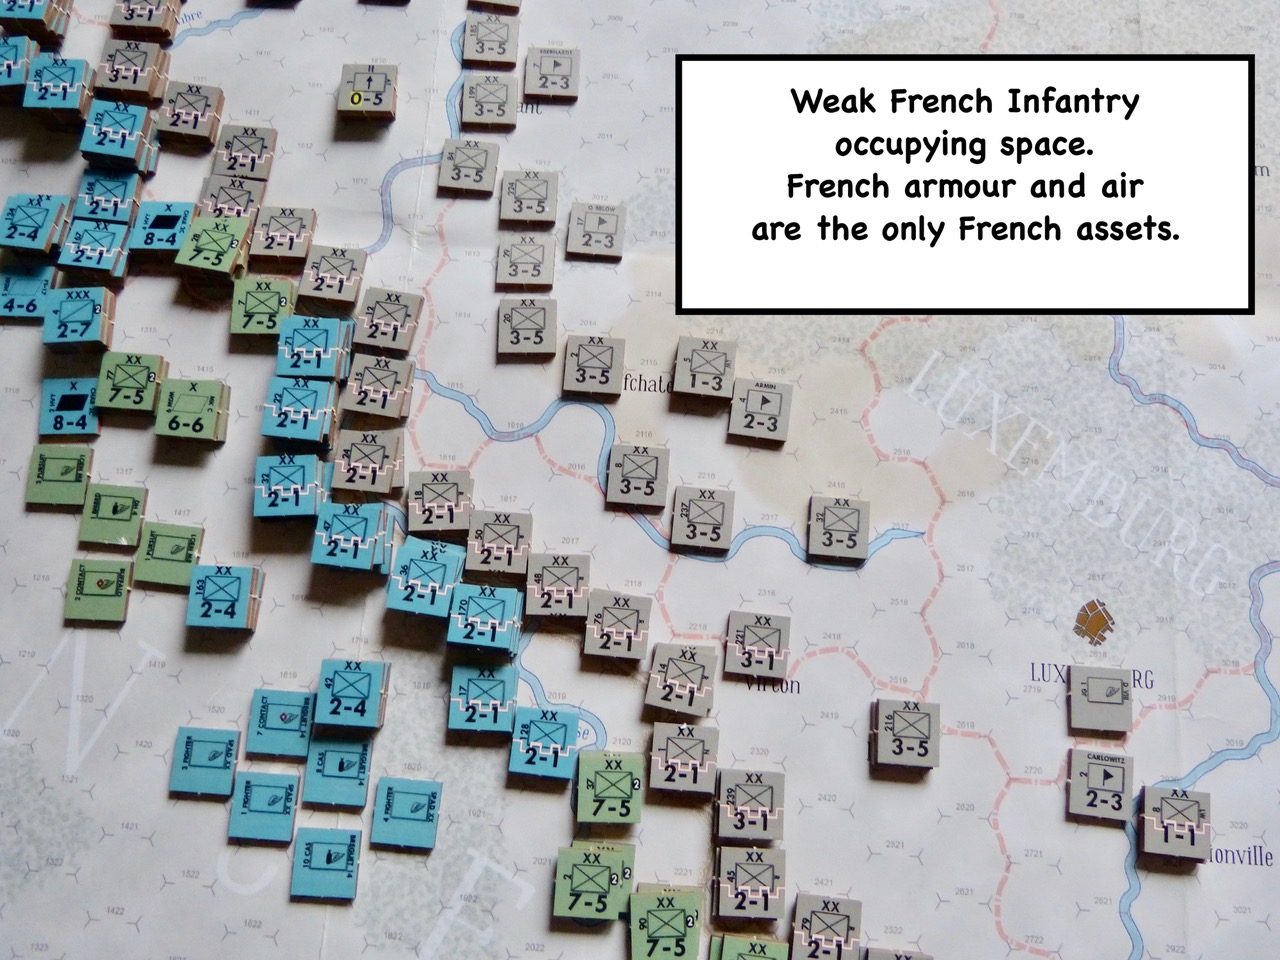
 The French army, by contrast, is pretty much on its last knockings. Years of attritional slog coupled with the consequences of a low birthrate and an aging population mean France has only really got infantry capable of discharging the role of space-fillers. Practically all its infantry is combat factor 2, which in game terms means it is of scant little offensive worth against many enemy positions. France does have a decent armoured force, however, and enough air power to contribute some teeth to the Entente push.
The Belgians have four indifferent corps-sized formations that are all rated 2 for combat and are likely to do nothing all game but sit unobtrusively on the map or take losses in place or something better.
The Americans look powerful – their infantry divisions are around double the strength of British equivalents (strength 7) and are also two-step units – i.e. it takes two steps of losses to eliminate them, with them flipping to reduced strength after their first loss. The Americans also have a fair amount of heavy and medium armour as well as copious amounts of airpower.
One problem with the US forces actually stems from their mode of organization. With no more than five steps of ground forces being permitted in a hex, in many instances what the Americans will be able to fit into a hex will not equal the British equivalents:
Extreme Case
3x US Heavy Tank Brigades (Strength 8 and 1 step each) plus 1x Full Strength US Infantry Division (Strength 7 and 2 steps) equals 31 factors.
4x GB Heavy Tank Brigades (as above) plus 1x GB Infantry Division (Strength 4 and 1 step) equals 36 factors.
Obviously, there are all sorts of permutations you can work with here, but the above case makes the point. It may also be worth noting that half strength (reduced to one step) US divisions cannot be strengthened until they have been fully eliminated. Food for thought, though it must also be remembered that US Infantry Divisions are the only ones that can be replaced.
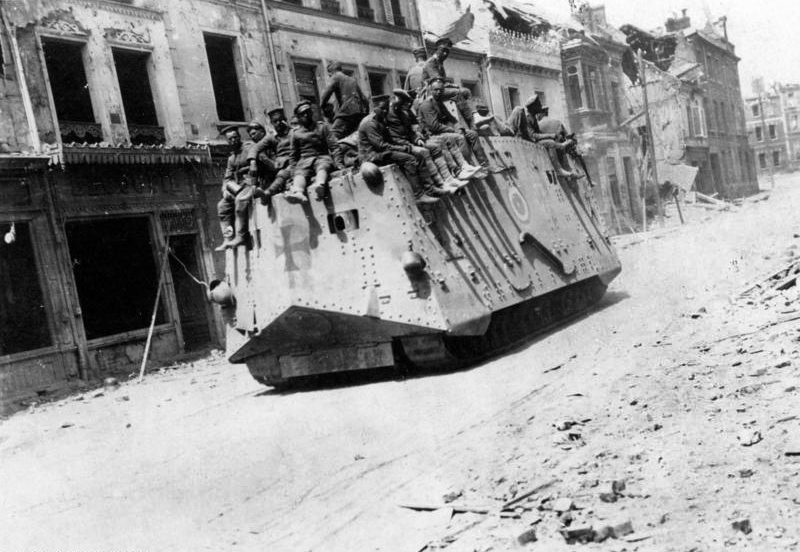
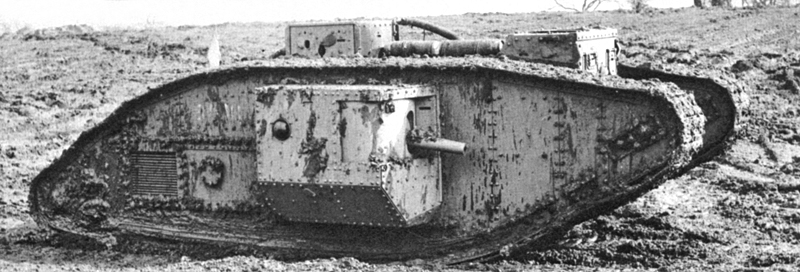
German World War I tank
The German army can easily look like an accident waiting to happen. It has a large number of 2 and especially 3 strength infantry divisions, a relatively small number of 4 strength divisions, a handful of 1 strength forces, and alongside these various army headquarters, a small quantity of anti-tank units and precisely one heavy tank formation. These units are backed by a very modest amount of lingering German air strength.
Adding to its woes is the dependence on headquarters proximity. German units can do next to nothing if they stray more than five hexes from a German army command. That is not much of a distance, and if bad play or bad luck diminishes the pool of army command units, maintaining anything like a cohesive front will be that more difficult.
Something else that should also be readily apparent is that the German army has precious little offensive capacity at all – except as opportunities present themselves at the very local level. It is not so much that every last Entente unit is too strong to attack, but that the Germans can rarely get better odds even against Entente units that are unlikely to be dug in much of the time. This, plus the lack of German units that increase attacking odds or add die modifiers means that combat “trades” are rarely going to favourable. To put it bluntly, the German army has no decent mobility by 1919 standards. Digging in, which it often needs to do, can often mean digging itself into a hole it can not get out of quickly. This means it can well have trouble assembling a decent attack force, or moving out of the way of approaching threats. Finally, it has no force of any consequence that can move in exploitation phases (the part of a turn where mobile forces can get on a tear) while its air force can only really function wherever Entente air does not happen to be.
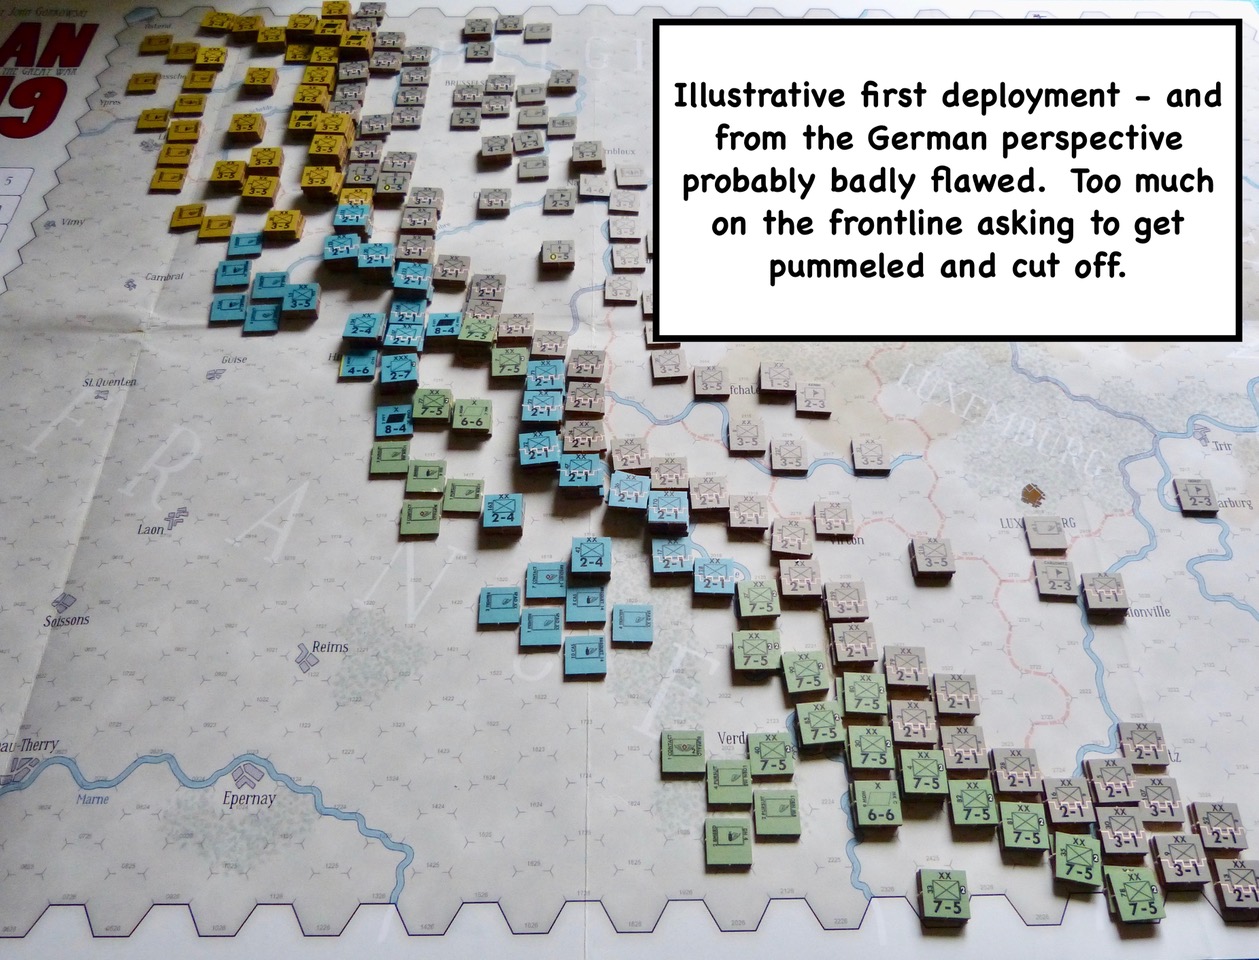
Having set this game up several times and seen what can unravel, I have no doubt that the Germans, while they cannot possibly “win” via their opening set-up, can definitely lose against competent play if they get their initial set-up wrong.
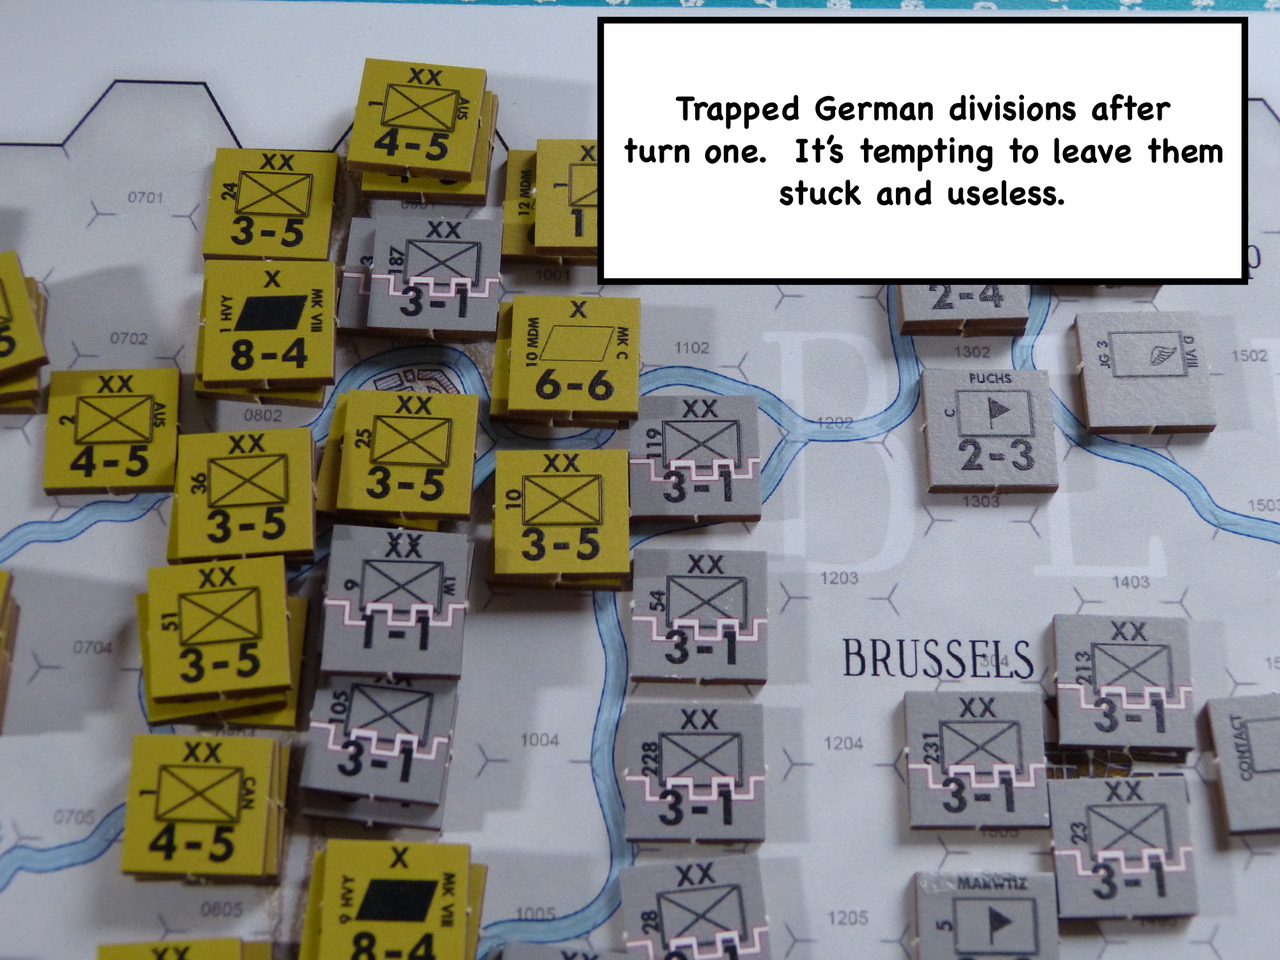
Given the indifferent mobility of their army overall, and the “stuck in the mud” nature of any unit that is entrenched, filling a German initial/forward line with copious amounts of entrenched infantry is soon likely to resemble a bad day in Belorussia in June or July 1941. Your line will be penetrated at selected points, exploited through and over, and by the time whatever is left is mobile again (it takes a whole turn of stopping still to regain mobility), they will be cut off and useless.
But here is a point – although as the Entente player you might think you want to blast everything to pieces, remember that such “blasting” will almost always cost you something, and that something, like the German target(s) will probably not be coming back. Whatever one thinks of this “devilish” mechanism, it provides just one more reason why, as the German, you do not want a frontline full of units. Just one unit, given the realities of the combat system, will inflict hurt on the attacker in most circumstances, and if the attack included heavy armour, they must take the first loss. From the German point of view, that is a good trade.
Without doubt, armour provides the Entente “bite,” adding both substantial combat factors as well as die modifiers for each such unit present. But they are also the first units to get holes in them when Jerry fights back, and as the Entente you are not so generously supplied with armour that you can throw it around like Zhukov on the Oder. It is not just waiting for it to come back (you only have twenty turns in total) but then getting it back to where it needs to be.
As the Germans, doing anything that wastes the Entente’s time and wears down its armour forces is a good idea. Although one might equate heavy armour as the equivalent of two and a half German infantry divisions, give or take, the combat impact of these forces in terms of modifiers goes far beyond that. So, within reason, accept some casualties sometimes to kill armour. Conversely for the Entente, do not use armour in places where you do not have to – as the game progresses, sitting duck Germans do not have to be rumbled over if infantry alone can do the job at modest expense. Spare the armour when you can.
If you study the sequence of play in conjunction with having some basic grasp of how the units work, a certain pulse or rhythm of play should suggest itself for either side – and I am really talking about far more than: “First you have to do this, and then you do that…”
If we first turn to the matter of replacements, it will be important for the Entente player to gauge when his inevitable armour losses are going to be back on the map, and think about where to place them when they become eligible. Going hand in glove with this, is knowing when to call a pause and get your armies sorted out. There is nothing clever in wearing your armour down to nothing, or doing the same with elements of your air forces. If you need to stop, then stop – and ideally have a well-placed city or two near the front you can bring units to life on.
Because the reality of the situation, the Germans are likely to lose far more units per turn – the power of the defence not being what it used to be in 1916 or 1917. Furthermore, unlike the Entente, the Germans get precious little of anything back, so trading space for time and knowing when to run or make a brief stand is very import.
I sense that counter play for the Germans will involve little timing tricks and devices. But there is no getting away from the power of the forces set against you, and that their grip on the game’s initiative is going to be hard to deal with. This can be seen all too clearly in the air movement and combat mechanisms.
As explained earlier, air power is represented by various unit types; in the air phases air units move in alternating “batches” of three – three Entente then three German; air combat follows, and then possible interventions in ground combat.
Allied air units have the first mission batch move, and while one can think of a few reasons why it is sometimes better to react in games, with a large superiority in numbers and the facility of always seeing how the Hun has reacted to your first move, the opportunity is there to wrong step the enemy, intimidate him, or better still knock him out of the sky very quickly.
All kinds of opening air moves are available to the Entente player – move something from each of your three air forces; move only units from one air force; decide, in whatever national combination, which unit type to deploy first.

British World War I biplanes
If, for illustration purposes, at game start the Entente player decides to fly with the RAF first, how do the options work out? Placing fighters first, if in concentration, is a major signal of intent – a message to the Hun to keep away or else! Although it is not expressly stated in the rules (or I missed it) if the Black Cross Boys have put their bases too close to the front, you can also counter-air them by plonking your Sopwith Snipes right on top of those bases. This will mean that the Germans cannot go anywhere else and must dogfight in place – or at least that is my present interpretation.
Of course, a careful enemy will seek to avoid this, and will most likely steer away from a storming swarm of Sopwiths wherever they happen to be. So, unless you are very clear as to your reasons for going in immediately to one or two locations with masses of fighters, you may prefer leading with the bombers first.
In my early play, I felt the advantage of this was that it presents Jerry with the stark reality of uncomfortable odds shifts he must either live with or seek to negate. To be blunt, the Germans only have enough air power, at best, to contest a couple of locations. Their only other possible piece of counter play can involve going early where the Entente air is not, and seeing if you can drag some of that air away from your more vulnerable places.

French World War I Renault FT-17 tank
Guessing what reaction to make ahead of time is another burden the Germans must learn to live with. One potentially useful asset the Germans possess is their small number of anti-tank units. The ground version is relatively mobile, but with only three of these in total you really need to bring all of them to bear against the same tank stack in order to have a decent chance of doing hurt – you need to roll 1d6 equal or less than the number of such units you brought to bear. The ramifications of this include the simple fact that these units – each rated 0 for ordinary combat – should not be stacked together in many circumstances as they will have no power to assist the main defence; and because they will create a weak stack if caught in such circumstances, you automatically create the possibility of their loss unless all the required step losses can be taken from somewhere else.
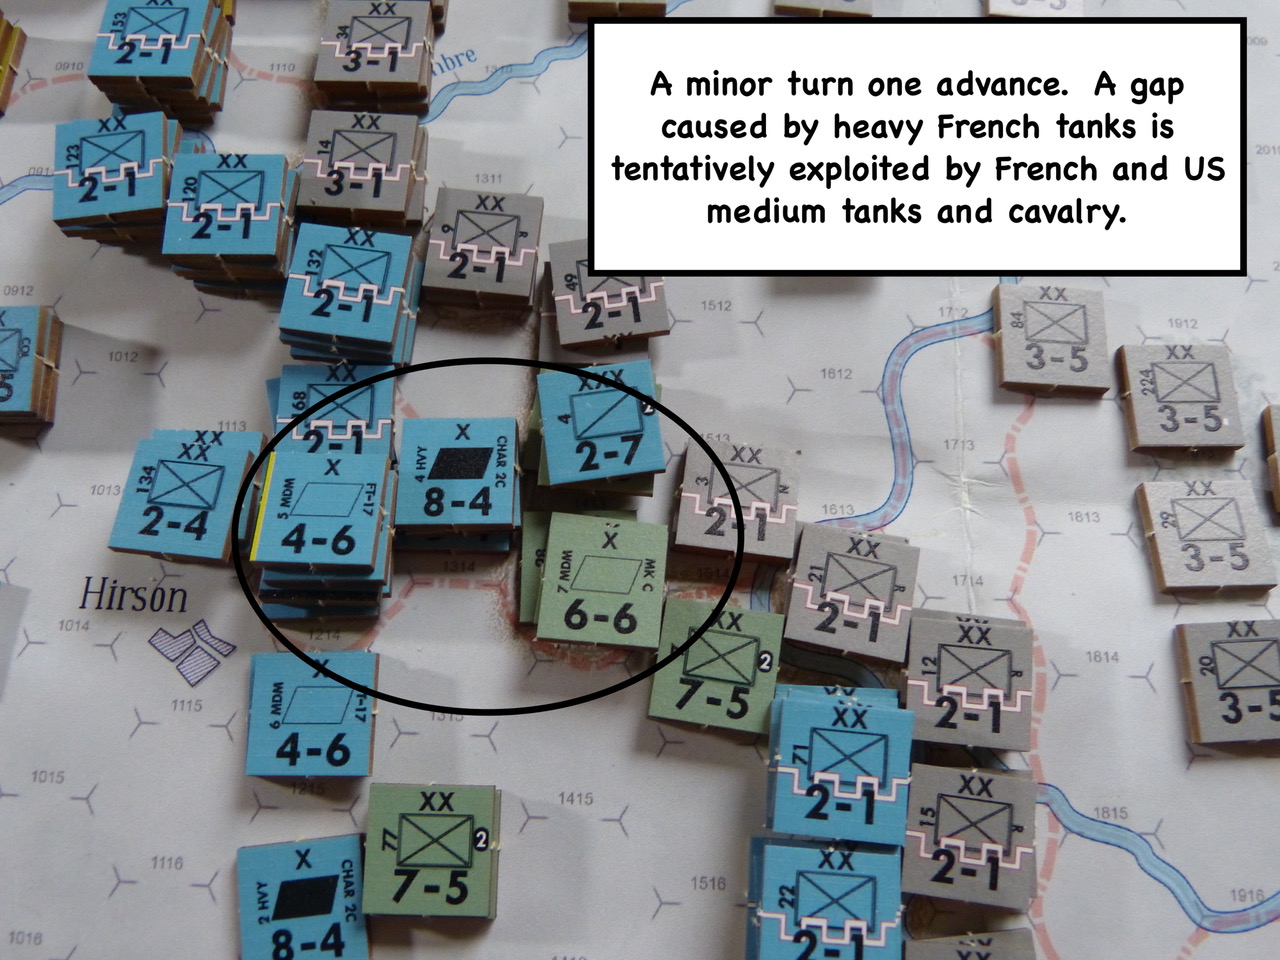
The final aspect of understanding the game’s pulse comes in that novelty for a WW1 game, the Exploitation Phase. Medium armour and the sparse cavalry can make their way through the gaps and launch some secondary attacks, although it is important to note that movement costs are increased for those units that can move in this phase. This is also the ideal phase for your contact air, which is the only aircraft type permitted to fly in this phase and add some shifts to what might be relatively weak attacks otherwise.
And these things basically make the model – asymmetrical armies nicely realised, combat by odds and step loss, and all this in what hardly amounts to more than a short leaflet of rules – at the end of which is that victory determination.
 For me, within the scope of the time I have had to look at things, this is a problem. Playing a game of “Capture the Flag(s)” does not suit the model or the situation – at least in my opinion. As things stand, Germany can lose 95% of her army and 95% of her territory and still win. It is a purely “game” solution that does not align with the historical facts or the historical possibilities. Presenting the player with the spectre of the “Men of 1919” supplementing the last-gasp resolution of those who barely held on the previous year just seems better.
But then it is all a matter of conjecture. Even if Germany had held on into a new year, and if the Entente held off from any major moves until months later, would they have permitted the sort of realignment of German forces the game permits? Would they have allowed the armies to break contact to the extent possible at game set-up? And would the Germans ever have countenanced giving up any more of their remaining land buffer without a proper fight? Who can say, and from the perspective of allowing this game to work, who would be foolish enough to say it must be this way or that way?
The best of this design is the modeling of the armies, the challenge of German deployment, and a definite sense of drama. Its weaknesses for me lie in those victory conditions and too much reliance on too much stuff being placed on the map. Yes, there are holding boxes for the air units, but then aircraft type markers working on a points “slider” might have worked just as well. Beyond all that I must confess my admiration for John Gorkowski’s knack for producing valid simulations with such a modest amount of rules. He has done that again here, and simply for that reason it is certainly worth a look.
Epilogue
Had the war stretched into 1919, a certain Adolf “Where There’s an Iron Will There’s a Way” Hitler could well have been back in the active ranks of the German army. And there is a pretty good chance that this last foray to the front would have seen him killed – by Fuller’s plan. The irony is that Fuller, historically, became one of Hitler’s most ardent British admirers by the 1930s. In fact, he was seriously in the running to boss a Nazi-occupied Great Britain.
Strange indeed are the twists of fate…
Paul Comben
Game Resources:
 Plan 1919 Home Page
Plan 1919 BGG page:
[Note: This article was updated to correct an item involving Plan 1919’s replacement mechanism and a few other minor matters. – Fred]