By Fred Manzo
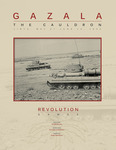
Gazala: The Cauldron
“In difficult ground, keep steadily on the march.On hemmed-in ground, resort to stratagem.On desperate ground, fight.”
Hermann Luttman and I played Gazala: The Cauldron – Libya, May 27 – June 14, 1942 by designer Roger Miller these past few weeks. It was published by Revolution Games last year and, in my opinion, hasn’t received nearly the notice a game of its caliber deserves.
What we’re talking about here is a good, old school hex-and-counter game of modest complexity that comes with a modern chit pull activation system.
 A system that I must say does an excellent job of simulating the famous desert battle outside of Tobruk, between the 90,000 men (and 560 tanks) of the German-Italian army lead by Erwin Rommel and the 110,000 men (and 860 tanks) of the British and Commonwealth 8th army commanded by general Neil Ritchie (and Claude Auchinleck, the Commander-in-Chief, Middle East). This is the battle that historically lead to the greatest victory in the “Desert Fox’s” storied career.
Basically, the British 8th army had concentrated behind an extensive series of minefields, which generally stretched in a northwesterly to southeasterly line, with their southern ends anchored by Free French garrison entrenched in the old Trukish fortress at Bir Hachiem. The German – Italian forces generally start to the west of these minefields or off the board; the British and Commonwealth troops, on the other hand, start to their north and east.
Rommel, therefore, decided to use his armor in what British historian Sir B. H. Liddell Hart called an “indirect approach.” That is, instead of attacking the western face of the quite formable “Gazala Line” as was expected, his Operation Venezia (Venice) swept around the Free French and attacked the British 8th army along its open desert flank. Although the French held, Rommel managed to re-establish his supply line at the last minute by punching through the allied minefields in a westerly (!) direction. As the German General Bayerlein later said:
| “We were in a really desperate situation, our backs against a minefield, no food, no water, no petrol, very little ammunition, no way through the mines for our convoys; Bir Hakeim still holding out and preventing our supplies from the south. We were being attacked all the time from the air.” |
Or as Rommel himself said at the time “But I agree that we cannot go on like this. If we don’t get a convoy through tonight I shall have to ask General Ritchie for terms.”
However, Rommel famously did get a supply convoy through and the ensuing British retreat to El Alamein led directly to the fall of the British fortress of Tobruk and the second largest number of Commonwealth troops ever captured by the Axis (Singapore being the largest).
As Churchill wrote::
| “This was one of the heaviest blows I can recall during the war. Not only were the military effects grim, but it affected the reputation of British arms…….Defeat is one thing; disgrace is another.” |
The game comes with a 22” by 17” paper map, 168 counters, a player chart and a 12 page rules booklet. Each hex is about 1 mile across; with every unit in the game havinga “hard” and “soft” combat strength and a movement allowance. Initiating combat costs movement points, with light attacks costing 8 movement points, medium attacks 16 and heavy attacks 24 MPs. As most units have between 24 and 30 movement points, they have to start adjacent or, at the very least, close to their opponent in order to launch heavy assaults. Once an attack is launched, however, players have to decide if they are using their units “hard” or “soft” combat strength. A unit’s hard value is used when armor is involved, and its soft value is used when only infantry is concerned.
In one of the game’s cleverer approaches infantry units may not attack armor units. This results in players defending with mixed armor/ infantry teams and attacking with all armor spearheads. It also results in the German player holding the Italian armor in a much higher regard then the typical allied soldier ever did. Although the individual Italian units are weaker than their German counterparts, every fresh unit that can be thrown into a battle, no matter how weak, is a resource not to be taken lightly. When you are that short of troops, in order to win the game, every unit must pull its weight.
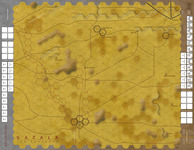
The map for Gazala: The Cauldron.
Movement costs depend on whether a unit is wheeled, tracked or leg, with only the Italian forces having classical leg infantry. In our game I used the Italian infantry to breach the minefield from the west and to screen the Bir Hachiem position. I felt that due to the severe shortage of combat engineers in the Axis forces it just wasn’t practical to assault the fortress in any meaningful way. (Breach markers, which represent combat engineers, can be placed down two at a time, but there are only 6 of them for the entire Axis army and they cannot be moved once placed. So there are way too few of them to use on the 4 hexes of the Bir Hachiem position AND punch through the 2 lines of mines to its north. )
Stacking is at a two counter maximum, with supply being judge rather loosely, as it may be traced through Enemy Zones of Control. (According to the games designer it was practically impossible to cut supply lines in the desert.)
Units in the game have from one to three steps and usually represent battalions. The minefields are printed on the map and the effects of airpower are abstracted out through the use of random event chits.
The Turn Sequence is as follows:
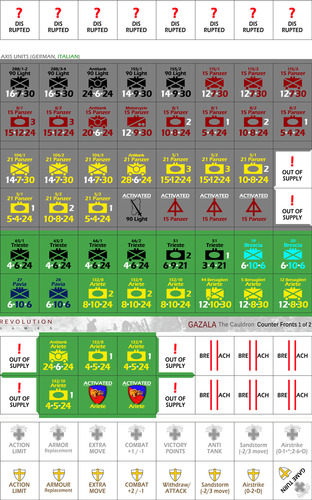
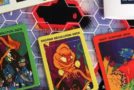
Counter-sheet 1 (front side) for Gazala: The Cauldron
1. Chit adjustment Phase: The number and type of chits that may be used varies from turn to turn.
2. Minefield Phase: The Axis player may place two of his 6 breach markers on the map each turn.
3. The Supply Phase. Supply lines may run through Enemy Zones of Control and may be of any length, which results in some rather unusual situations (as they did historically).
4. The Initiative Phase, when players determine who has the initiative for this turn.
5. The First Player’s Action Phase,
6. The Second Player’s Action Phase
7. Player’s now alternate action phases until they run out of unit chits to activate.
8. The Recovery Phase: All disrupted units and those on their exhausted side recover.
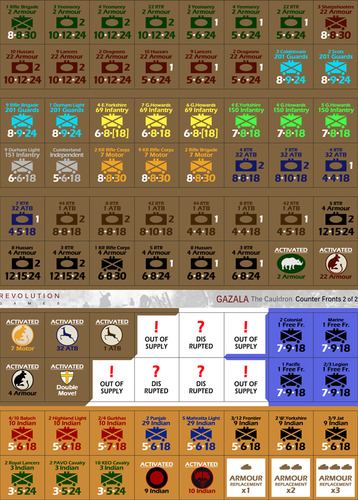
Counter-sheet 2 (front side) for Gazala: The Cauldron
9. The Victory Point Phase: The Axis player accumulates victory points for controlling geographical locations. Although, each player also accumulates VPs for every enemy step eliminated and not replaced. The player with the most VPs wins, with ties possible.
The game comes with two scenarios: a campaign game, which takes about 7 hours to play and a short scenario, which should take about half that time. We’ve been playing the short scenario.
The chit pull system used here is unique in that not only are there a number of random tactical events, such as “Sandstorms” and “Armor Replacements,” but some units may be activated more than once. That is, during some turns there are, for example, two activation chits for the 21st panzer division/15th panzer division or the German 90th light division/the Italian Pavia division. (Some chits allow you a choice which of two units to activate, thus elegantly representing supply and command control problems). So player sometimes have the choice of double activating their spearhead division or engaging in a broad front approach.
Individual battles are initiated somewhat along the lines of the battles in one of our all-time favorite games, The Korean War: June 1950-May 1951, in that once a unit moves and/or fights it is flipped to its “exhausted” side. But exhausted or not it may be drawn into a fight when a fresh unit leads the attack. Obviously, this type of system places a high premium on fresh units, as the only way to launch multiple attacks in one turn against a stubborn foe is to commit fresh forces. One of the nice touches of this system is that it requires players to concentrate on the tactical situation to a much greater degree than is normal for a game of this size and complexity.
The vicissitudes of supply are modeled quite effectively by the number of chits a player may draw per turn, a situation one does not find represented in many games.
Gazala – The Cauldron comes in a poly bag and costs $30 from its publisher, Revolution Games. For that price one gets an elegant design, a high degree of re-playability and an educational experience. What more can one ask for?
Resources: