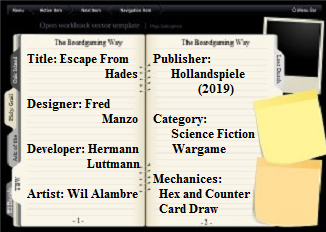
By Fred Manzo:
The following is the first draft of version 2.0 of the rules to “Escape from Hades.” They take into account errata, clarifications, and frequently asked questions as of August 25th, 2020. They are based on the rules and FAQ published on Boardgamegeek. Eventually, an official rules 2.0 version will be published by Hollandspiele. Until then this set of rules should help clear up any misunderstandings. I wish to thank everyone who participated in making this version possible. – FWM
(Additions have been printed in bold [green] type to highlight changes from the first edition rules. The occasional typos and grammatical errors have also been corrected.)
[Update: as of 09/28/2020: All changes in (Green) bold, italics are for version 2.1. This includes a phrase in section 4.0 concerning combat results, and phrases in section 6.2 and 6.3)
[Update as of 10/08/2020: Corrects a phase in (Green) bold, italics in Section 5.3, adds a phrase in section 6.0, and adds a word in section 11.0.]
“Escape From Hades” is one of only five games nominated for the Charles S. Roberts Award for “Best Science Fiction or Fantasy Board Wargame” of 2019. The winner will be announced shortly.

On 14 August 3044, the Nastian Innermost Circle ordered the transfer of high-value political prisoners from prison hulk NE-249 (the Hades) deeper into their territory. This order was intercepted by Galactic Combat Intelligence (GCI) and confirmed that the missing Princess Emily—heir to the Laylian Empire—was one of those prisoners. Sadly, it was believed that any rescue attempt would need months of planning and an armored brigade to succeed.
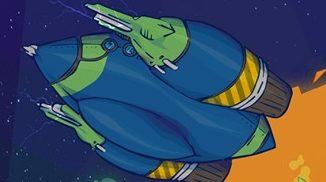
 But due to the ongoing Battle of Imhotep-IV, the only allied vessel available was the Vittles, belonging to the Solar Hanseatic League (SHL). The Vittles was a Fast Armed Transport (FAT) under Captain Jack Christopher, with a small security detail—The Black Sheep—commanded by Major Acuto. They would reach Hades with no time to spare and face sophisticated surface defenses, fighter squadrons, and Nastian troops. Their sole option would be to fight their way in, rescue the captives, fight their way out, and bring everyone safely home… provided the Vittles wasn’t blown up in the interim! Some say Major Acuto and her Black Sheep volunteered for this impossible mission in a fit of bravado. Others think the SHL saw it as a way to cement their close economic ties to the Laylian Empire.
However it happened, GCI created a plan of attack, Operation Squeeze Play, and two contingency plans, Operation Chin Music and Operation High and Tight. True to form, Major Acuto cheerfully ignored all of them and chose her own path. And thus began what many historians call the craziest raid in galactic history. But for the Vittles, it was just another Wednesday… – Encyclopedia Galactica
1.0 INTRODUCTION
Escape From Hades is a solitaire game simulating the famous 14 August 3044 “Assault on Hades”, sometimes called “The Hijacking of the Golden Calamari”. Using statistical analysis and intensive research, the game realistically models the tactics employed and challenges the player to recreate the historical result. Additionally, the game allows you to explore the feasibility of the three GCI plans through “what-if” scenarios. Throughout these rules, historical notes are used to help you better understand this fascinating episode from our distant past.
2.0 COMPONENTS
The game is played with two mapsheets, one sheet of counters, 51 cards, one player aid, and this rulebook.
2.1 Mapsheets
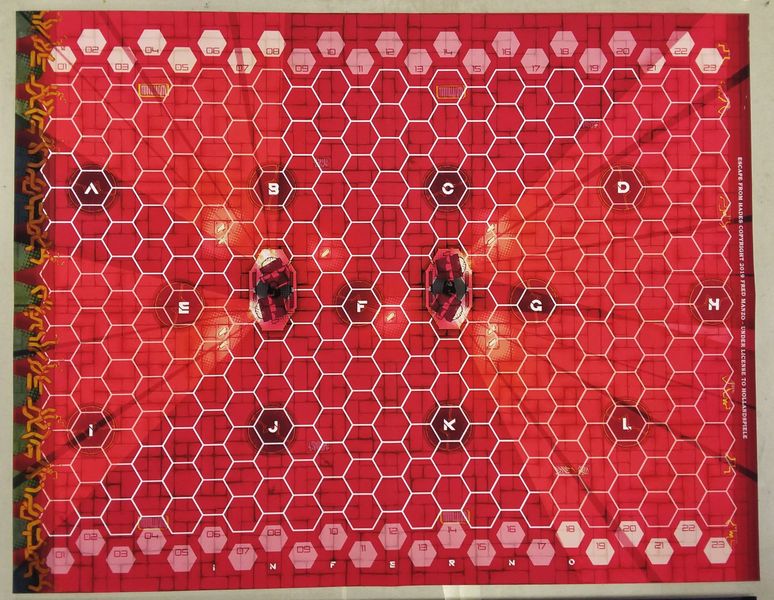
The Inferno map from “Escape from Hades” That is, the outer hull of the NE “Hades”
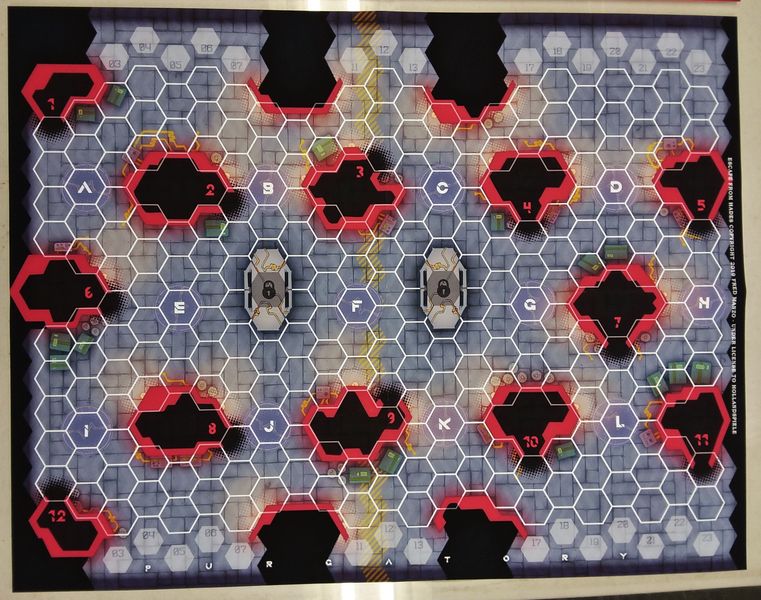
The Purgatory map from “Escape from Hades” that is, the inner, hangar deck of the NE “Hades.”
One mapsheet represents the outside of the Hades, commonly dubbed the Inferno Deck, while the other represents the inside of the prison—the Purgatory Deck. The Hades was cylindrical in shape, and if walking east or west in a straight line one would eventually make a full circuit. Therefore the east and west edges of each two-dimensional mapsheet are adjacent to one another and units that move “off” the map on one edge will immediately show up on the opposite edge in the [same] corresponding white numbered hex. [These highlighted numbered hexes are playable and hexes with identical numbers on the same map are one and the same hex.] A hexagonal grid is imposed over the terrain to regulate movement and combat. Only the terrain features delineated in the following have an effect; other illustrations within a hex do not.
Complexes: Twelve hexes on each map are labeled “A” through “L”. These are called Complexes; Complexes on the Inferno map are called Surface Installations (SIs). Units may move from map to map via maintenance shafts. Two additional Complexes on each map are Guard Towers, from which new enemy Units enter the game. Your own Units can never enter these Guard Towers or attack enemy units in them; as a reminder, these hexes bear a padlock symbol.
Circles: The Purgatory map features several rooms—the Circles of Hades. (Due to recent renovations, there were twelve of these instead of nine.) Some of these contain prisoners, and some have special features, with the contents of each determined randomly at the start of the game, only revealed over the course of play. These Circles may only be entered or exited via the “doorway” indicated on the map. Each Circle represents a single distinct area regardless of the number of grid hexes it would occupy. The functions of each Circle are covered in greater detail in 11.0. [Prisoners or units found in these Circles face the doorway and are adjacent to it when revealed. No matter how the actual outline of the Circle appears it is considered to be the size and shape of one hex located adjacent to the doorway.]
Walls: The Purgatory map features red Walls. Units cannot move or see through walls or locked doors; gotta save something for the expansion. North and South map edges on both maps count as Walls. Units in adjacent hexes separated by Walls are not engaged. See 5.4 and 6.1.
————————————————————————
Historical Note: The Circles themselves are not circular in shape. Nastians were not fond of Euclidean geometry.
————————————————————————
2.2 Counters
The majority of the counters are 5/8″ square and fall into broad categories as follows:
Units: These represent carbon- (or sodium-) based lifeforms. Counters depicting a full figure represent a squad (multiple humans or Nastians), while counters with a headshot represent one specific named personage (and/or their staff). All Units have a Movement Factor listed on the counter, as well as an arrow that indicates the direction that Unit is facing. (This only matters for enemy Units.) The Movement Factor is the number of hexes it can enter on a turn. A red arrow indicates that Unit is a Shock Unit. An ID number in the counter’s upper right corner is used to resolve certain game functions. Almost all Units have a fresh full-strength side and a depleted or damaged side (with a stripe), the latter of which diminishes their abilities in Combat. The terms depleted and damaged serve the same game function, but are utilized where historically appropriate.
[Counters with unit information on only one side, such as Princess Emily, her honor guard, and the Elder Aliens, etc., are only one step units. This means they are eliminated when they receive one hit, counters with unit information on both sides are two-step units and have a depleted side.]
Green and blue Units are friendly to, and controlled by, the player. Green Units are Combat Units, while blue Units are not. This does not necessarily mean that blue Units cannot participate in Combat, but they might end up doing so at reduced capacity. Yellow Units are Nastian forces, controlled by “the game” and hostile to the player. Additionally, there are two gold Units, the Gorgon Sisters, which are hostile to both the player and the Nastians. More on them later.
Different types of Units have different capabilities; see 13.0.
Fighters: These are special Nastian Units that do not move on the maps, but instead concern themselves primarily with attacking the Vittles. See 5.1.
Surface Installations: These red counters represent the various weapons systems and elevators used by the Nastians in defense of the station. Once they enter play (5.6 and 6.1), they have three statuses: Fully Operational (their fresh side), Damaged (striped side), and Destroyed (affixed with a marker). See 10.0.
Circle Markers: are used to fill the twelve Circles of Hades at the start of the game, though note that at least one Circle, the Engine Room, will always be revealed and the door opened. See 11.0. Various other markers are used to indicate certain statuses, track certain pieces of information, and simulate certain catastrophic events. These will be explained in further detail later.
2.3 The Vittles Counter
 A large counter represents the Vittles itself and is used in conjunction with the Vittles Status counter to track the damage done to the Vittles during the operation. Historically, it came very close to being destroyed, having lost its shield generators, its 50 caliber Quad gun, and both of its “guardian angel” rail guns (Michael and Gabriel). All of these are represented by modules that are damaged and then destroyed in turn; these modules are explained in greater detail in 12.0.
2.4 Cards
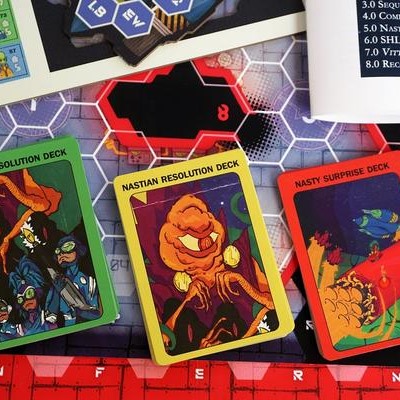
There are three decks of cards plus three tracking cards.
Resolution Decks: Two of the decks are Resolution Decks, a green SHL deck, and a yellow Nastian deck. These are chiefly used to resolve Combat for the two sides (4.0), but the random letter and random number on each card may be used to resolve certain other game functions.
Nasty Surprise Deck: Drawn during each turn, these represent “Nasty Surprises” that the devious Nastians (not to be confused with the nasty Devians of Alpha Centauri) have waiting in store for you. These also serve as the timer for the game. See 5.6 for further details.
Preferred Direction Indicator (PDI) Cards: Movement for the Nastians is sometimes regulated by a Preferred Direction. Each turn, a separate Preferred Direction will be determined for each map (5.2); ergo, each map has its own PDI card, upon which you will place a PDI marker.
Orbital Display Card: This card has a box to hold Fighters that are assigned to Combat Orbital Patrol (in play) and another used in conjunction with the Vittles In/Out System marker to indicate whether the Vittles is in the system or, you guessed it, out of it. When a Fighter is Destroyed (removed from play) it is
placed below this card to indicate this status. However, it may be rebuilt as a result of a Nasty Surprise.
2.5 SHL Approved Security Containers
The game requires the use of two Solar Hanseatic League Approved Security Containers. Normally these containers retail for 15 galactic credits apiece, but if you send in your proof-of-purchase, you can purchase two containers in a single order at the low, low price of 30 galactic credits (plus postage and handling from Alpha Centauri). One container is used to hold Nastian Units (called the Nastian Cup) and the other holds Surface Installation markers (the Surface Installation Cup). Using an unauthorized set of containers—such as a coffee mug or other opaque container—is strictly prohibited, violates the End-User License Agreement, and will result in mandatory forfeiture of your kidney or bladder.
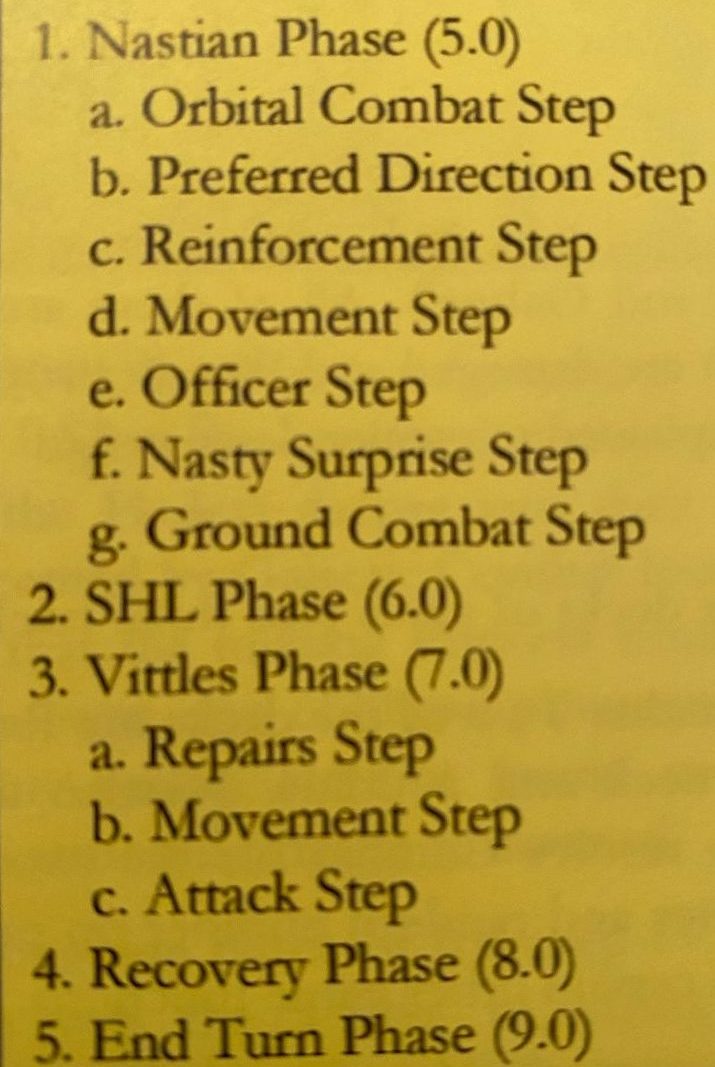
3.0 SEQUENCE OF PLAY
After choosing a scenario and setting up, the game is played over a series of Game Turns with each turn consisting of the following phases always performed in the following order:
4.0 COMBAT RESOLUTION
Combat always involves two participants: one attacker and one defender (except when Combining Fire, 6.2). Two Units cannot simultaneously attack another nor may a Unit attack more than one Unit. The attacker/defender roles may be fulfilled by a Unit, the Vittles, or an SI.
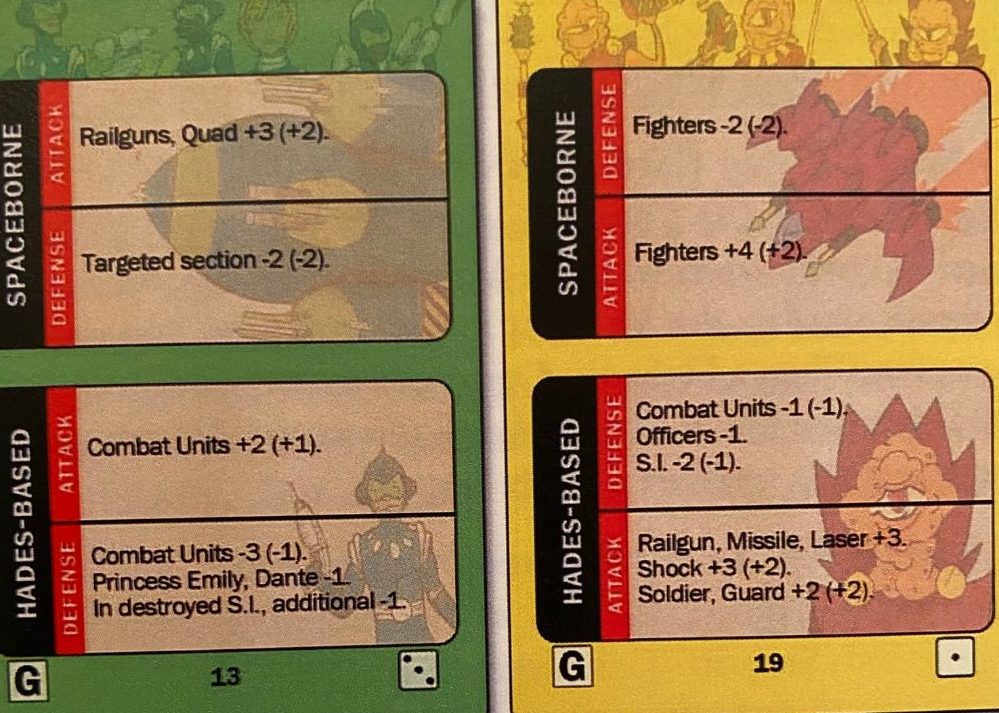
When Combat occurs, draw one card for each participant: draw an SHL Resolution Card for a participant that you control and draw a Nastian Resolution Card for a participant that you do not (but see 5.7 for an exception to this). Each Resolution Card has text for Spaceborne Attack or Defense and Ground Attack or Defense. Find the text that corresponds to each participant:
If the Vittles or a Nastian Fighter are attacking, it is a Spaceborne Attack. Likewise, if one of them is defending, it is a Spaceborne Defense.
If a Unit or SI on one of the maps is attacking, it is a Ground Attack; if they are defending, it is a Ground Defense.
Note that a Unit that occupies a Destroyed SI hex often has a beneficial defense modifier indicated on the card. The text in the relevant section will indicate positive or negative Modifiers for certain types of Units or Weapons. If the Unit, SI, or Vittles Weapon is depleted or damaged, use the modifier indicated in parentheses for that Unit, SI, or Weapon. If not mentioned, the modifier is zero. Reduce the attacker’s positive modifier by the defender’s negative modifier. If the net result is:
+2 or greater, the defender is Destroyed
+1, the defender is depleted [or eliminated if already depleted or if it is unable to become depleted, E.G. a former prisoner]
+0, no effect
-1, for Ground versus Ground only, the attacker is depleted (no effect for other combatants) [or eliminated if already depleted or if it is unable to become depleted, E.G. a former prisoner].
-2 or less, for Ground versus Ground only, the attacker is Destroyed (no effect for other combats) When a fresh target is depleted, it is flipped over to its depleted side. When a depleted target suffers a depletion result, it is Destroyed:
When a Unit is Destroyed, it is removed from play. SHL losses are permanent (return the counter to the box), while Nastian Units (except Officers) are placed back into the Nastian Cup.
When an SI is Destroyed, place a “Destroyed” marker on it. The destruction of Vittles’ modules are explained in 12.0.
If a Resolution Deck is empty, shuffle its discards to form a new deck.
5.0 NASTIAN PHASE
During the Nastian Phase, you will resolve certain procedures and actions for your Nastian enemies. The six steps of the Nastian Phase are always performed in order.
 5.1 Orbital Combat Step: During this Step, Nastian Fighters and fully-operational Surface Installations will attack. If the Vittles is “In System” (see 7.2), they will attack the Vittles, inflicting hits on the Vittles module corresponding to the current position of the Vittles Status marker. If the Vittles is “Out System”, then these attacks will be focused on eligible Units on the Inferno map:
Nastian Fighters will target the highest-numbered player-controlled Unit. SIs will target an adjacent player-controlled Unit. If multiple targets exist, the SI will target the Unit that is in its Preferred Direction (or, that is closest to its Preferred Direction going clockwise).
Resolve attacks for active Fighters first (in ascending ID number order), then do the same for all offensive SIs (Railguns, Missiles, and Lasers, but not Elevators or the Radar Dome) that are not Destroyed or damaged.
5.2 Preferred Direction Step
Draw one SHL Resolution Card and one Nastian Resolution Card. Check the Random Number for each. Use the SHL Random Number to set the Preferred Direction for the Inferno map, placing the PDI marker in the box corresponding to the Random Number. Use the Nastian Random Number to do the same for the Purgatory map.
5.3 Reinforcement Step
For each Guard Tower hex (two on the Inferno map, two on the Purgatory map), pull one counter from the Nastian Reinforcement Cup, placing it inside the Guard Tower hex, on its fresh side.
If this would cause more than two Nastian Units to occupy that hex (a rare occurrence), the new Unit is placed on an adjacent hex that is vacant or containing only one Nastian Unit. This will be the hex in its Preferred Direction (or closest to it moving clockwise).
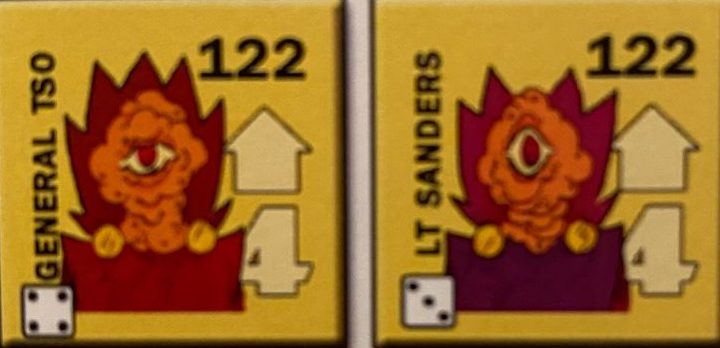
You may in the process draw a Crisis! or Comm Crash chit instead of a Nastian Unit. If so, no Nastian reinforcement enters that hex at this time, but you do have to deal with the effects of the drawn chit (see below). If the Nastian Officer counter is drawn while pulling for an Inferno Guard Tower, it is placed in the corresponding Purgatory map Guard Tower instead. It counts as an Inferno draw despite this. Note per 5.4 that Nastian Officers do not count toward stacking and so may be placed in a hex containing two Nastian Units. The Nastian Officer counter is placed with its General Tso side face-up.
[If there are not enough counters to supply a full load of reinforcements, the player should place what they can, starting with the left-most Guard Tower on the Inferno deck and ending up at the right-most Guard Tower on the Purgatory deck.]
_________________________________________
“Rumors circulated that Hades provided the Nastian Innermost Circle’s circus-like entertainment, including gladiatorial matches between captives…. This may the reason SHL company troops called [the prison’s] Guard Towers ‘Clown Cars’.” – Encyclopedia Galactica
———————————————————————–
Additional Reinforcements: The Radar Dome (10.4) and Elevators (10.5-10.6) will if fully-operational generate an additional Nastian Unit in corresponding Purgatory Complex hexes. [These installations are also known as Defensive Complexes or Defensive Installations as they can not fire at the SHL Vittles, even when fully operational.]
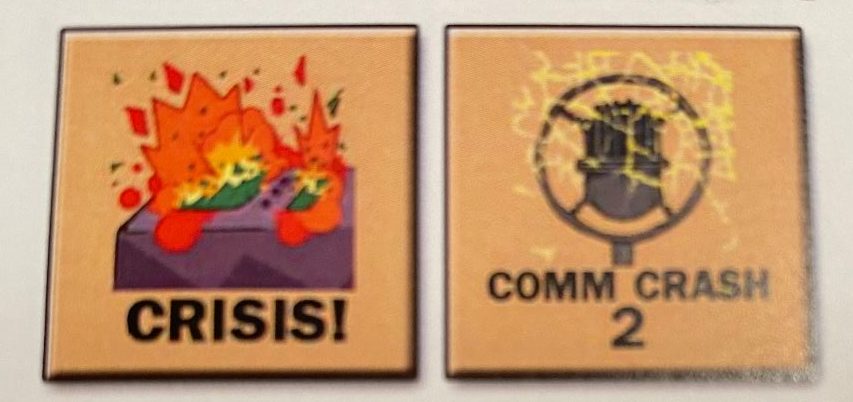 Crisis!: When this chit is drawn, the Vittles’ outdated power plant temporarily shuts down. For the remainder of the current turn, the Vittles may only participate in ONE of the following:
It may transfer friendly forces to or from Hades (6.7)
It may fire its weapons, only if In-System (7.3)
It may move into or out of the system (7.2).
That is, if it transfers friendly forces, it cannot fire or move; if it fires, it cannot move or transfer; if it moves, it cannot fire or transfer. This does not prevent the Vittles from performing the Repairs step (7.1) of the Vittles Phase, however.
Comm Crash: When this chit is drawn, the SHL communications network is jammed, and two HQ Units are prevented from activating this turn. Mark those HQs with Activated Markers immediately. These HQs cannot transfer to or from Hades, or be used in any manner. HQs aboard the Vittles can be used to satisfy these requirements (regardless of whether or not the Vittles is In-System or Out). HQ Units that have been Destroyed cannot satisfy this requirement if there are eligible in-play HQs remaining. If both Comm Crash chits are active, all 4 HQs are jammed.
5.4 Movement Step
During this step, all enemy Units will move according to certain rules, priorities, and limitations. Resolve movement in descending order for the Inferno map, then do the same for the Purgatory map. If there are a large number of Units to be moved, use the Activated markers to mark each Unit as it completes it Movement Step (removing them when that deck has been fully resolved).
Engaged: If an enemy Unit begins the Movement Step adjacent to an SHL-friendly Unit, it is engaged and does not move. So long as the Unit is not engaged, it will move in the direction it is facing, and will attempt to move a number of hexes equal to its Movement Factor. If during its movement it becomes adjacent to an SHL-friendly Unit, it will become engaged and stop moving. Nastian Units that are adjacent to Gorgons (and vice-versa) are likewise engaged.
Facing: The arrows on the enemy counters always “point” to a flat hexside, never a vertex. Note that when a Nastian first enters a map (whether from the Nastian Cup or by exiting the other map), their facing will be oriented in that map’s current Preferred Direction. Units already on the map do not have their facing changed when the new Preferred Direction is determined. When facing is changed, it does not expend Movement Factors. Facing has no effect on combat.
Collisions: If the next hexside to be crossed by the acting enemy Unit contains a wall or locked door, the enemy Unit changes facing by 180° and moves in this new direction.
Enemy Stacking Limits: A hex may contain up to two Nastian Units or two Gorgon Units, and may never contain more than that. Nastian Units may pass through a hex containing two Nastian Units but cannot end their movement there; if the acting Unit would not have sufficient Movement Points to end in a hex containing one or zero other Nastians, instead of moving through the hex they change facing, according to the following priorities:
First, they will change facing to the Preferred Direction for the map they occupy, so long as this will allow them to end movement in a valid hex.
If this does not allow them to end their movement in a valid hex, they will change facing by 60° clockwise from the Preferred Direction, and continue doing so until they have a valid direction. If they somehow managed to get themselves surrounded by friendlies with nowhere else to go, they stay put (Union-mandated break). Officers and SIs do not count toward this stacking limit.
Changing Maps: If a Nastian Unit (not a Gorgon or Nastian Officer) enters a Complex hex (regardless of status) that is free of SHL-friendly forces, they will attempt to change maps. Successfully changing maps will cost 1 Movement Factor and result in the Unit’s counter being moved to the corresponding Complex hex on the other map, with its facing changed to match the new map’s Preferred Direction. It will then continue its movement as normal until it has expended all Movement Factors or become Engaged. However, the following circumstances will prevent the Unit from changing maps:
The corresponding Complex hex on the destination map contains any SHL-friendly Units or Gorgons. If this situation occurs, the forces in these hexes are considered adjacent and engaged. If the hex contains two Nastian Units, the moving Unit may move through the hex but cannot end movement in the hex; it changes direction instead, moving in the Preferred Direction or as close to it as possible turning clockwise.
They expend their last Movement Factor to enter the Complex hex. If this happens, they will attempt to change maps at the beginning of their next Movement Step; place two “Activated” markers on the Unit as a mnemonic – removing one at the end of the Movement Step. A Nastian Unit that uses its last Movement Factor to change maps does not change maps again at the start of its next Movement Step, but will move in the direction they are facing (having changed facing to the new map’s Preferred Direction at the conclusion of their last activation).
Nastian Officer Movement: Nastian Officers do not count toward stacking. They never attempt to leave the Purgatory Deck; if they enter a Complex hex, they will simply change facing to the map’s current Preferred Direction and continue moving if not Engaged. If they move adjacent to an SHL friendly Unit or Gorgon, they stop moving, but at the beginning of their next Movement Step, they will change facing to 180° from the highest numbered SHL-friendly or Gorgon Unit, attempting to move away.
Gorgon Movement: The Gorgons always move toward the Engine Room (11.0) by the shortest route possible in an attempt to destroy the ship, changing facing as needed. If there are multiple choices of hexes that will continue the shortest route, they will choose the hex that it is in the Preferred Direction (if applicable) or the first available hex that is clockwise from the Preferred Direction. They never change levels: they are focused on the Engine Room.
 ——————————————————————–
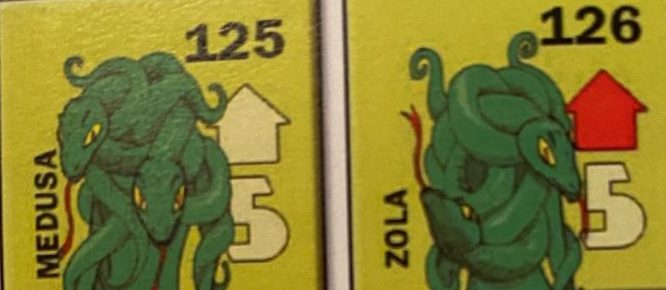
Historical Note: Little is known today about the two Gorgon sisters, Medusa and her even more sinister sister Zola, as records have not survived. It is generally accepted that they were psychotic nihilists who had been in Nastian custody for decades; some historians believe the prison itself was established specifically to house them. They were singularly bent on the destruction of their place of captivity, and of everyone aboard.
——————————————————————–
If at least one of the Gorgons enters the Engine Room, they cease movement and a card is drawn from either Resolution Deck (your choice) to generate a random number. If the result is 3 or less, the Gorgons succeed in compromising the reactor core, and the Hades explodes, resulting in your immediate defeat. If the result is 4 or more, the Gorgon(s) will try again (again drawing a card to generate a random number) once more on each subsequent Movement Step. Each Gorgon makes this attempt separately; if both Gorgons are in the Engine Room, then there are two attempts.
——————————————————————–
Play Note: Obviously the Hades did not blow up in reality, but this is a plausible outcome that is simulated here to reflect the seriousness of the threat posed by the Gorgons. If you are not comfortable with this outcome, then don’t let the Gorgons get to the Engine Room.
——————————————————————-
5.5 Officer Step
If the Nastian Officer is in play, during this step regardless of his location he will attempt to repair the highest-numbered damaged (not destroyed) SI: draw one card from either Resolution Deck to generate a random number. If General Tso is in play, the attempt succeeds on a 4 or less. If Lt. Sanders is in play, the attempt succeeds on a 3 or less. If successful, the damaged SI is flipped to its fully-operation side. As a reminder of this ability and the number needed to succeed, a die symbol is included on the counter.
 ——————————————————————–
Historical Note: The actual names of the commanding officers could not be replicated by human throats. Given the common feeling in that period that Nastians resembled “fried chicken”, these hapless and cowardly tyrants were apparently named after two popular Earth poultry dishes, the recipes for which, like the fabled lemon meringue, have been lost to antiquity.
——————————————————————-
5.6 Nasty Surprise Step
During the Nasty Surprise Step, draw a new Nasty Surprise card from the deck. First, consult the letters at the top of the card and check the corresponding hexes on the Inferno map. If any of those hexes do not contain an SI marker (damaged/destroyed SIs count), for each eligible hex randomly draw a new SI marker from the Surface Installation Cup and place it in that hex on its fully-operational side.
Then, fully resolve the event text on the card. Note that certain Units may be activated for Movement during this step and might even exceed their Movement Factors. However, they obey all other rules for movement (including engagement) unless specified otherwise on the card. Note that the Nasty Surprise Deck functions as the timer of the game; when it is empty, the game is over. Under two circumstances you will shuffle in another card to the deck from among those cards that were not used during set-up:
If card NS-12 is drawn.
If the Overtime Option (14.2) is used.
Once a card has been resolved, it is discarded; be careful not to confuse this discard pile with cards that were not used during set-up.
[If a Nasty Surprise card says to place certain units (e.g., Soldiers) on each Guard Tower, and there are not enough of those units left to place, the player should place what they can of what’s specified, and fill in the rest randomly.]
5.7 Ground Combat Step
During the Ground Combat Step, all enemy Units that are engaged conduct one Attack. Resolve all attacks in descending order for the Inferno map, then do the same for the Purgatory map. When it attacks, a Nastian Unit will change its facing so that it is pointing toward the highest-numbered SHL-friendly Combat Unit or Gorgon, and attack that Unit, resolving Ground Combat per 4.0; a Gorgon will face and attack the highest-numbered SHL-friendly Combat Unit or Nastian. If the only SHL-friendly Units that are adjacent to the enemy are non-Combat Units, they choose their target according to the following priority:
Nastian Officer (if Gorgon is attacking)
Elder Alien (highest-numbered first)
Professor Dante
Princess Emily
Gorgon Combat Resolution: Medusa is treated as a Soldier when resolving combat, and Zola is treated as a Shock Unit (hence the red arrow). When Gorgons attack Nastians, there are two rounds of combat: in the first, the Gorgon is the attacker and the Nastian the defender, and in the second, these roles are reversed (provided the Nastian survived!).
Nastian Officer Combat: Nastian Officers never attack. There are some special restrictions on attacking the current Officer, explained in more detail in 6.2.
6.0 SHL PHASE
During the SHL Phase, you get to take ONE action for each pro-SHL ground Unit, resolving these actions in any order (you may temporarily mark Units with Activated markers to indicate which ones have already performed an action). Any pro-SHL Unit may perform one of the Standard Actions:
Full Move (6.1)
Full Fire (6.2)
Run and Gun (6.3)
Additionally, two Units each performing Full Fire, or one Unit performing Full Fire and one performing Run and Gun, may Combine Fire (6.2-6.3).
Specific Units may perform one Special Action instead:
SWAT: CFP Action (6.4)
Engineer: Sabotage Action (6.5)
HQ: Rally (6.6)
HQ: Request Reinforcements or Evac (6.7)
HQ: Forced March (6.8)
Dante or Emily: Science Action (6.9)
Prisoners: Some of the Circles of Hades contain prisoners, some friendly to the player, (including trapped SHL forces). These Units can only take an action if they begin the SHL Phase already revealed, with their cell door opened.
6.1 Full Move
This action allows the activated Unit to enter any number of hexes up to its Movement Factor. Units must stop moving when they become adjacent to an enemy Unit (becoming engaged) but may move away during their activation. Friendly Units occupying a Complex are engaged with enemy Units occupying the corresponding Complex hex on the other map.
SHL Stacking: Only one SHL Unit may occupy a hex. Units may move through hexes containing friendly Units, but cannot end their movement there. Up to two Elder Aliens can occupy a single hex, but they can never co-occupy a hex containing an SHL Unit. Professor Dante and Princess Emily do not count toward stacking limits and may stack with any friendly Unit(s).
Walls and Doors: Units may never move through walls or locked doors, and friendly Units may never enter a Guard Tower hex. An SHL Unit that is adjacent to a locked door may blow it open by expending 2 Movement Factors; this will flip over the Circle counter, revealing the contents of the Circle (11.0). A Unit may enter or exit a room (Circle) at the expense of 1 Movement Factor, provided an enemy Unit does not occupy the Circle. The interior of the Circle itself counts as a [single discrete “hex,” which is adjacent to the doorway]; Units cannot see each other or move, through walls. A friendly Unit that occupies a hex adjacent to the Circle becomes engaged with any enemy Unit that is inside the Circle if the door is open, and thus stops moving. [Once a door is opened it remains open for the rest of the game unless a “Trap” is involved.]
Entering Complexes: On the Inferno map, only destroyed SI Complexes may be entered by friendly Units; damaged, fully operational, and inactive SI hexes cannot be entered. When a friendly Unit moves adjacent to an inactive SI hex, a new SI is immediately drawn and placed. Upon entering a destroyed SI hex, a friendly Unit can change maps, moving to the corresponding hex on the other map, by spending one Movement Factor (providing they are able to enter that hex).
SI Complexes on the Inferno map will automatically be destroyed if a friendly Unit enters the corresponding hex on the Purgatory map. [Also see section 10.6 regarding Flight Elevators.]
6.2 Full Fire
This action allows the activated Unit to attack one enemy Unit (of their choice) or SI with which they are adjacent, resolving the Combat normally, using either the Fresh or Depleted rating depending on the Unit’s actual status. (For an exception, see Combined Fire below). For these purposes, Complex hexes are considered adjacent to their counterparts on the other map.
————————————————————————————-
Geometric Note: It is a well-known fact that the only thing wargamers enjoy more than wargames is arguing about weapon ranges, and folks might well wonder why combat is only between adjacent units. This has to do with the curvature of the Hades itself, which greatly limited visibility beyond the range represented by adjacent hexes. Note below however an important exception involving Heavy Weapons Units.
Attacks vs. Nastian Officers: A Nastian Officer can only be attacked if it is the only Unit in its hex; so long as there are other Nastians in the hex, they will be all too eager to hide behind them. If General Tso, the Nastian Officer that first enters play, is attacked and suffers at least one Hit, the counter is flipped to the Lt. Sanders side (any excess Hits scored in single combat are disregarded). If in a future Attack Lt. Sanders suffers at least one Hit, the counter is Destroyed; unlike other Nastian counters, the counter does not reenter the Nastian Cup.
Combined Fire: Two Units may be activated for Full Fire simultaneously against the same target to which both are adjacent. Alternatively, one Unit activated for Run and Gun may Combine Fire with one Unit activated for Full Fire (two Units activated for Run and Gun cannot Combine Fire). When resolving the Combined Fire, draw two SHL Resolution Cards – one for the first Unit, and one for the second – and compare the sum to a single Nastian Resolution Card. The Nastian Unit faces toward the highest-numbered attacking Unit on its level. If any Hits are scored on your Units, the Unit with the highest ID number is afflicted.
Heavy Weapons vs. Fighters: Heavy Weapons Units on the Inferno map may fire at Nastian Fighters assigned to Combat Orbital Patrol. These are the only ground Units that may attack Fighters.
6.3 Run and Gun
This action allows a Unit to move up to half of its Movement Factor (rounded down) and attack (as in 6.2), but as if it was a depleted Unit. Units that are actually depleted conduct this attack normally. The activated Unit may first move and then attack, or first attack and then move. (Such an action, however, is under the same limitations as Full Movement and Full Fire actions).
6.4 SWAT CFP
This action, only used by SWAT Units on the Inferno map, allows that Unit to employ their Centrifugal Force Projectors (CFP) in a special and powerful combination of movement and attack. The movement portion of the action is called a Jump; the acting Unit has the option of either performing a Jump and an attack, or only performing an attack. To resolve the CFP action, first, choose a destination hex. This can be the hex that the acting SWAT Unit currently occupies (in which case there will be no Jump, only an attack) or it can be any vacant hex on the Inferno map that does not contain a Complex (in which case there will be a Jump). A SWAT Unit that is engaged with an enemy Unit may use CFP to attempt a Jump to move away from the enemy. Draw a Resolution card from either deck to generate a random number, and modify the result as follows:
Subtract “1” if the SWAT Unit is depleted.
Add “1” if the SWAT Unit is not Jumping.
These modifiers are cumulative, and the final modified result will determine the success or failure of the CFP Action.
0 – Misfire! The Unit does not attack and is immediately destroyed.
1 – Malfunction! Draw two Resolution cards to generate two random numbers, which together determine the recoil. The first random number determines which direction the SWAT Unit will move from its destination hex (corresponding to the Preferred Direction numbering) and the second the number of hexes traveled. If this recoil takes the Unit off the North or South edge of the map, they are flung into the cold and merciless vacuum of space, and the Unit is Destroyed. If this recoil would cause them to move through a wall, splat, and the Unit is Destroyed. If this recoil causes them to land in a hex containing a Unit (friendly or enemy) or Complex regardless of status), also splat, and the SWAT Unit is Destroyed. If the Unit somehow manages to land in a vacant hex, it is depleted (Units already depleted do not suffer any additional adverse effects). The Unit does not attack.
2 – Partial Success? (or, Hey, I’m Alive!) There is no recoil and the Unit is placed (or remains) in its destination hex. If it is now adjacent to an enemy Unit or SI, it may now attack it, resolving Combat normally.
3+ – Success! There is no recoil and the Unit is placed (or remains) in its destination hex. If it is now adjacent to an enemy Unit or SI, it may now attack it, with a bonus: the enemy does not get to draw a card in its defense.
Note that using a CFP is a distinct action, and the attacking SWAT Unit cannot combine fire with any other Units. (Nor can two SWAT Units simultaneously attempt to use CFP; early trials with the technology saw attempts at simultaneous jumps and it was rather messy.)
—————————————————————————–
Historical Note: The specific model utilized during the Assault on Hades was the CFP-12a, which saw a marked reduction of its fatality rate to an apparently acceptable 17%. This was good enough for the SHL to finally offer them to the general public. Unfortunately that 17% figure for military personnel did not hold for civilians, as it did not account for alcohol consumption.
—————————————————————————–
6.5 Engineer Sabotage
This action, only used by Combat Engineers (Engineers for short), allows that Unit to attack an SI. The attack is resolved normally, except that a fresh Engineer gets a +4 modifier (depleted, +2) instead of any provided by the card draw; defender still draws. Note that this is a distinct action, and cannot be combined with the attacks of any other Units.
—————————————————————————-
Historical Note: The Black Sheep’s contingent of Combat Engineers was soon known aboard the ship as the “Bad Neighbors” given their zeal for destroying enemy complexes.
—————————————————————————-
6.6 HQ Rally
This action, only used by an HQ, allows the HQ itself and all adjacent SHL Units (not separated by a wall or locked door) on the same map to each make one attempt to rally (flipping to its fresh side) if depleted. For each such Unit, flip a Resolution card from either deck to generate a random number; the attempt succeeds, and the counter is flipped, on a 3 or less. Note that some Units will rally automatically during
the Recovery Phase (8.0).
6.7 HQ Request
This action, only used by an HQ on the Inferno map, allows the HQ to request reinforcements from, or evacuations to, the Vittles. This action is only available if the Vittles is in system. Flip a Resolution card from either deck to generate a random number, to which are applied the following modifiers:
+1 if the HQ is depleted.
+1 if the HQ is adjacent to an enemy Unit or active, non-destroyed SI.
If the result is 4 or less, one of the following occurs:
Reinforcements: Up to 3 Units [of any kind] move from the Vittles (supply) to any vacant hex on the Inferno map within three hexes of the HQ. [They are then marked as activated and may not move this phase.]
Evacuations: Up to 3 Units that are within three hexes of the HQ move from the Inferno map to the Vittles (supply). Treasure counters (11.0) may be moved for free. Princess Emily cannot be among the first three Units evacuated during the game (noblesse oblige and all that).
6.8 HQ Forced March
This action, only used by an HQ, adds 3 Movement Factors to any SHL Combat Unit that occupies the same map as the HQ; this uses up the HQ’s activation, and the designated Combat Unit is then immediately activated. Units that have already been activated are not eligible to receive this bonus.
6.9 Science Action This action may only be used by Professor Dante or Princess Emily. The effect of the Science Action depends on where it takes place. All Science Actions are resolved by drawing a card from either Resolution Deck and generating a random number to determine its success or failure. Dante’s Science Actions have a +1 modifier when he is depleted.
Vittles: Dante’s Lab (LB, 12.7): If Dante occupies his Lab on the Vittles, and the Vittles is in-system, he may take a Science Action to attempt to damage the highest-numbered fully operational SI:
If the Lab is Holding, it succeeds on a modified 4 or less.
If the Lab is Failing, it succeeds on a modified 2 or less.
If the Lab is Destroyed, the action cannot be performed; you’ve got bigger problems.
On a modified 5, a fresh Dante is depleted, or if already depleted, thrown into the sixth dimension (removed from play).
On a modified 6 or greater, Dante is thrown into the sixth dimension (removed from play).
———————————————————————-
Historical Note: Professor Dante of course was thrown into the sixth dimension, resulting ultimately in major scientific breakthroughs when he returned to our reality. He did not return before the conclusion of the raid, however, hence his removal from the game. Many have speculated how the mission would have been changed had Professor Dante not been thrown into the sixth dimension, and the game allows you to explore this.
———————————————————————
Vittles: Bridge/Living Quarters (LQ, 12.8): If depleted and occupying the Bridge/Living Quarters, Dante may attempt to recover – flipping to his fresh side – succeeding on a
modified 4 or less.
Purgatory: Bridge (11.0): If Dante or Emily occupies this Circle, they may attempt to hack the Hades’s Bridge computer system. This succeeds on a modified 4 or less, and if successful, choose any locked door and open it, flipping the counter face-up. This can be hacked once per turn.
Purgatory: Back-Up Core Computer (11.0): If Dante or Emily occupies this Circle, they may attempt to crash the computer. This succeeds on a modified 3 or less, and if successful, damages the highest-numbered fully-operational SI in each of the following three categories: Railgun, Missile Battery, and Laser. The Back-Up Core Computer can only be crashed once; if successful, simply remove the Back-Up Core Computer counter from play
Purgatory: Teleporter (11.0): If Dante or Emily occupies this Circle, and the Vittles is in-system, they may attempt to hack the teleporter. This succeeds on a modified 4 or less, and if successful, teleports one friendly Unit (activated or otherwise) that is within three hexes of the teleporter to the Vittles. Princess Emily may not be among the first three evacuees (in total, including evacuations performed per 6.7). This action cannot be performed in Scenario 2.
7.0 VITTLES PHASE
 During the Vittles Phase, you will perform the three steps of the phase in the order given. Note that a detailed description of the Vittles’ modules is provided in 12.0.
7.1 Repair Step
During the Repair Step, the Vittles Damage Control Team may make one attempt to repair damage to the ship. Draw a Resolution Card from either deck to generate a random number; on a 3 or less, the attempt is successful. The Vittles Status Marker is moved one space up and placed with its “Holding” side up. For example, if the status marker occupied the “R1” space and the repair was successful, it
would be moved to the “50” space.
7.2 Movement Step
During the Movement Step, the Vittles may either Skedaddle (changing status from “In System” to “Out System”) or Approach (changing status from “Out System” to “In System”). When the Vittles is “Out System”, it cannot be attacked but it also cannot itself attack or provide Reinforcements or Evacuations. [This prevents Nasty Surprise card NS-10 from having a damaged fighter ram the Vittles when it is out-of-the-system.]
When the Vittles is “In System”, it has a wider variety of both functions and vulnerabilities.
Parting Shots: When the Vittles Skedaddles, all fully operational SIs each make one attack while it departs unless the Hades Long-Range Targeting Computer (11.0) is destroyed, in which case no such attacks are made. [These attacks occur simultaneously with the Vittles’ departure. This usually does not cause a problem except in the rare case of Parting Shots disabling the last Warp engine but then failing to destroy the ship. In such a situation the Vittles is able to leave the system but may not return until at least one Warp engine is repaired to “failing” status or better.]
Warp Engines (12.5): If both Warp Engine modules have been disabled, the Vittles cannot Skedaddle or Approach.
7.3 Attack Step
During the Attack Step, if the Vittles is In System, it may make one attack with each of its functioning weapons modules (“50”, “R1”, and “R2”).
50 (Quad 50-caliber Gatling Gun): This anti-personnel weapon can only target enemy Units (not SIs or Officers) on the Inferno map.
R1 (120mm Railgun “Michael”): This bow gun turret can target either an active Nastian fighter or a surface target (SI or Unit) on the Inferno map.
R2 (110mm Railgun “Gabriel”): This stern gun turret can target either an active Nastian fighter or a surface target (SI or Unit) on the Inferno map.
8.0 RECOVERY PHASE
During this phase, any depleted SHL Combat Units that are not adjacent to any enemy Unit or non-destroyed SI counter automatically recover, flipping to their fresh sides.
9.0 END TURN PHASE
Any critical chits (Crisis! and Comm Crash) are discarded. If there are no cards remaining in the Nasty Surprise deck (and you have not utilized the Overtime Option, 14.2), the game is concluded; check for victory (14.1). If the game has not ended, continue to the next turn, beginning with a new Nastian Phase.
10.0 SURFACE INSTALLATIONS
Surface Installations fall into six types. Only SIs that are fully-operational take actions or perform functions; SIs that are damaged, destroyed, or inactive do not. Destroyed SIs provide a defensive terrain benefit for Units occupying the Complex per the combat card drawn.
10.1 Railgun
Fully-operational 90mm “Niflheim” railguns fire on the Vittles when it is In-System during the Orbital Combat Step of the Nastian Phase (5.1). If the Vittles is Out-System, the railguns target adjacent pro-SHL Units per 5.1.
10.2 Lasers
Fully-operational Mark VII “Satan” lasers fire on the Vittles when it is In System during the Orbital Combat Step of the Nastian Phase (5.1). If the Vittles is Out System, the lasers target adjacent pro-SHL Units per 5.1.
10.3 Missile Batteries
Full-operational Mark IV Missile Batteries fire on the Vittles when it is In System during the Orbital Combat Step of the Nastian Phase (5.1). If the Vittles is Out System, the batteries target adjacent pro-SHL Units per 5.1.
10.4 Radar Dome
When the Radar Dome is fully-operational during the Reinforcement Step, a new Nastian Unit appears in the corresponding Complex hex on the Purgatory Deck. When the Radar Dome is fully-operational during the Nasty Surprise Step, it might result in one or more other SIs firing normally. (If there is a choice to be made, resolve it in favor of the highest-numbered eligible SIs.)
10.5 Troop Elevator
A fully-operational Troop Elevator generates a new Nastian Unit during the Reinforcement
Step in the corresponding Complex hex on the Purgatory Deck.
10.6 Flight Elevator The moment it first becomes fully-operational, the Flight Elevator adds its only fighter to the Combat Orbital Patrol box. On subsequent turns, during the Reinforcement Step, it generates a new Nastian Unit in the corresponding Complex hex on the Purgatory Deck. [When activated a Flight Elevator will instantly release its one and only Fighter into a Combat Orbital Patrol box before becoming damaged or destroyed.]
11.0 THE CIRCLES OF HADES
Most of the twelve Circles of Hades begin the game behind locked doors that will have to be busted open (6.1) or hacked (6.9). While almost every primary source has a list of twelve Circles, none of these lists agree with each other. As a result, twenty counters are provided, with only a certain number and randomized mix being used in a given session/scenario. Some of these Circles allow Dante or Emily to perform Science Actions (6.9); the number needed to succeed for a given action is indicated by a die symbol on the counter. [These “circles” are one hex in size and shape.]
Back-Up Core Computer: If Dante or Emily occupies this Circle, they may attempt to crash the Back-Up Core Computer via a Science Action (6.9). This succeeds on a modified 3 or less, and if successful, damages the highest-numbered fully operational SI in each of the following three categories: Railgun, Missile Battery, and Laser. The Back-Up Core Computer can only be crashed once; if successful, simply remove the Back-Up Core Computer counter from play.
Bridge: If Dante or Emily occupies this Circle, they may attempt to hack the computer system via a Science Action (6.9). This succeeds on a modified 4 or less, and if successful, you choose any locked door and open it, flipping the counter face-up. Alternatively, this can be used to disarm an active Trap. This can be hacked once per turn.
Brig: When the Brig is revealed, place two depleted Guards in this Circle, facing the door. Comm Room: When one of your Units first enters the Comm Room, all fully-operational Elevators are damaged (Elevators already damaged are Destroyed). Once this has been done, remove the Comm Room counter from play.
Comm Room: When one of your Units first enters the Comm Room, all fully-operational Elevators are damaged (Elevators already Damaged are Destroyed). Once this has been done, remove the Comm Room counter from play.
Engine Room: The location of this room is always known, due to its Virtual Neutrino Field. Also known as the “Boom Room” due to its infamous self-destruct button. Should the Gorgons succeed in pressing this button (5.4), the Hades explodes, and you lose the game. (Note: the game map will not actually explode unless you purchased the deluxe kick-starter edition with all stretch goals.)
Fuel Tank: When this room is first revealed, the Fuel Tank explodes: this damages the highest-numbered fully-operational Missile Battery. Additionally, this explosion attacks any Unit that has the misfortune to be adjacent to the doorway, resolving as if the explosion was a fresh Nastian Soldier. The Fuel Tank counter is then removed from play.
Long Range Targeting Computer: When one of your Units first enters this Circle, it disables
the “Parting Shots” ability of SIs (see 7.2).
Railgun Ammo Ready Room: When this room is first revealed, the ammo explodes: this damages the highest-numbered fully-operational Railgun SI. Additionally, this explosion attacks any Unit that has the misfortune to be adjacent to the doorway, resolving as if the explosion was a fresh Nastian Shock Trooper. The Ammo Room counter is then removed from play.
Supply Room: When this room is first revealed, the highest-numbered fully-operational Laser SI is damaged.
Teleporter: If Dante or Emily occupies this Circle, and the Vittles is In System, they may attempt to hack the teleporter via a Science Action (6.9). This succeeds on a modified 4 or less, and if successful, teleports one friendly Unit (activated or otherwise) that is within three hexes of the teleporter to the Vittles. Princess Emily may not be among the first three evacuees (in total, including evacuations performed per 6.7). This action cannot be performed in Scenario 2.
Traps: If one of your Units blows open a door to reveal a trap, the Unit is placed under the Trap counter as a prisoner. The Unit cannot move until the Trap is disarmed. If another friendly Unit moves adjacent to the door and expends 2 Movement Factors, the Trap is disarmed and the Trap counter is removed. Hacking the bridge computer (6.9) will also disarm one Trap and remove the Trap counter.
Golden Idol Shrine: Containing the Golden Calamari, of “The Hijacking of” fame. This treasure represents the great idol of the Nastians. This counter may stack freely with any pro-SHL Unit, and moves by being “carried” by that Unit. However, for as long as the Idol is in the possession of one of your Units, or in a vacant hex, all Nastians on that same deck that are within two hexes of the Idol will try to recapture it:
At the start of the Nastian Movement Step (5.4), before resolving any activations, any eligible Nastians (on the same deck and within two hexes) will change facing to point toward the Idol’s hex. This condition only applies when the Idol is outside of its original Circle and not in possession of a Nastian Unit.
If a Nastian enters the hex containing the Idol, it is recaptured, and carried by that Nastian as it moves at no cost, stacking freely. You can, of course, re-recapture the Idol by taking out that Nastian.
The Loot Cellar: Containing various alien artifacts, but the real prize was a series of illicit and illegal contracts between the Nastian Empire and the Interstellar Depot, arch-rivals of the SHL. The publication of these contracts by the SHL greatly embarrassed and weakened the Depot.
[The Golden Idol and Loot are considered treasures and are never targeted or destroyed as they are valued by both sides. They may be freely carried by any force capable of movement. If that force is attacked and eliminated the treasure is left unharmed in the targeted hex. If a treasure is then recaptured it will again be freely carried by the recapturing force. SHL captured treasures can also be teleported with their guardian force to the Vittles at no extra cost. They are lightweight and do not count against any transportation limit.]
Emily’s Honor Guard: A depleted Armored Infantry Unit that can never recover or rally. It was captured along with the Princess.
Medusa: One of the two Gorgons, resolving combat as if a Soldier. See the Gorgon section of
5.4 for more details.
Zola: The deadlier of the two Gorgons, resolving combat as if a Shock Trooper. See the Gorgon section of 5.4 for more details.
Elder Aliens: Political prisoners and pacifists. Not only are they not Combat Units, but they
can never attack, only defend.
Princess Emily: Heir to the Laylian Empire, her rescue is the primary objective of the mission. Emily is able to take Science Actions (6.9).
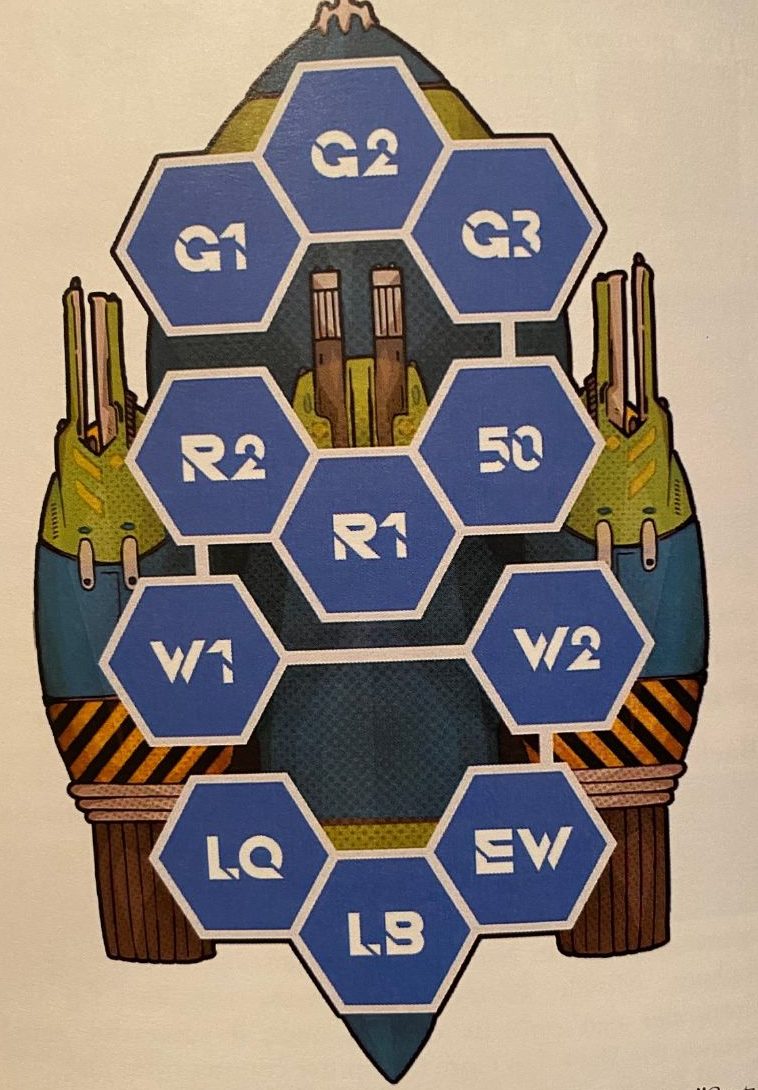
12.0 ABOARD THE S.H.L. VITTLES
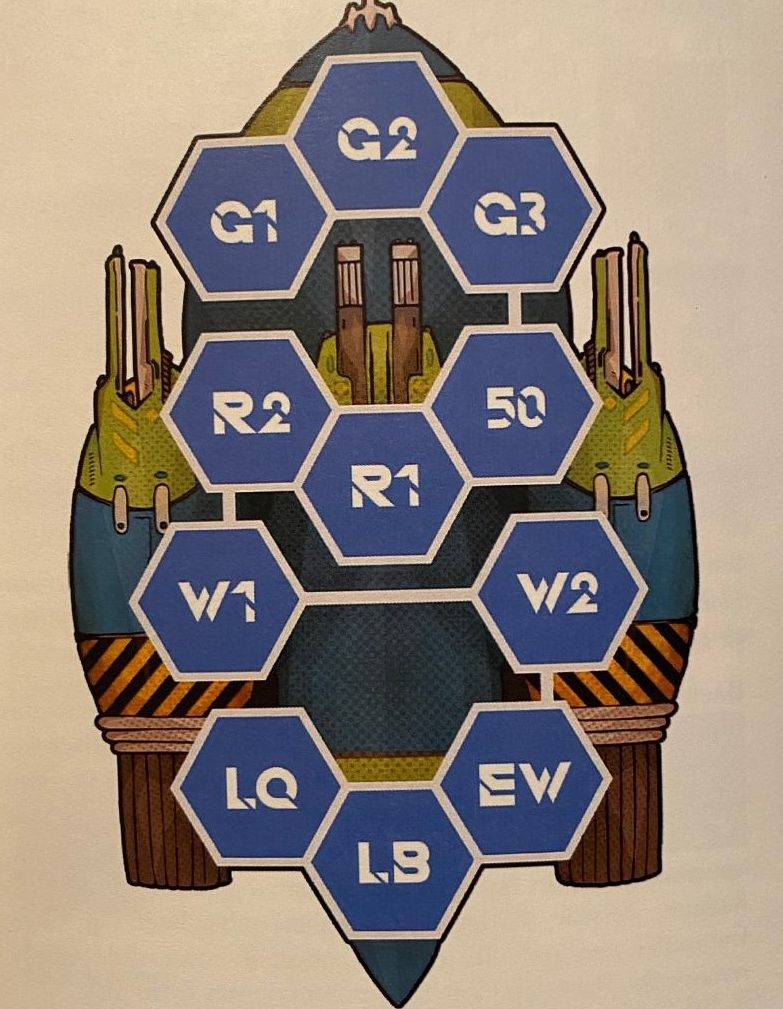 The Vittles is made up of several modules with different functions. Modules are targeted by the enemy one at a time, in the specific order indicated on the Vittles counter, beginning with G1 (Primary Shield Generator) and proceeding in order until the last module, LQ (Living Quarters and Bridge). The current targeted module is indicated by the placement of the “Status Holding/Status Failing” marker. All modules below the current targeted module automatically have “Holding” status and are fully functional. One Hit scored against the current module will flip the “Status Holding” marker to its “Status Failing” side, and a second Hit will Destroy the current module causing the marker to slip to the next module (e.g., from G3 to 50), flipping back to “Status Holding”. Destroyed modules cannot be used for any reason until repaired. During the Repair Step (7.1) of the Vittles Phase, repairs can be attempted and, if successful, will move the marker back up one module (e.g., from 50 to G3), flipping back to “Status Holding”. This means that the target of Nastian attacks will also shift up one module.
12.1 Shield Generators (G1, G2, G3)These modules provide no mechanical benefit, other than delaying attacks on more vital modules.
12.2 50 Caliber Quad (50)This anti-personnel weapon can fire (7.3) on Nastian Units on the Inferno map when the Vittles is In System.
12.3 Railgun Michael (R1)
The more powerful of the two Railguns aboard the Vittles can fire (7.3) at Nastian Fighters, SIs, and Units on the Inferno map when the Vittles is In System.
12.4 Railgun Gabriel (R2)
This Railgun can fire (7.3) at Nastian Fighters, SIs, and Units on the Inferno map when the Vittles is In System.
12.5 Warp Engines (W1, W2)
When both Warp Engines have been Destroyed, the Vittles can no longer Approach (move In System) or Skedaddle (move Out System) until and unless W2 has been repaired.
12.6 Electronic Warfare Suite (EW)
Its software keeps the auto-repair capabilities of Nastian SIs from functioning. Immediately when the EW module is Destroyed, the lowest-numbered damaged Railgun, Missile Battery, and Laser SIs [that are completely empty of all enemy units on either of their levels] are repaired to fully operational status. Note that this effect happens immediately each time the EW is Destroyed, so time your repairs.
[If the SHL Electronic Warfare Suite is destroyed in the middle of a Nastian Orbital Combat Phase, any newly repaired SIs may immediately attack the Vittles in that same phase.]
12.7 Dante’s Lab (LB)
Dante may move to this space without activating and at no MF cost if he is aboard the Vittles [or he may be placed there directly when returning from the Hades.] This grants access to certain Science Actions (6.9). If the Lab is destroyed with Dante inside it, Dante is removed from play. (While aboard the Vittles, Dante can be activated to move to the Living Quarters and Bridge, which is a good idea if the Lab is on the chopping block.)
12.8 Living Quarters and Bridge (LQ)
Any SHL Units that are not on the maps and have not been Destroyed are considered to be occupying this module; place them in a pool beside the Vittles counter. If the LQ module is destroyed, that’s it for the Vittles, and you lose the game immediately.
13.0 ORDER OF BATTLE
This section covers the various types of Units and their capabilities.
13.1 The Black Sheep
Trading vessels such as the Vittles typically carried only a small armed contingent when doing business in less relaxed sections of the galactic arm. The core forces that made up the Black Sheep consisted of 11 squads: 2 Heavy Weapon, 5 Armored Infantry, 1 Combat Engineer, and 3 administrative/HQ squads
under Major Acuto, Captain Sever, and Lieutenant Knight. Due to the current political crisis, 4 Scout and 3 SWAT squads were also assigned to the Black Sheep, with the SWAT Units being equipped with their new CFP model 12-a. A fourth HQ squad was created to accommodate these additional forces and was headed by a Laylian military officer, Wilson, who was brevetted the honorary rank of Lieutenant within the SHL.
 Armored Infantry: The core of the Black Sheep, capable and steadfast, but with no particular specialty.
Combat Engineer: This squad can perform the Sabotage Special Action (6.5).
Heavy Weapon: When on the Inferno map, these squads can fire at Nastian Fighters in orbit.
Scout: These squads are less effective in combat, but make up for it in speed, hence their increased Movement Factors.
SWAT: These squads can utilize their Centrifugal Force Projectors as a Special Action (6.4).
HQ: HQ squads direct and enhance the abilities of the troops around them. These squads are able to take a number of Special Actions: Rally (6.6), Request (6.7), and Forced March (6.8).
13.2 Nastian Forces
Nastian forces aboard the Hades fell into three basic categories.
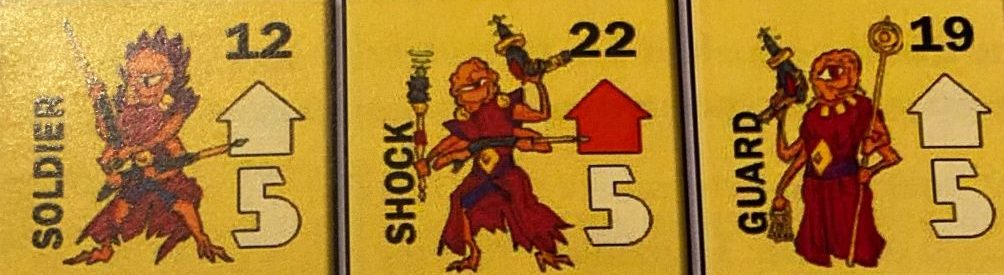 Soldiers: Basic fighting forces.
Shock Troops: Veterans and combat specialists, and as such often packing more of a punch.
Guards: Assigned to keep demoralized prisoners under lock and key, they were not especially known for their fighting prowess.
14.0 VICTORY & DEFEAT
The game can end early in an instant defeat if one of the following occurs:
The Vittles is destroyed (12.8)
Hades is destroyed by the Gorgons (5.4)
Additionally, at the conclusion of the final turn, if the Vittles is still In-System, you will lose the game. If however the Vittles is Out-System, proceed to scoring as below.
14.1 Scoring
Score Victory Points (VPs) for each of the following that is aboard the Vittles (in the pool besides the Vittles counter, representing the Living Quarters and Bridge):
1 VP per SHL Combat Unit
1 VP for Professor Dante (he can also be in his Lab)
3 VP for Princess Emily
3 VP for Golden Idol
3 VP for The Loot
3 VP per Elder Alien
Additionally, score a 2 VP Performance Bonus for each of the following pairs aboard the Vittles:
Both Elder Aliens Princess Emily and her Honor Guard Golden Idol and The Loot
Score VP for the elimination of Nastian Officers:
2 VP for General Tso
1 VP for Lt. Sanders
From this, apply the following penalties:
-½ VP if Dante is removed from play or left behind on Hades
-½ VP per Elder Alien removed from play or left behind on Hades
-½ VP if Emily is removed from play or left behind on Hades
-½ VP for each Circle counter left with its door side still up
-5 VP if Overtime Option (14.2) is used
Note that the penalties for Elder Aliens and Emily only apply if those counters were revealed (turned face-up).
Your final score determines your level of Victory (or Defeat):
27½ or more: Legendary Victory (Historical Result)
25½ – 27: Major Victory
23½ – 25: Solid Victory
21½ – 23: Tactical Victory
19½ – 21: Marginal Victory
17 – 19: Draw
13½ – 16½: Defeat
13 or less: Defeat, and Lt. Sanders gets a promotion!
14.2 Overtime Option
Except during Scenario 4, at any time once per game, you may exercise an “Overtime Option”. This extends the length of the game by one turn, but accrues a -5 VP penalty. When you exercise this option, add a face-down Nasty Surprise card that was set aside at Set-Up and shuffle it into the Nasty
Surprise deck.

15.0 SCENARIOS & SET-UP
SHL objectives were to rescue political prisoners and high-value items with a minimum of losses. In all scenarios, you will need to place the two maps on the table, with their Preferred Direction Indicator cards next to the map in question. Place the Orbital card and the Vittles counter near the maps.
15.1 Scenario 1: Historical
Using their own plans, the Vittles and the Black Sheep achieved complete surprise.
Nastian Set-Up
Place 3 fresh Fighters in the Combat Orbital Patrol box, setting the other two Fighters aside. Draw two Resolution cards to generate random numbers, adding them together. Place the Engine Room counter in the corresponding numbered Circle. Set aside Princess Emily, the Golden Idol, and the Teleporter face-down. Randomly add eight face-down Circle counters, randomize all eleven, and then place them, one-by-one and without looking at them, into each of the remaining Circles on the Purgatory map. Unused Circle counters are returned to the box without examining them.
Place all Nastian forces, along with the Crisis! and Comm Crash chits, into the Nastian Cup. Place all SIs into the Surface Installation Cup. Shuffle the two Resolution Decks separately. Shuffle the Nasty Surprise Deck, setting aside four cards without examining them (no peeking!). These four cards will not be used; since you have eight cards in the deck, there will be 8 turns.
SHL Set-Up
Place 1 HQ, 7 squads (of any type), and Dante on separate empty non-Complex Inferno map hexes. If placed adjacent to a Complex, immediately pull a random SI counter from the cup and place it in the Complex hex, fully-operational side up. Place all remaining SHL forces in a pool adjacent to the Vittles counter; this pool represents the LQ module aboard the Vittles. The Vittles begins In-System and with its “Holding Status” marker on the G1 module.
Scenario Special Rules No special limitations in this historical scenario.
15.2 Scenario 2: Operation Squeeze Play
This was Galactic Combat Intelligence’s preferred battle plan. It hinged on being able to hack the Hades Teleporter, beaming a small force directly onto the Purgatory deck, without much support from the Vittles, making for a riskier plan. Use all set-up instructions for Scenario 1, except as modified:
Nastian Set-Up Modifications
Place 1 Guard Unit on each Inferno Guard Tower hex. Place only 2 fresh Fighters in Combat Orbital Patrol, setting aside the other three. After placing the Engine Room as before, repeat the procedure to place the Teleporter face-up (draw again if it is the same hex as the Engine Room).
Set aside Princess Emily face-down and randomly add nine face-down Circle counters, randomizing all ten, and then place them face-down in each of the remaining Circles on the Purgatory map. Shuffle the Nasty Surprise Deck, setting aside five cards without examining them (don’t peek!). The game will be
7 turns.
SHL Set-Up Modifications
Place no Units on the Inferno map, instead place 1 HQ, 5 squads (of any type), and Dante in separate hexes within three hexes of the Teleporter (one Unit can occupy the Teleporter room itself). The Vittles begins “Out System” and with its “Holding Status” marker on the G1 module.
Scenario Special Rules
No Nastian Reinforcements appear on the Inferno map. Instead, each Reinforcement Step, two Nastians are drawn for each Purgatory Guard Tower. Elevators and the Radar Dome still provide only one new Nastian Unit each turn, however.
Additional SHL forces may arrive by activating an HQ Unit that occupies the Teleporter. This activation consists of drawing a card from a Resolution Deck to generate a random number; if the result is 4 or less, one new Unit of your choice is taken from the pool aboard the Vittles and placed within three hexes of the Teleporter in an eligible hex. This newly placed Unit cannot move or attack this turn. The location of the Vittles does not effect this kind of movement.
The Vittles skips its Movement Step on turns 1 and 2 (place two Activation markers on the Vittles as a reminder). The Teleporter cannot be used to evacuate Units. The Vittles can evacuate or land Units normally when “In-System” only.
15.3 Scenario 3: Operation Chin Music. This GCI alternative plan was based on the doctrine of “Victory through Superior Firepower”. Use all set-up instructions for Scenario 1, except as modified:
Nastian Set-Up Modifications
Place 4 fresh Fighters in Combat Orbital Patrol, setting aside the remaining Fighter. After placing the Engine Room, repeat the procedure twice, to place both Gorgons face-up. Set aside Princess Emily and her Honor Guard facedown and randomly add seven face-down Circle counters, randomizing all nine, and then place them face-down in each of the remaining Circles on the Purgatory map. Draw a Resolution Card and check its random letter; place a fully-operational Flight Elevator there (its Fighter is already in orbit). Shuffle the Nasty Surprise Deck, setting aside five cards without examining them (you guessed it, no peeking!). The game will be 7 turns.
SHL Set-Up Modifications
No differences from Scenario 1.
Scenario Special Rules
Before the game begins, conduct a Surprise Pre-Invasion Bombardment: fire twice with each Vittles Railgun (R1 and R2), resolving combat normally. Obviously you have an incentive to give the Vittles as many targets as possible, so you might choose to place your starting Units adjacent to Complexes to generate SIs.
15.4 Scenario 4: Operation High and Tight. This was the final contingency plan submitted by GCI. It assumed that Dante’s hacking of the Teleporter would alert General Tso, preventing the Black Sheep from achieving surprise. Use all set-up instructions from Scenario 1, except as modified:
Nastian Set-Up Modifications. Place 4 fresh Fighters in Combat Orbital Patrol, setting aside the remaining Fighter. After placing the Engine Room, repeat the procedure to place the Teleporter. Draw a Resolution Card and check its random letter; place a fully-operational Flight Elevator there (its Fighter is already in orbit). Do the same to place a fully operational Radar Dome (draw again if the random letter matches that used for the Flight Elevator). Set aside Princess Emily, her Honor Guard, and Zola facedown, and randomly add seven face-down Circle counters, randomizing all ten, and then place them face-down in each of the remaining Circles on the Purgatory map. After resolving SHL Set-Up, draw a card from a Resolution Deck to generate a random number. If the result is 3 or less, place General Tso on the North Guard Tower (i.e., the guard tower closest to the map’s Northern edge) on the Purgatory map. If the result is 4 or more, place General Tso on the South Guard Tower. Shuffle the Nasty Surprise Deck, setting aside five cards without examining them (hey, what did I say about peeking?). The game will be 7 turns; note that the Overtime Option is, like peeking, strictly verboten.
SHL Set-Up Modifications
Place an HQ and 6 squads (of any type) on separate empty non-Complex Inferno map hexes. Place an HQ, 2 squads (of any type), and Dante in or adjacent to the Teleporter on the Purgatory map (respecting stacking limits).
Scenario Special Rules
If Dante or Emily occupy the Teleporter and perform a Science Action while the Vittles is In-System, instead of teleporting a Unit to the Vittles, they may teleport one Unit from the Vittles, again succeeding on a 4 or less. This new Unit is placed on the Purgatory map within two hexes of the Teleporter, and cannot move or attack the turn of its arrival. The Overtime Option cannot be exercised in this scenario.
16.0 NOTES & CONCLUSIONS
—————————————————————–
“The Assault on Hades was undoubtedly one of the most daring raids in military history, and stories about the mission have been told over and again, growing more incredible with each passing generation. It is hard at times to separate the truth from the legend. Scholars doubt, for example, that Princess Emily had enough time to write above the hatchway, “Abandon all hope, ye who enter
here… unless you happen to know a few good marines!” – Encyclopedia Galactica
——————————————————————
16.1 Designer’s Notes
I hope you enjoyed playing Escape From Hades as much as we did in designing it. We wanted to thank all those who worked on this project and thank you for purchasing it. – Fred Manzo.
16.2 Bibliography
Stein, Frank N., and Stein, Beer. “Old Fashioned Satellite Assaults.” Arisian Press.
Time, Justin. “Nasty Surprises Throughout History.” Barsoom Books.
Maines, Myra. “We Can Get It For You Retail: A History of the Solar Hanseatic League.” Mongo Media.
Brie, Rocky D. “The Old Man and the Sea 4.” The University of Almuric.
Game Resources
 Escape From Hades BGG page:
Escape from Hades Home page: