

")

")

")


")


By Paul Comben:
 In my last article for this site, I looked at The Battle of Quebec – which, like this design, is published by The Historical Game Company. A simple but rather engaging little game, that pleasant experience prompted me to look at this company’s other published title (same designer as well, Steve Kling) that covers eight battles from The Great Northern War.
Adding to my interest was my experience with another design covering battles from the same conflict – Strategemata’s Last Vikings, which featured the engagements at Kliszow and Fraustadt, with my review posted on The Boardgaming Life website. That was an especially positive experience, as the era was completely outside of my wargaming knowledge up to that point. Although not that complex a game, Last Vikings has a lot of tactical nuances where it matters. How an apparently even simpler system, covering quite a gamut of battles from this war, copes with the nature of European battle in the early 18th Century was something I found especially intriguing.
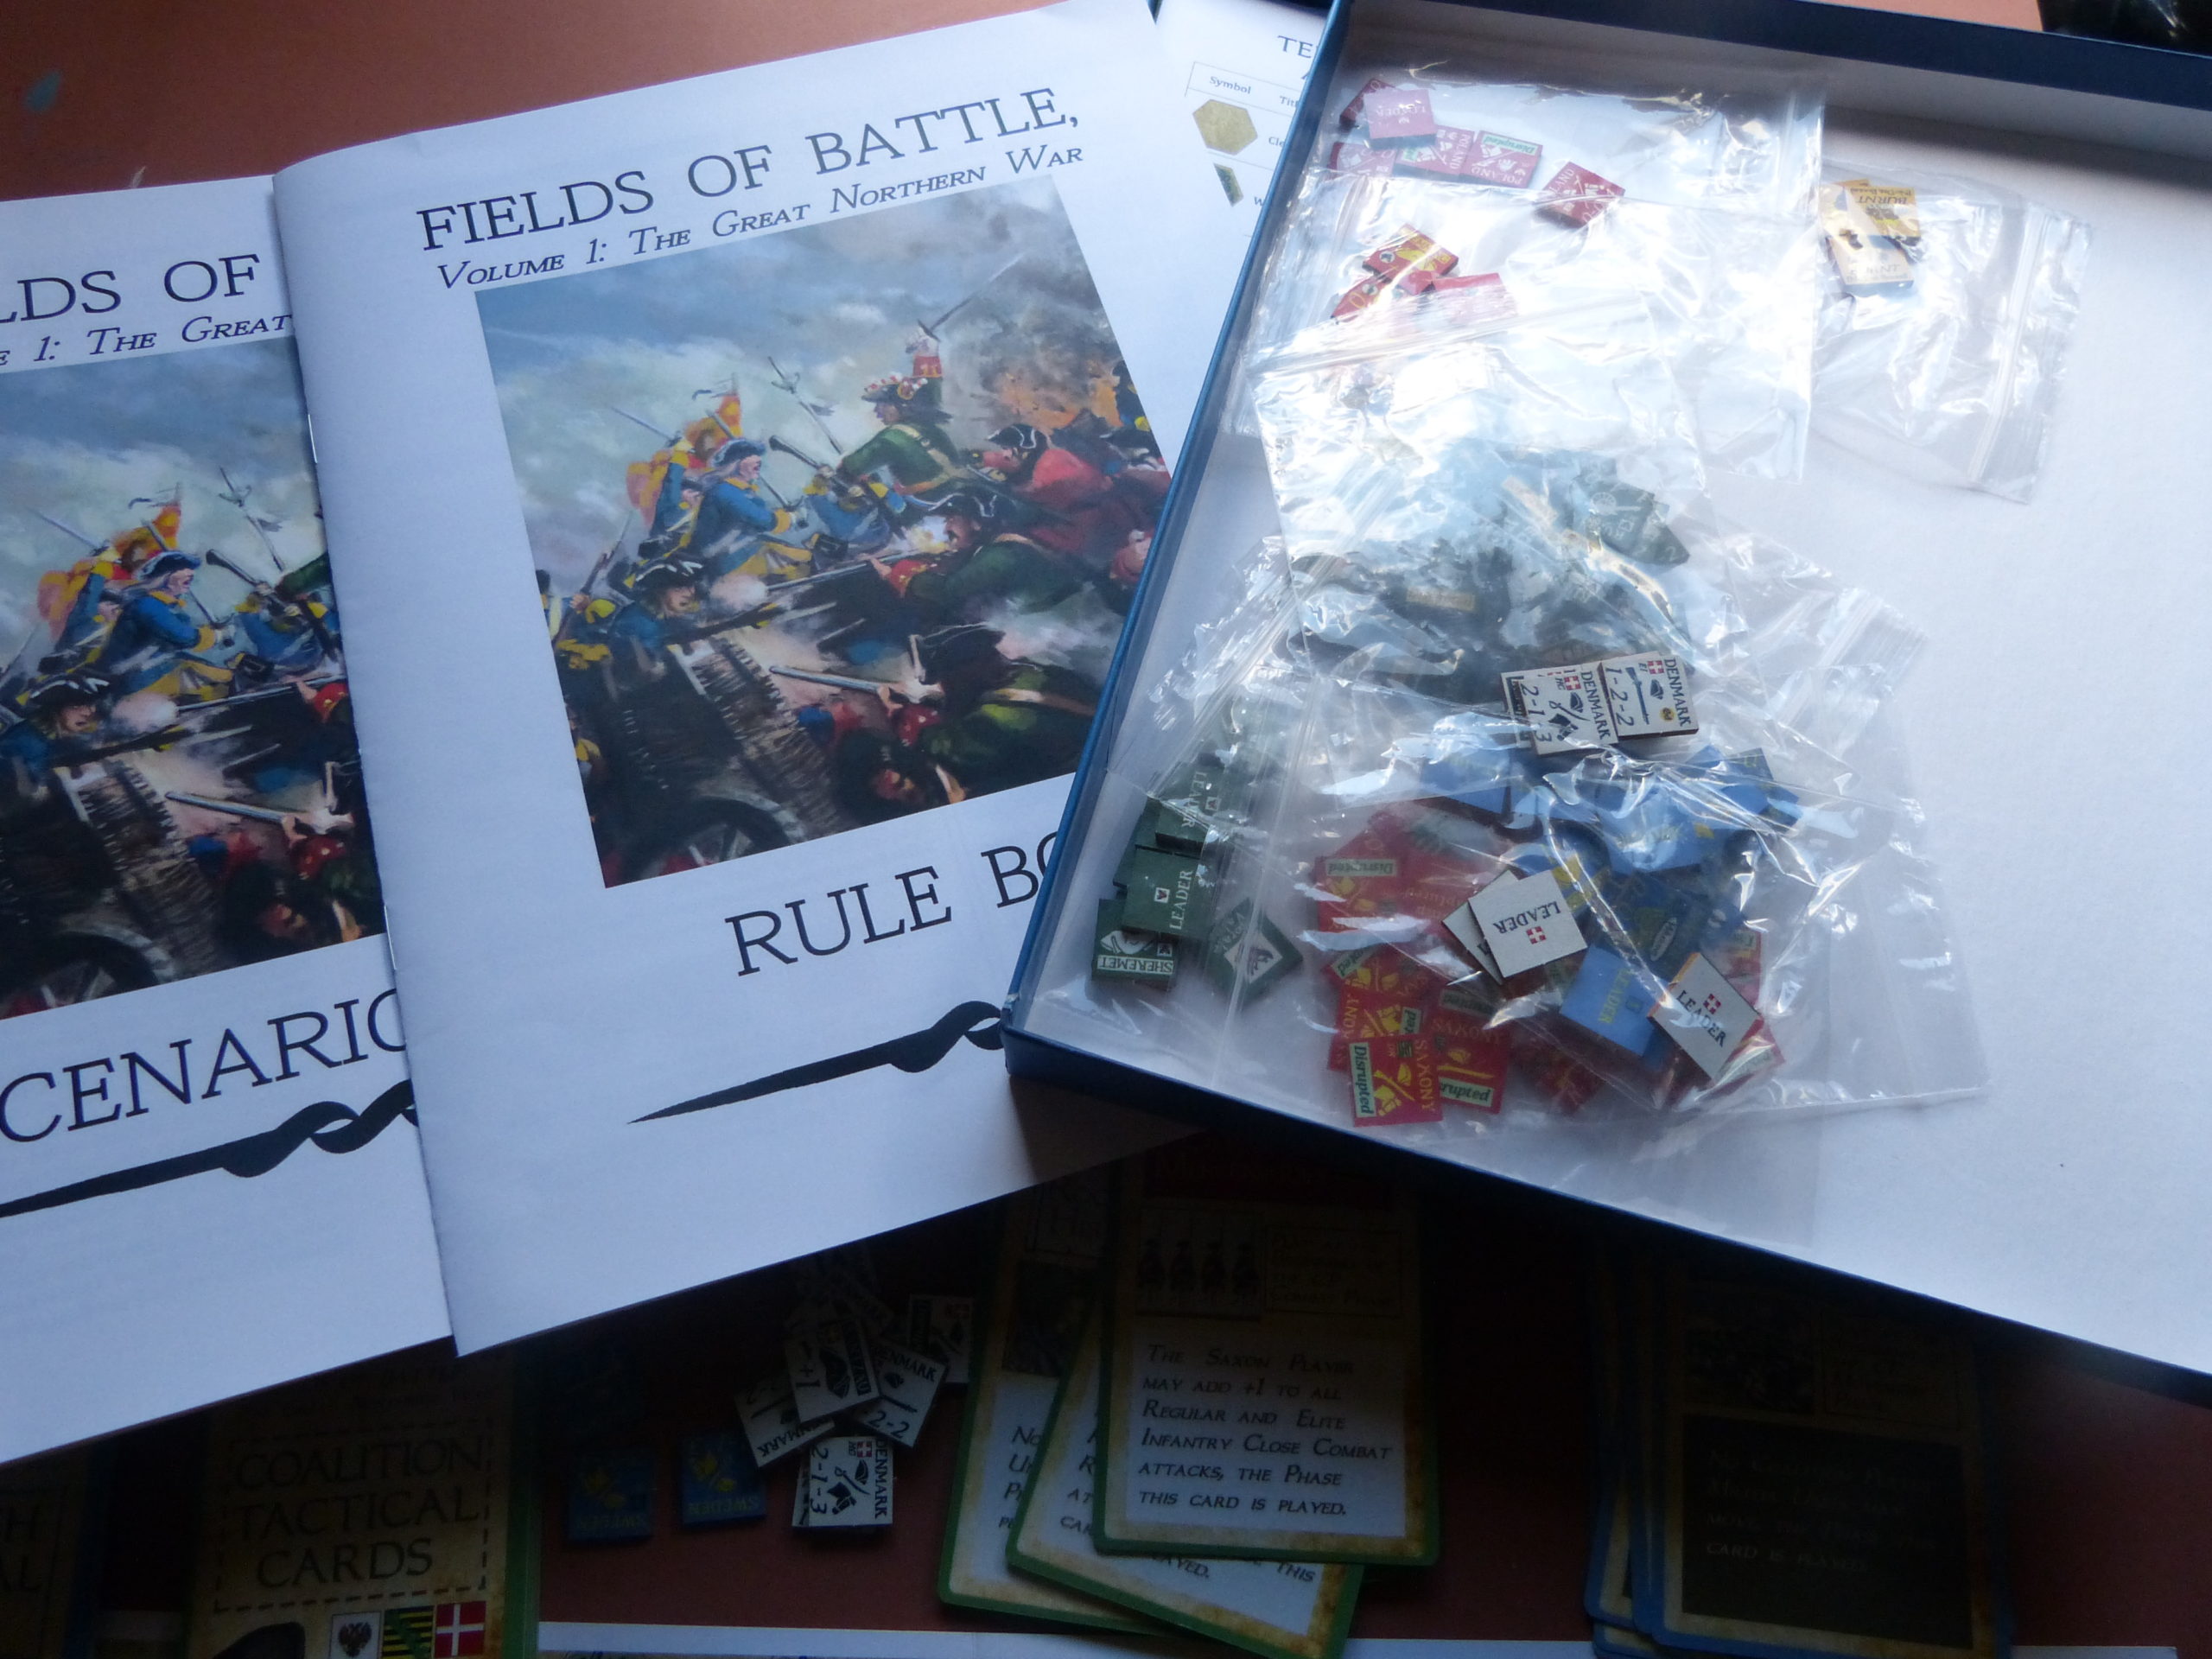
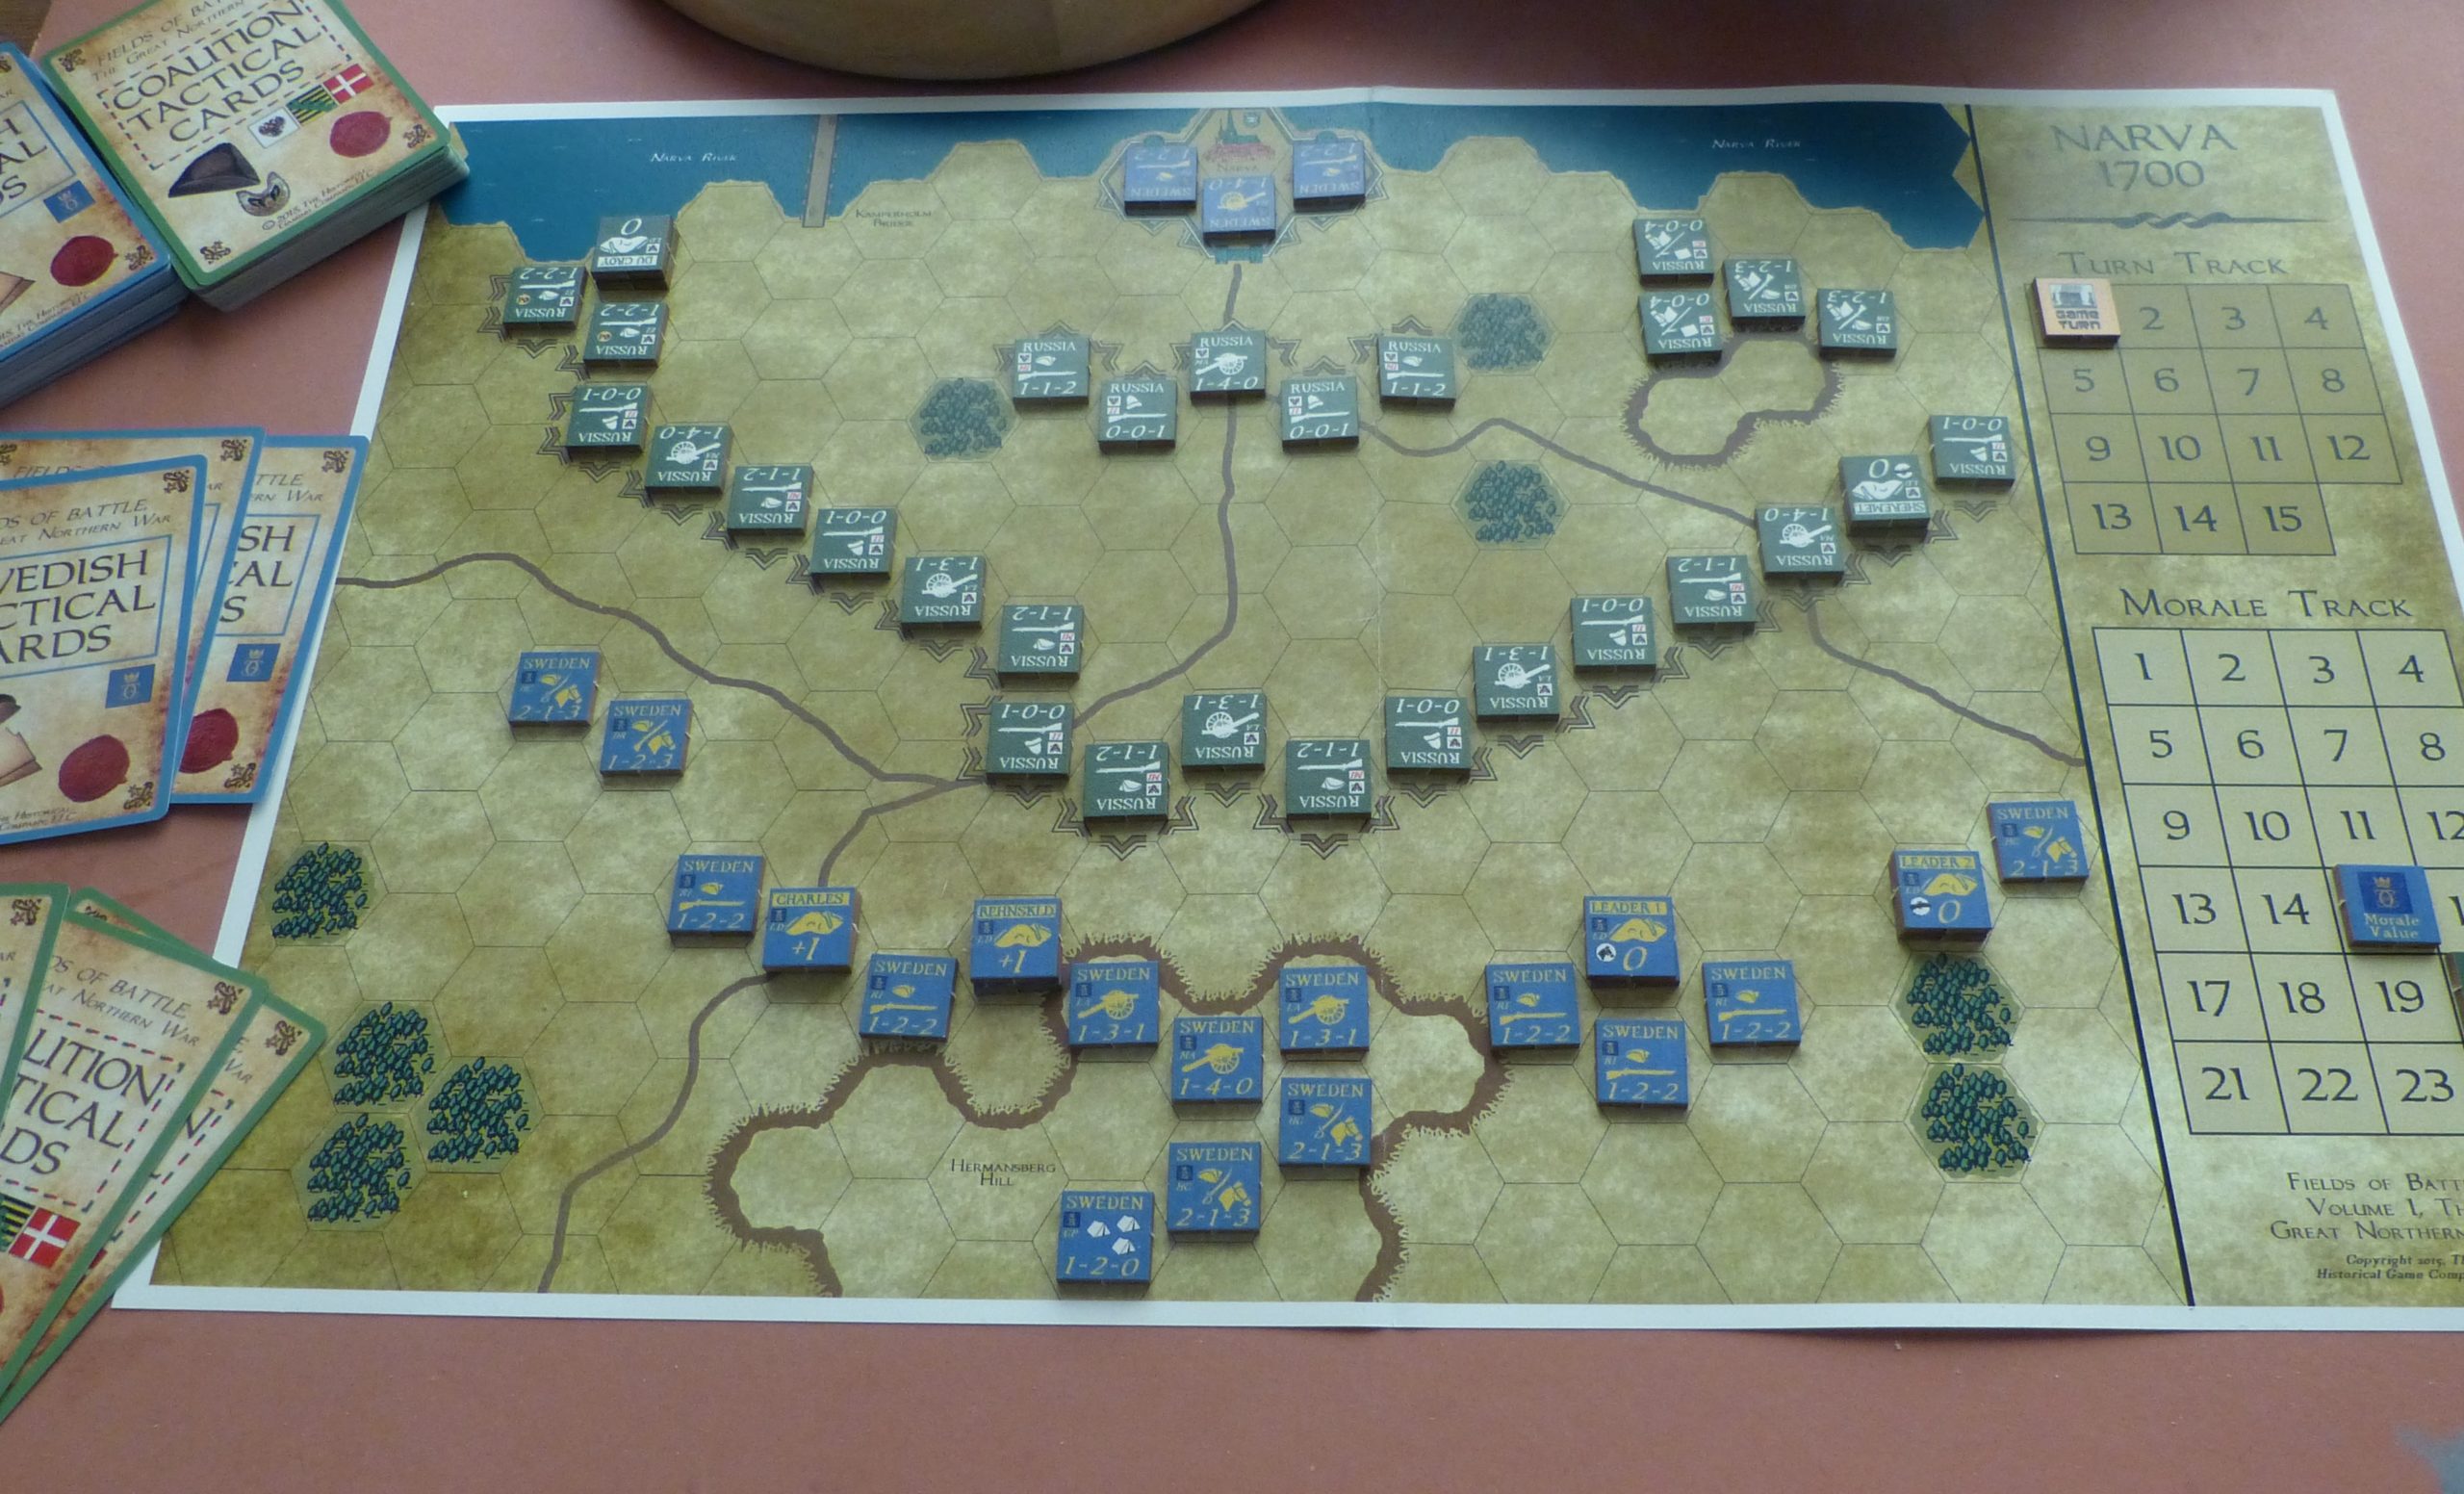
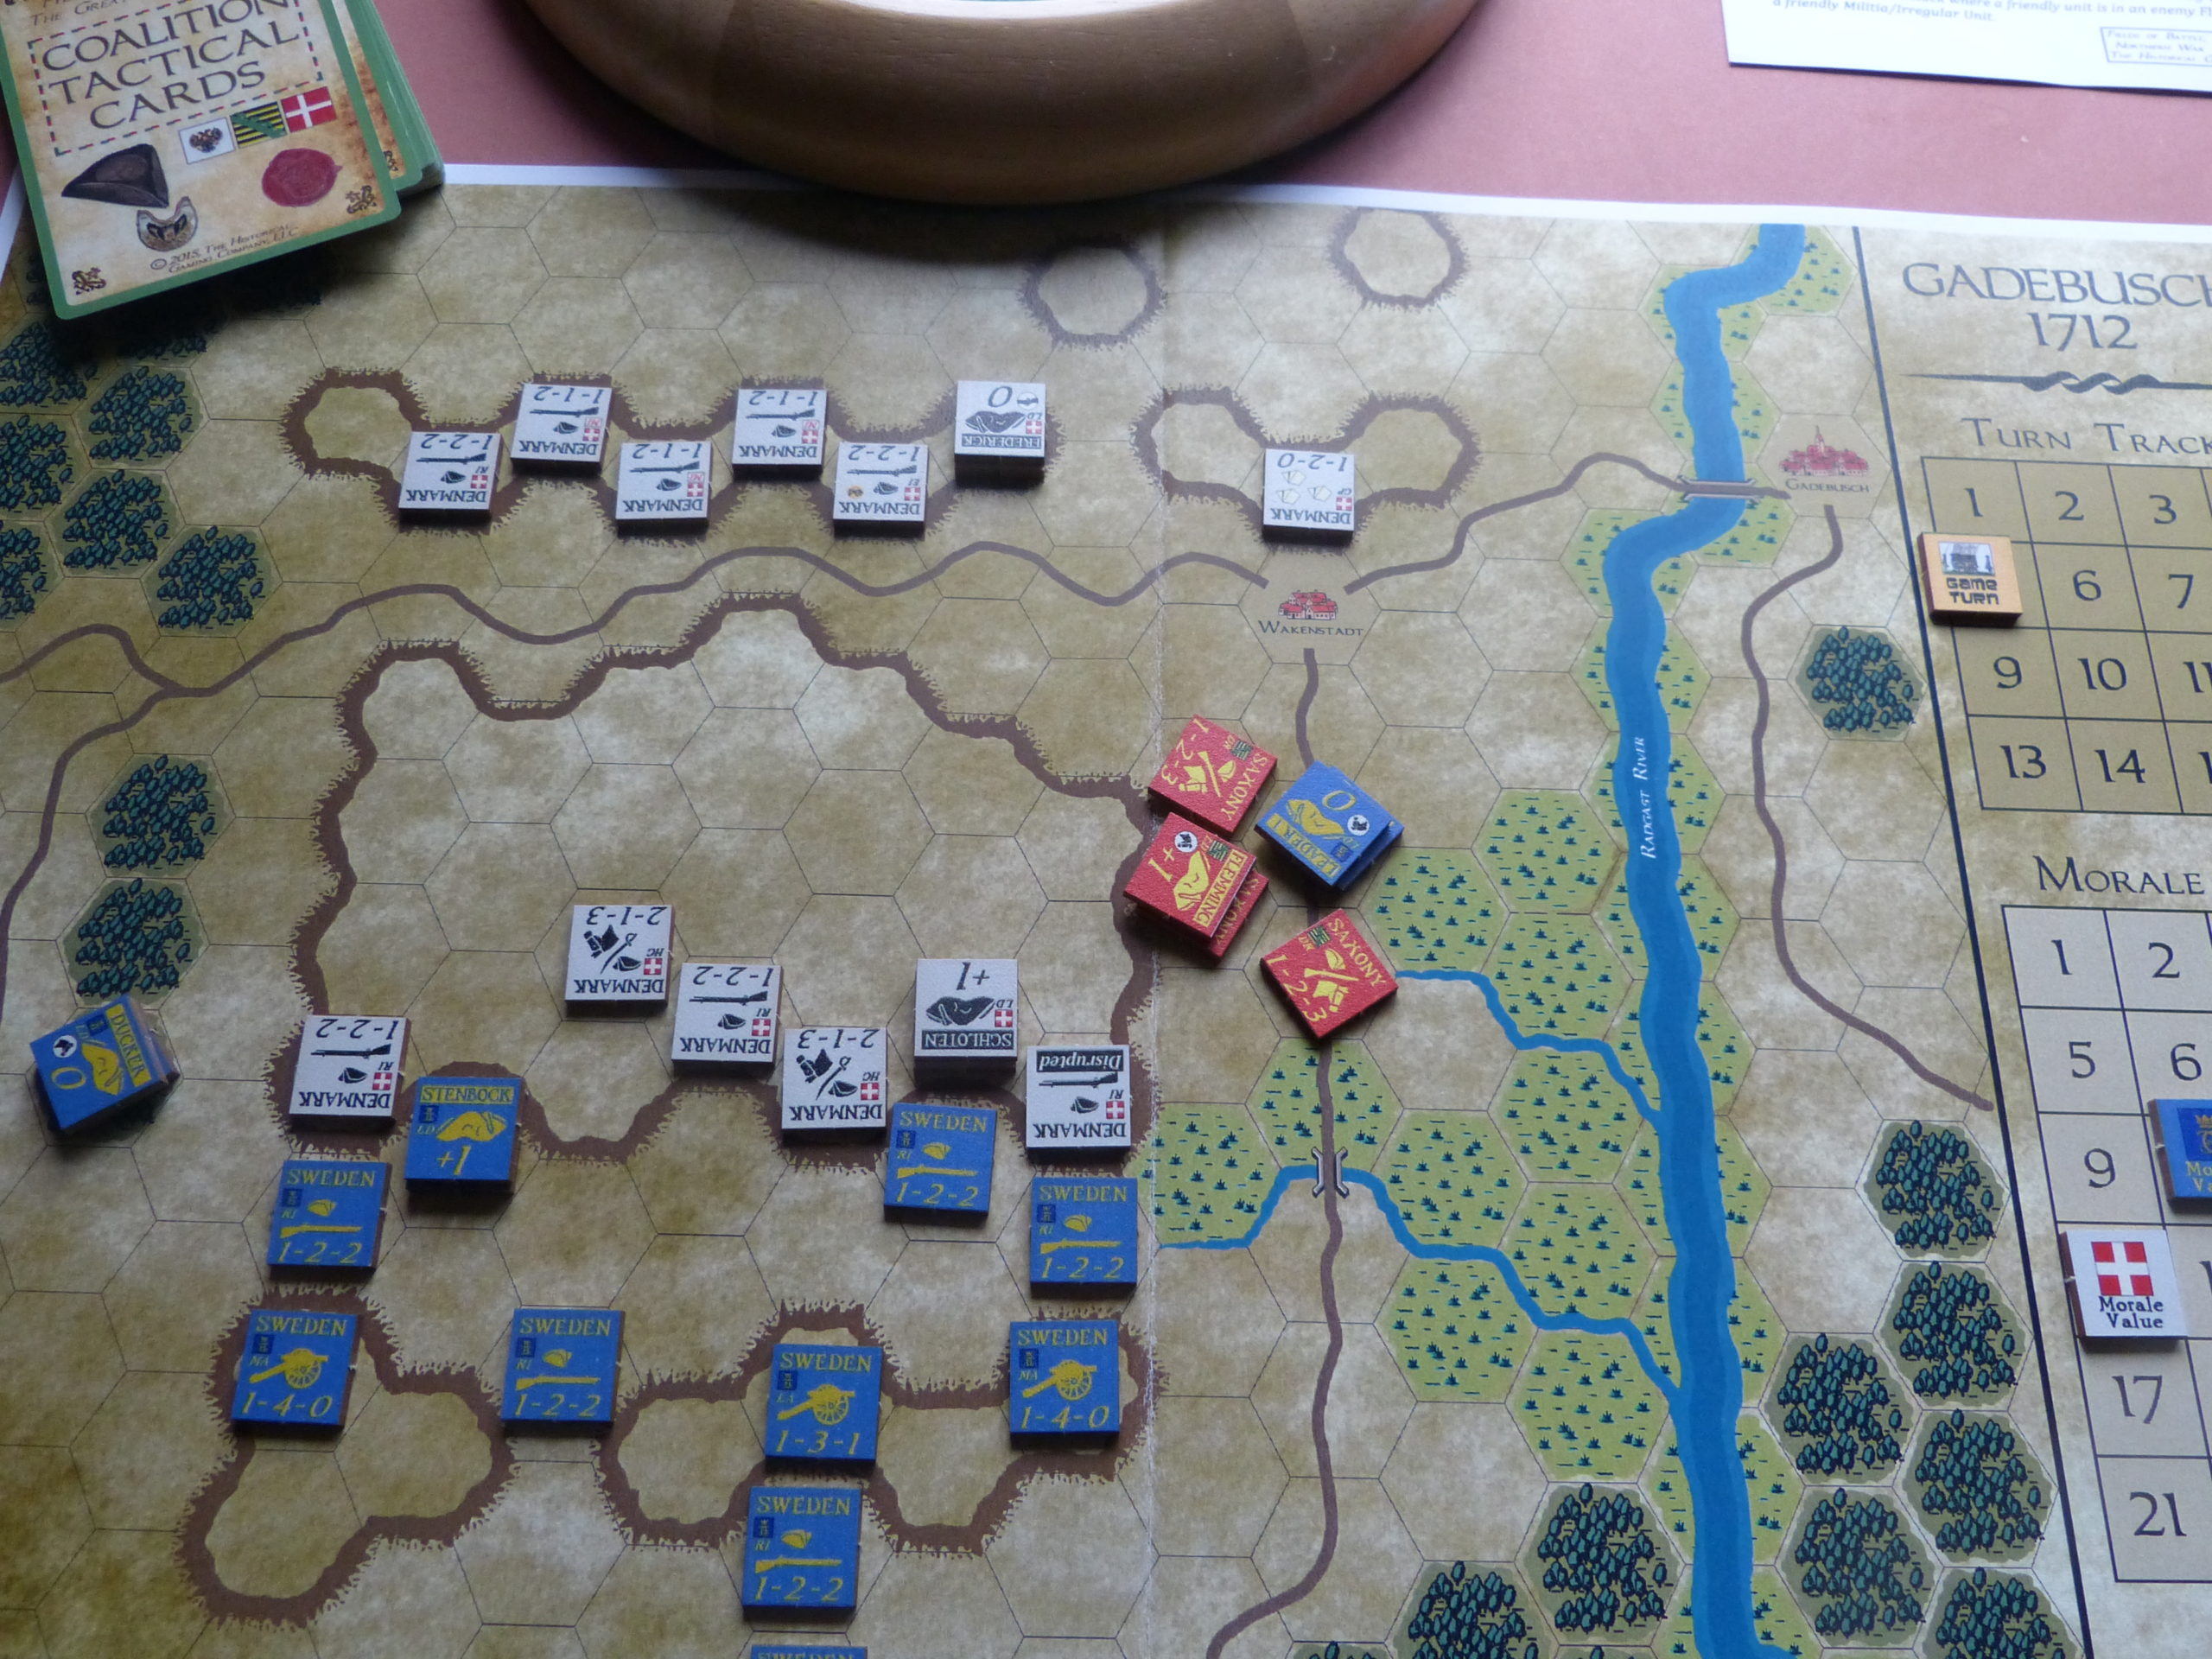
First, let us work through what is in the box. Each battle has its own map, which in all but the one for Poltava, also has morale and turn tracks – Poltava, needing that bit extra space, has its tracks on a separate sheet. All the maps are 11”x17” and have a style that is both clear and rather in keeping with the era. The units, like those for Battle of Quebec, are of that thick, “varnished/coated” variety probably associated most with Hollandspiele. In fact, the component quality here, including the rules and scenario booklets, is all very similar to Hollandspiele designs.
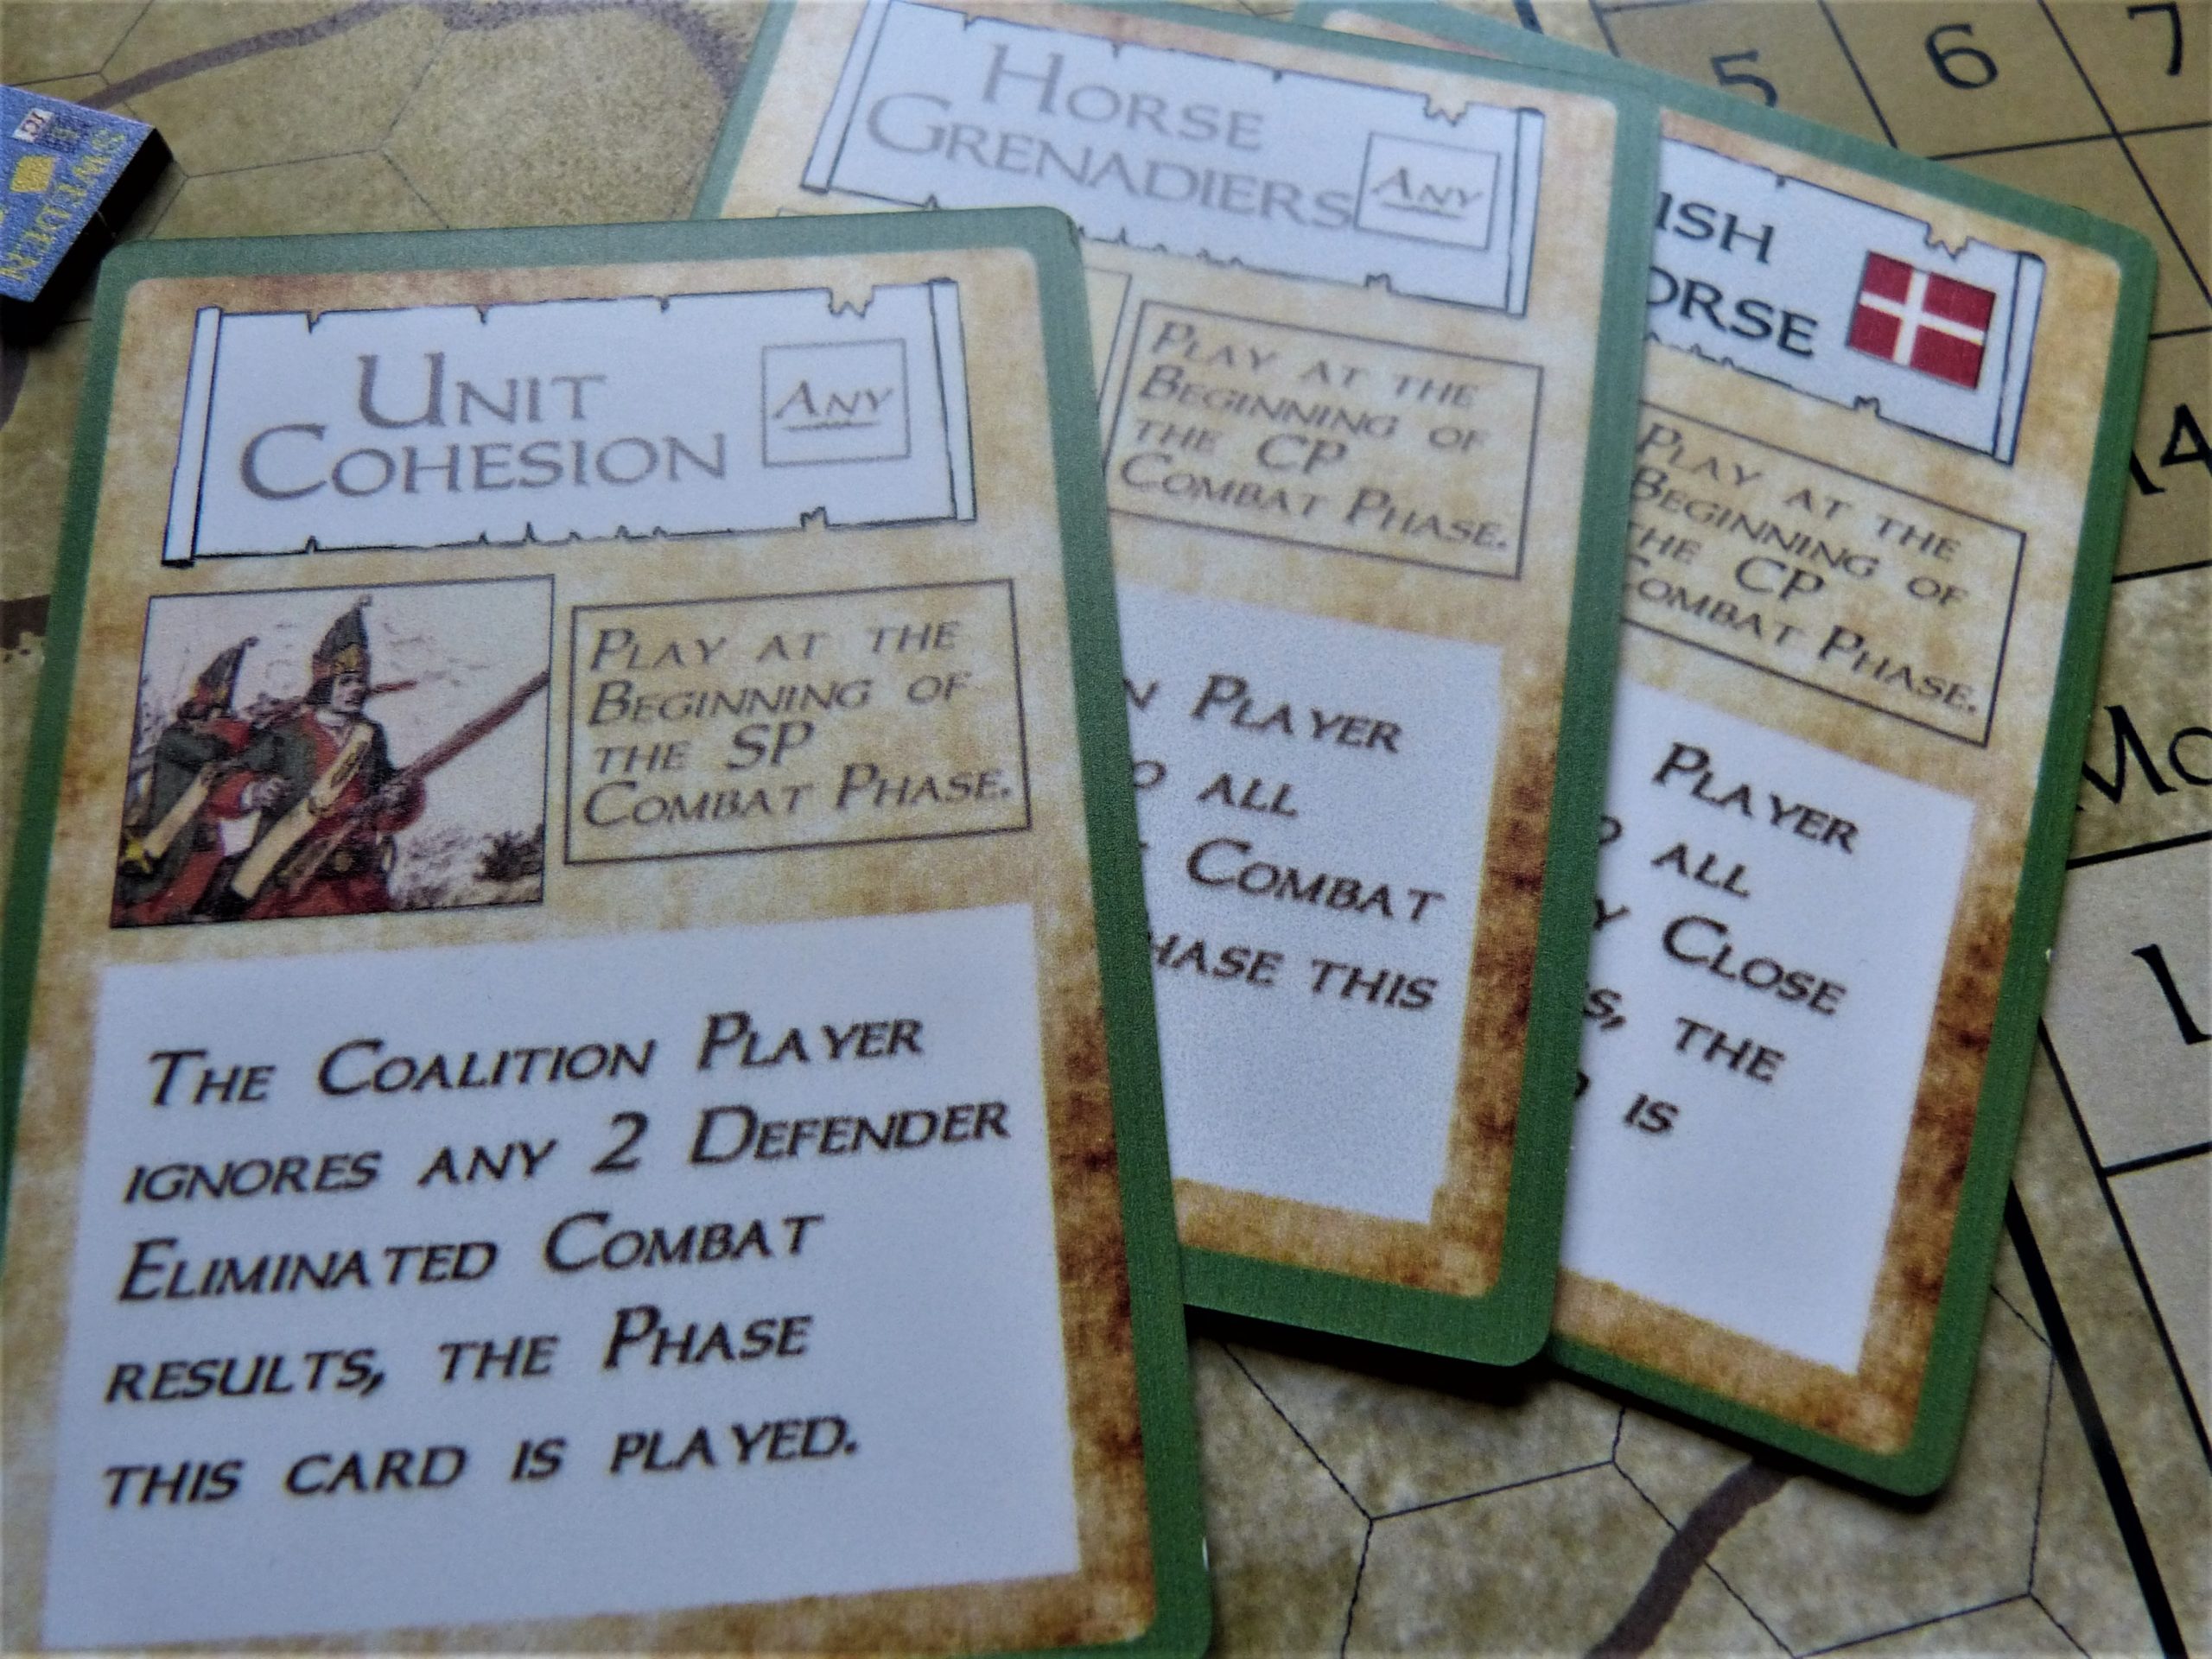
One extra and key addition is two decks of 27 cards apiece – one for the Swedes and the other to serve for whatever parts of the anti-Swedish coalition is taking to this or that field against them. These are well-presented items, with martial illustrations in keeping with the period, and are purposed to add more than a hint of how these armies conducted themselves in battles ranging from 1700 to 1712. Players can use cards at stipulated points in either their own or the opponent’s turn, and their effects range from being useful suppliers of modifiers in combat (such as the Swedish Ga-Pa card – a sort of early example of “they don’t like it up ‘em”) to adding manoeuvre abilities, to doing absolutely nothing at all. In the latter instance, the Coalition is deliberately plagued with cards that either only have a practicable use if the right nationality is on the map or are plain “duds” of no use to anyone other than the Swedes. This, as is stated in the game documentation, is meant to reflect the better overall tactical efficiency of the Swedes, although they do also have a small number of “duds,” and beyond that, not every potentially useful card is going to be in your hand at the apposite moment.
Overall, both decks are very well thought out, and not only add historical flavour as the Swedes go into a huddle of pikes or this or that contingent of cavalry gets its chance for glory, but also add a layer of battlefield chaos and uncertainty as both players have the ability to play cards in their opponent’s phases wrecking best-laid plans and stopping moves before they have even begun. Each card has a description of its historical context in the scenario documentation.
The cards are a massive part of the game, and the system itself is pretty liberal about hand management – players can easily use two or all three of the usual three-card hand during a turn. In fact, being able to discard or play cards at a fair rate is doubly important, as not only does it give you means to shape the battle with whatever you have, it is also key to chances of getting the sort of hand that can really do some damage.
But before discussing this further, we need to look at the armies you will fight with. Ranged against the Swedes are the Russians, Saxons, Danes, and Poles – the Poles only being present at Kliszow, and that with no great desire to hang around. The units represent different types or grades of infantry, cavalry, and artillery. There are also leaders of varying capacity, and the encampments of the armies – not a good idea to let your enemy loose on those!
Combat units are rated for the usual sort of things – combat strength/firepower, range, and movement ability. Some leaders offer a +1 to combat die rolls on the attack (if they are with the right type of unit – leaders being designated as cavalry or infantry specialist), but even those leaders with a “0” modifier are important just to get forces moving and making the rallying of disrupted units easier. Infantry, artillery, and dragoons can fire at range, while heavy cavalry and the infantry can also push forward into close combat. All of this uses exactly the same very simple combat system – roll 1d6 (two for heavy cavalry) and either achieve nothing or disrupt and possibly eliminate your target on rolls of 5 or 6. The big difference with close combat over ranged combat, apart from being mandatory, is that potentially, it brings an assortment of “melee” cards into play, to whatever effect, and also runs the risk of getting units stuck in zones of control if results produce nothing telling.
This aspect will have repercussions for both players but has an extra edge for the Swedes as the game modeling of the Ga-Pa doctrine. The Swedes, enamored at this point in their marital history with an ethos of holding fire until they were right on top of their enemy and then pressing forward at pace with anything sharp and pointy, are forbidden from firing anything other than their cannon at range, leaving their principal (just about only) combat option to move into close combat.
We can move here direct into an illustration of the sort of thinking gameplay will require. Although the Swedes, on balance, have the better cards, banging into the enemy on a one-on-one basis unless you have a flank you can curl around (bonuses for that) or have some very punchy cards that your enemy cannot counter (and there is no telling until it happens or not) the likelihood is that just knocking stuff together will put you in a situation you cannot control and plays to no apparent advantage. With everything “stuck,” a lucky extra card coming into your hand, or hanging onto that “boring” card that permits a limited withdrawal, could make a difference. Note, there are no adverse results to an attack in close combat other than getting stuck in place, but if you have misjudged the situation and the enemy can hit harder than you did, you might well end up wishing you had waited to form a better hand before plunging in.
Players might be a little surprised at the way some cards work with the system. Sticking with Ga-Pa, while it, within the overall game framework, forbids the Swedes from launching most any form of combat other than up close and personal, there is only one Ga-Pa card in the deck that confers the actual modifiers. This can be seen as simply highlighting one instance in a battle when there is a chance of this attack working incredibly well, but also, one suspects, putting a few more such cards in the mix, even just a couple, would have risked making the Swedes simply too strong for enjoyable gameplay.
As for the main body of the rules, very little these days come as simple as this – just a few little extras added to the framework to create a sense of linear battle and the importance of having leadership in the right place. Movement and combat mechanisms contain nothing that will surprise any gamer of experience, but sadly, just here and there, those very simple rules are simply missing something they should have clearly on view. To give an example, units can advance into a vacated hex after combat, but there is no mention as to whether they can then alter their facing. This is hardly a massive issue, and a whole range of games will offer cases of being able to adjust facing…or not. It is just a case of the rules needing that extra bit of tidying, especially as flank attacks can be devastating if you happen to be on the receiving end of one after gamely blundering forward.
Victory in battles is mainly a matter of bringing your opponent’s morale level down to zero – eliminated units usually deduct one from their army’s current level, while certain leaders can be worth rather more depending on their prominence – Charles of Sweden, for example, can strip his army of a third or more of their starting morale total should he fall. Taking particular locations or an enemy camp is often worth points (the camp especially), and in such cases, retaking the same locations (villages rather than camps, the latter being sacked and ruined if lost) will get the points back for the original owning side.
As you might expect in an eight battle set, the nature of the armies can vary a fair bit, as does the challenge facing the players. In those battles where one army can win simply by not losing (which is the Coalition stance in many of the engagements) a certain amount of passivity and playing for time may be in order. It is the Swedes who must often make the running, and there is an interesting pressure on them that consists of trying to get on with things while at the same time really needing a quality card or two in order to break an enemy rather than just giving him a push.
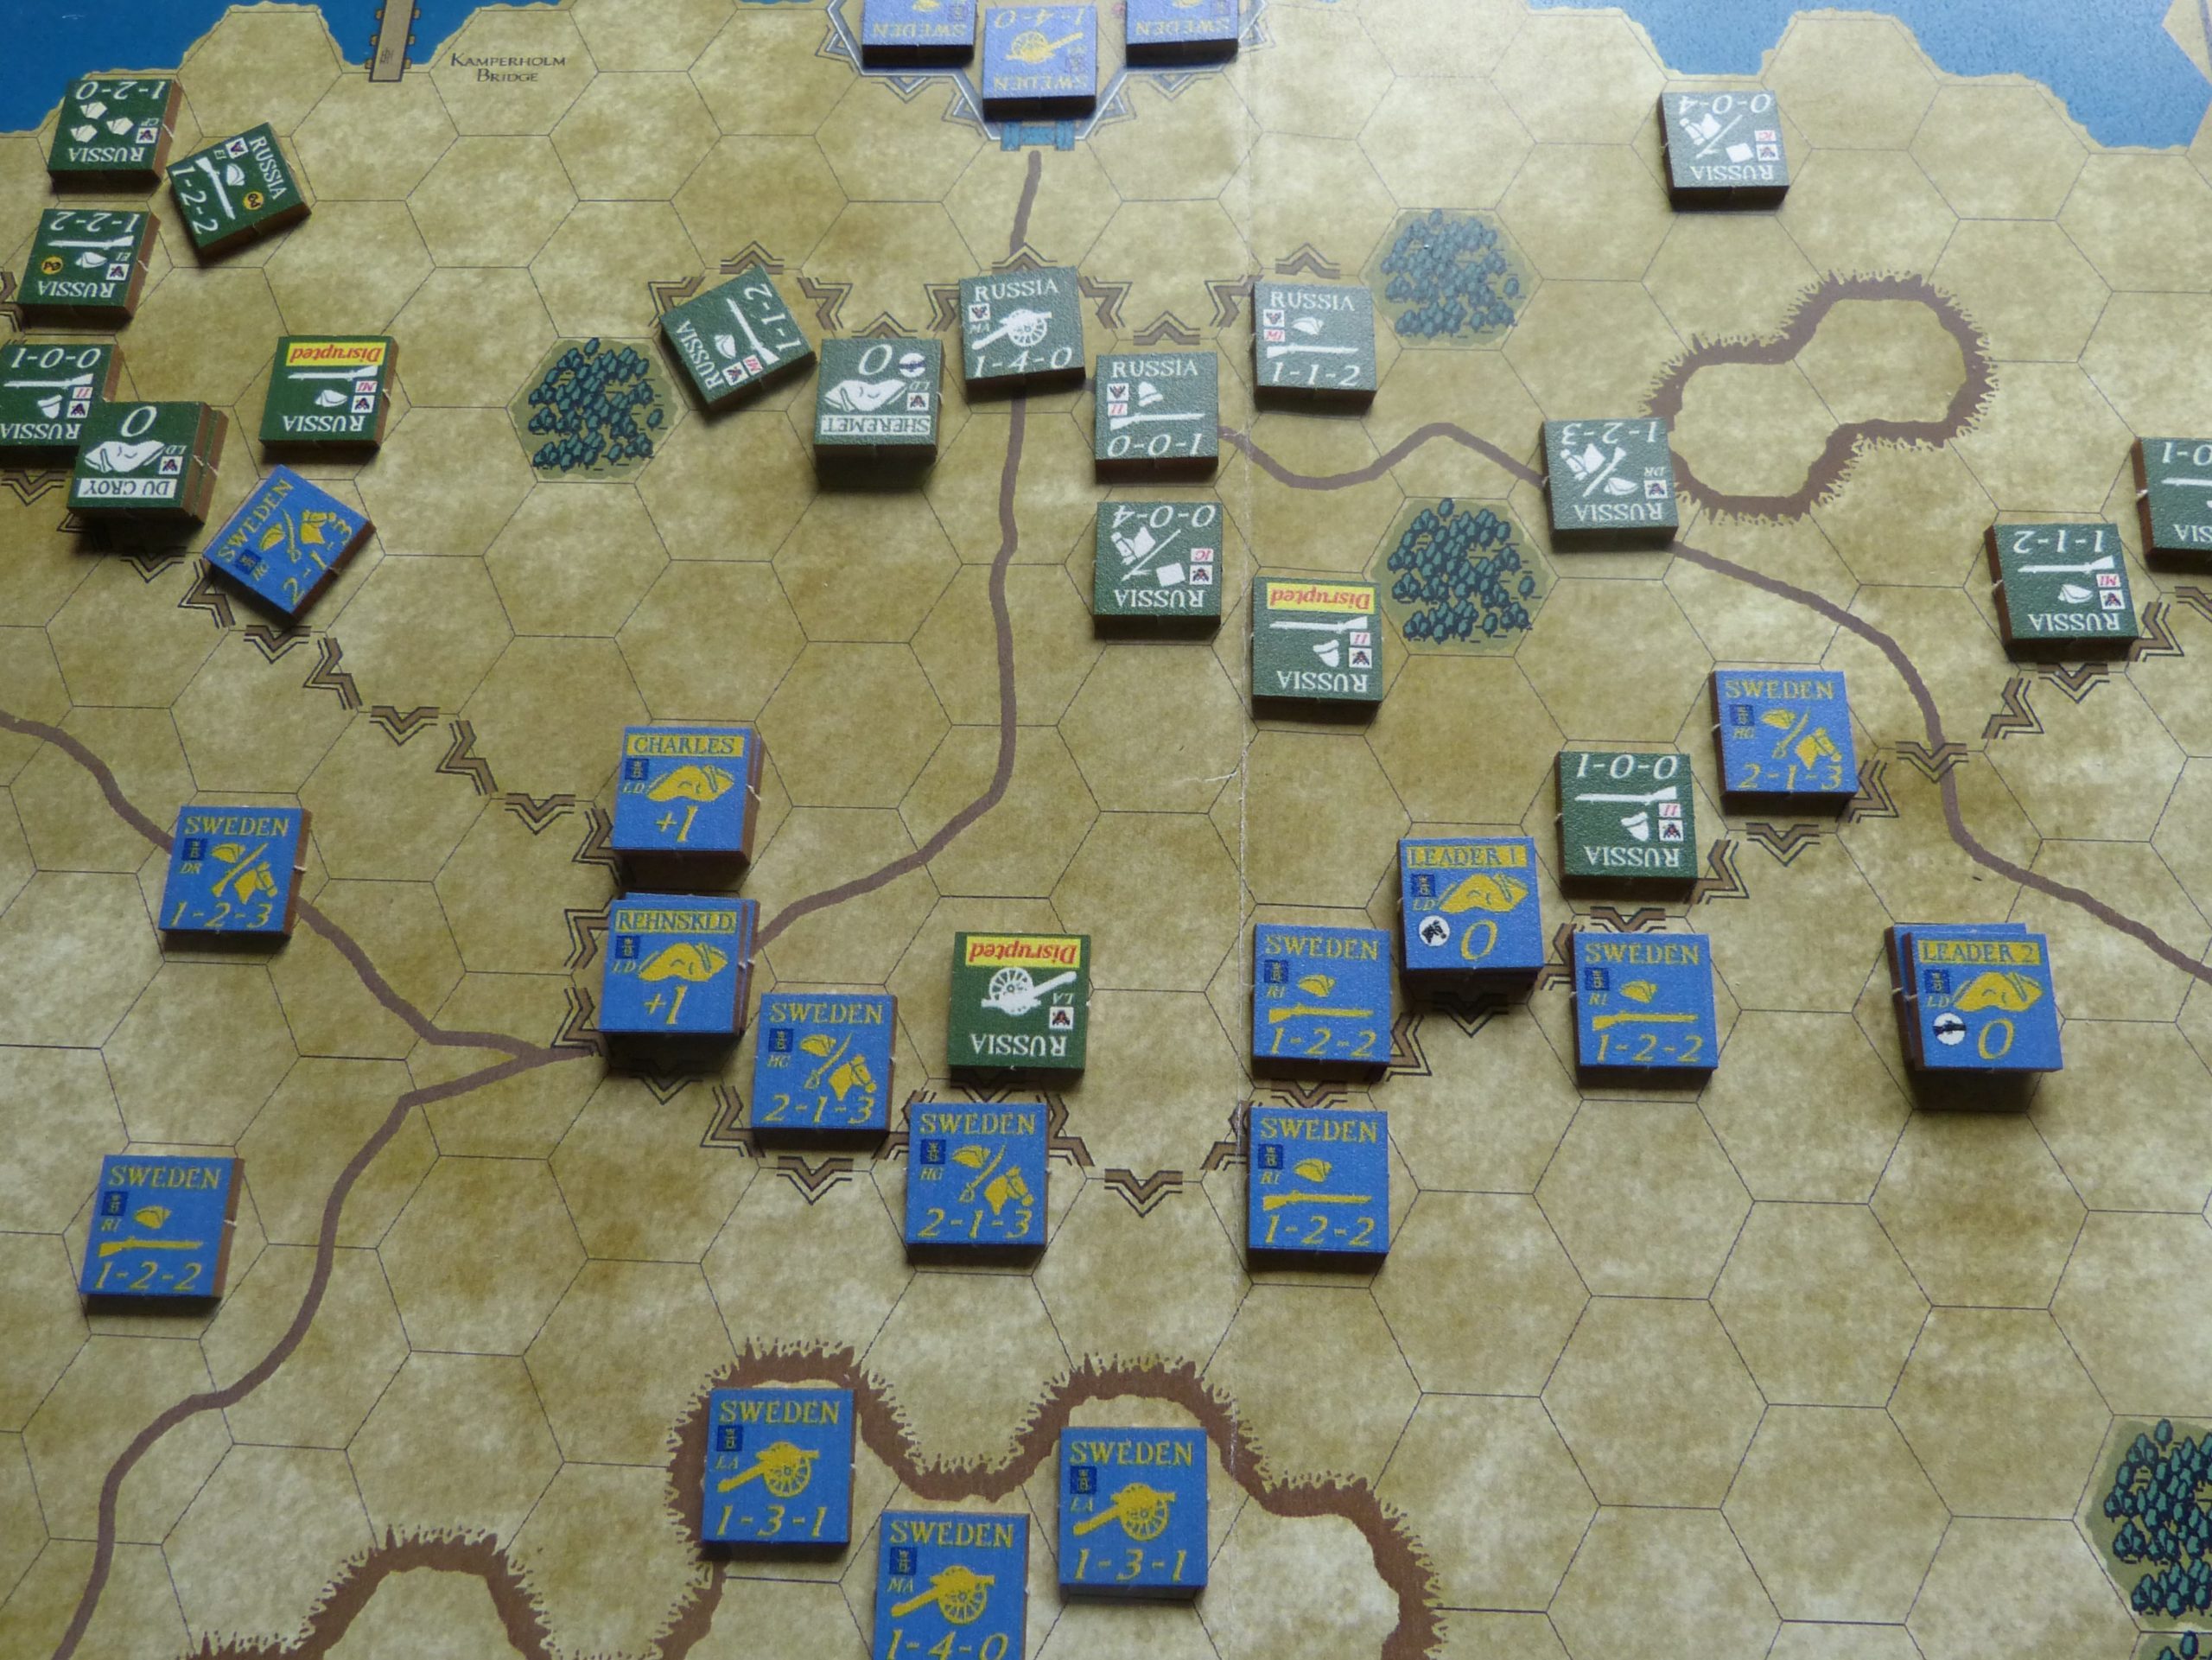
Probably the most extreme example of this comes in the shape of the first battle in the box – Narva. To explain the historical situation, a small Swedish garrison is holding the city of Narva, which is located some way to the west of St. Petersburg (that is not actually in existence at this point but does serve as a geographical reference). The Russians have positions facing the city as well as manning a substantial “fortified” perimeter to fend off the Swedish relief force. Tsar Peter was not present at the ensuing battle, which was probably just as well as this Russian host is possibly the worst army I have ever seen in any credible wargame. Hastily cobbled together, it contains a large number of units that are literally nothing more than space occupiers that the Swedes must dispose of in order to get their score on the move. Many of these Russian units make the Opolchenie of Borodino look like Napoleon’s Imperial Guard. In case you think I am exaggerating, these are units with no combat ability at all unless, just possibly, a card makes them temporally a fraction more than totally useless. But while they exist, and maybe later in the game, clear off the map via the bridge a little outside of the city (good for Russian victory determination as they try to cut their losses), the Swedes are not actually ahead.
I must admit that I was hesitant to describe this army in such terms, and so before settling on my opinion, I paid a visit to BGG to check out another design with a Narva scenario – A Thunder Upon The Land (an Against the Odds magazine game). Much to my relief, gamer’s reports there spoke of easily smashing through the Russian lines, accompanied by photos of the smashing in process. In the version under review here, the Russians are also not helped by being precluded from using ranged fire, what with there being a blizzard blowing straight at those manning the outer perimeter.
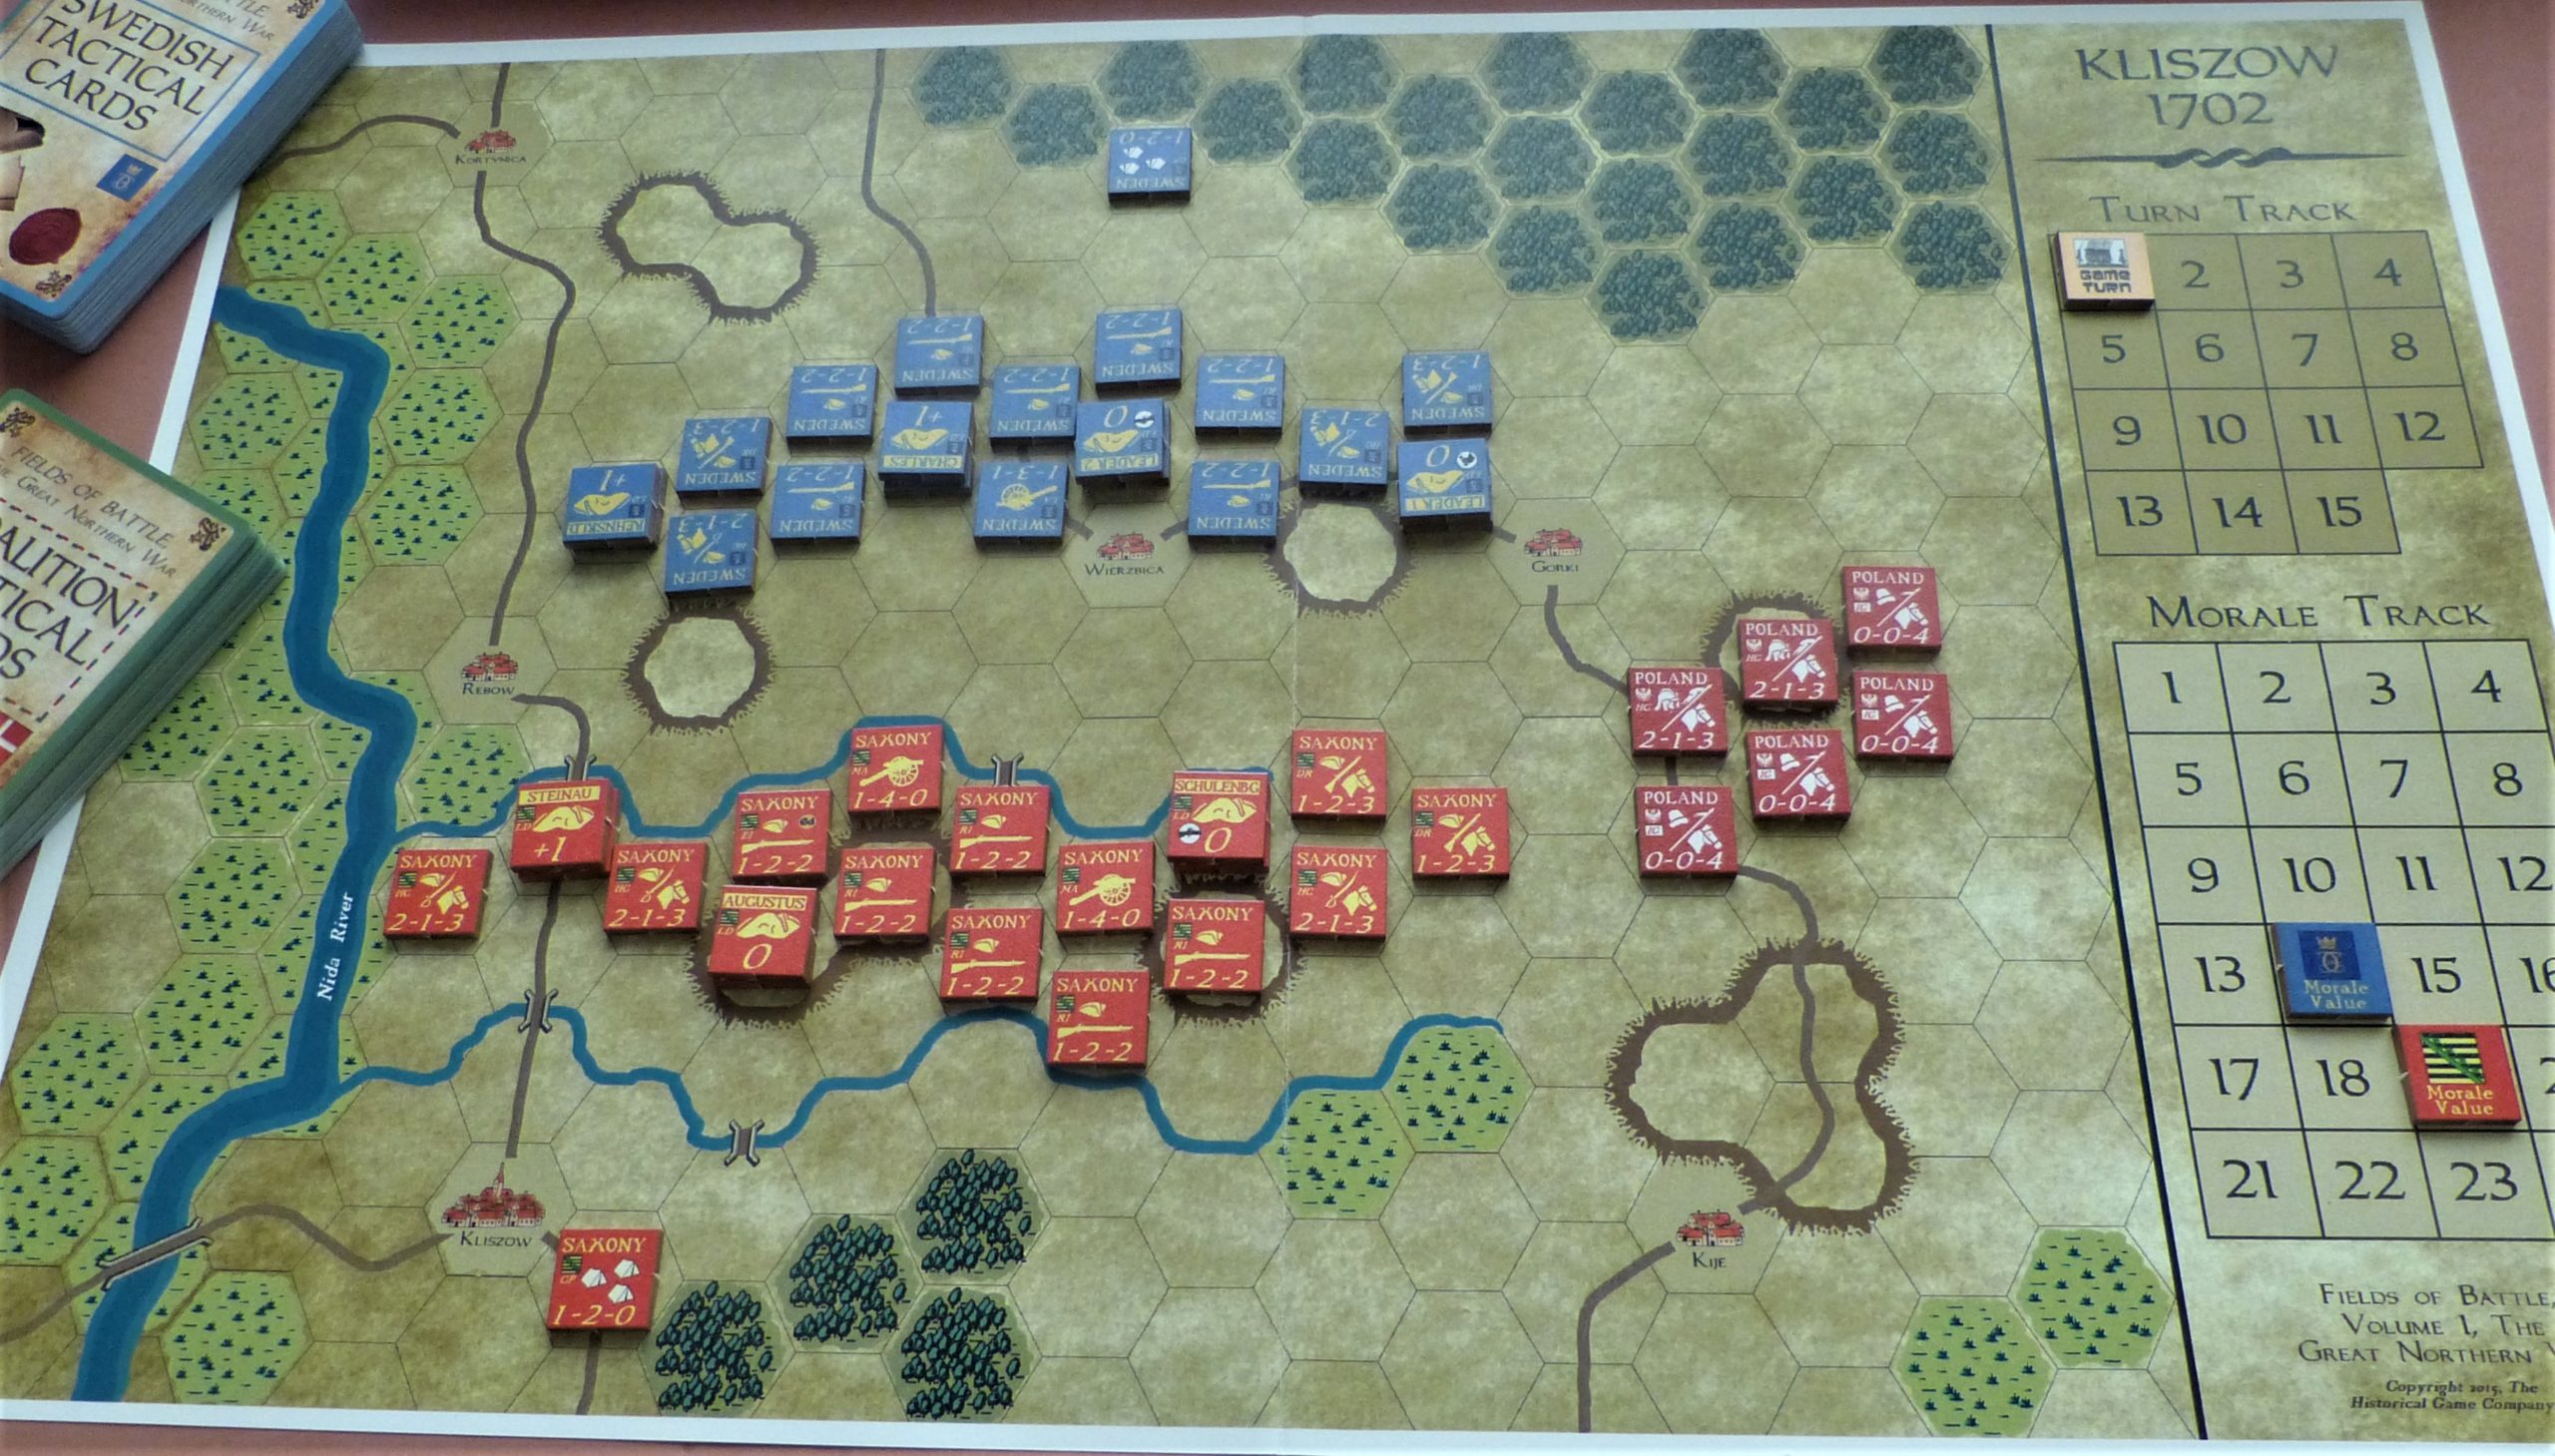
All the battles have a bit of nuance included in the individual scenario package, and that certainly applies in a different way to a rather different battle – Kliszow. On the face of it, the armies here, a predominantly Saxon host against the Swedes, are rather evenly matched. But then the Saxons are partnered by a Polish contingent of perfectly good units – save that they give the strong impression of wanting to be somewhere else. Last Vikings made it difficult to get anything from the Poles in this battle; here, they cannot move to begin with, and if they take as much as one loss, they all clear off, causing a nasty drop in the Coalition morale level. That probably makes the Swedes’ opening moves look pretty obvious, but from then on things can get tricky. The Saxons are defending behind a stream with their left flank further protected by boggy ground. They are also in that fortuitous position of winning if they do not lose by game end. In other words, there is no massive need for them to take the initiative. The likely disappearance of the Poles will have an effect (they can be retained on the field via an optional rule) but the Swedes are going to have to handle this one carefully and not commit along a broader front unless/until they have the cards to press attacks home with.
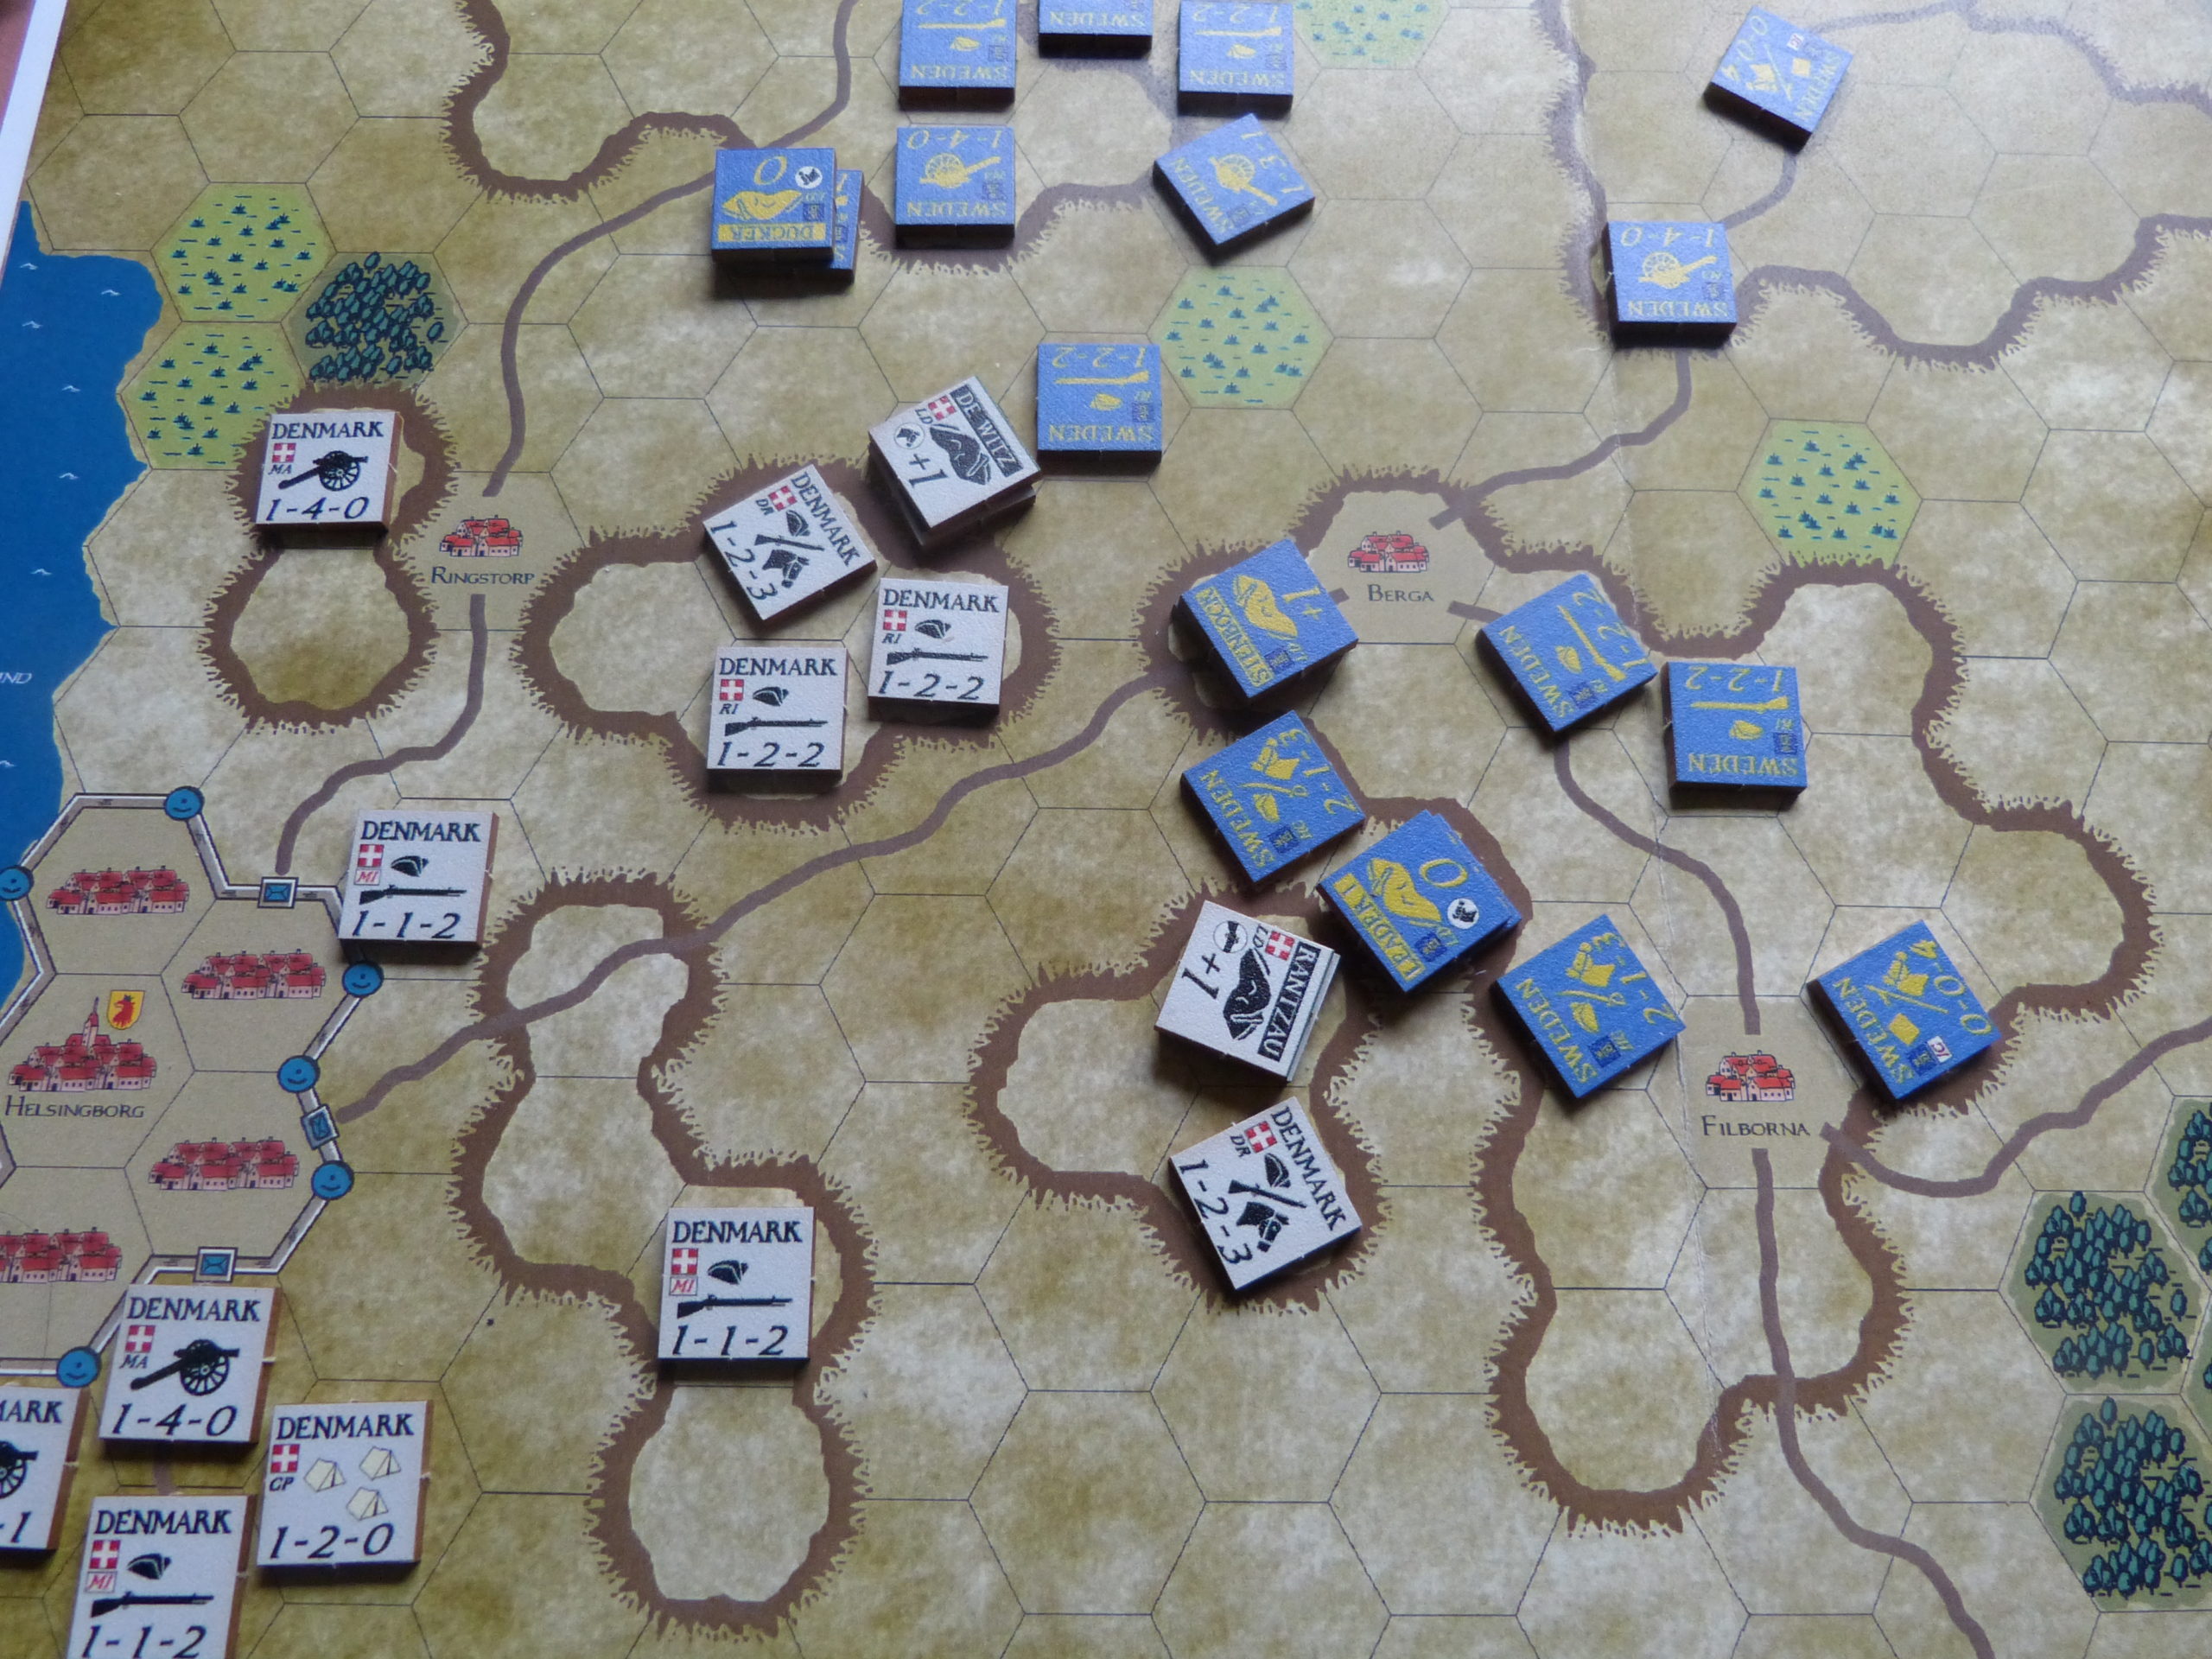
Moving on a few years and past some other battles in the design, my next play was of Helsingborg. This contest between the Danes and the Swedes is another study in contrasts as far as quality is concerned (a lot of militia on the Danish side) as well as some commanders having a very odd idea as to where to deploy their troops. Not for the first or last time, Sweden’s enemies have left one flank hanging in the air, and have several formations so far behind the line and away from any leaders their chance of getting into the fray might well depend on the fray coming to them. Nevertheless, a combination of fortuitous die rolls and cards meant the Danes did rather well in the early stages, but then collapsed like a soggy pastry later on. And just to illustrate how fate and the cards can muck around with each other, the Danish guards, about to be bolstered by the “Guard Tenacity” card for close combat purposes, was blown off the map by a totally speculative attack before the relevant friendly combat phase came into effect.
The same sense of the twists of fate played out with my recreation of Gadebusch. Historically, this was the last notable Swedish victory in the war – mine did not go historically. Luring the Saxon cavalry off their handy hill via the Swedes’ “Impetuosity” card did not work out as planned. Instead, the Saxons did their Danish allies a big favour by knocking the Swedish right flank cavalry to pieces. And then, just to darken the day even more from the Swedish point of view, the Danes got their “Heavy Horse” card, which then added to the pile of Swedish casualties and made the rest of the battle a bit of a foregone conclusion.
And there is a point that needs to be made. Having victory decided by a drop to zero morale or simply clinging on until the end is not a bad premise, but I did find on some occasions that the battle was essentially decided in common sense terms while the system dictated that more points had to be lost and more turns played. I suspect many players will know when to call a result, as otherwise, you might end up with situations of a few battered bits and pieces banging around the map to no real purpose and no great entertainment value.
One other small criticism I feel I should make concerns the way, in the old style of things, the hex grain rather decides who to gang up on for close combat. I think we all know that situation – three attacking hexes in front of one defending hex…some unit among the three is likely to strike a blow. Units in a ZoC are obliged to Close Combat attack, but there is no real stipulation as to what that attack should be aimed at, apart from the attacker having its target in a frontal hex.
Personally, I was not too bothered by this, as, after all, this is still meant to be a light wargame with easy rules and not the last word on the martial evolutions of the period. There is plenty of scope for house rules, and in fact, some might be necessary in order to deal with those vague occasions in the written rules – some of the cards, such as the aforementioned “Impetuosity” event could have done with some more explanation, and I know players balked at the inference in the rules that less mobile infantry could not puff their way up to the top of this or that hill.
But first and foremost, this is a design of merit. One only need look at the comments on the company’s Consimworld page to see how much players have enjoyed this unpretentious design. The only thing that might speak against this being an ideal introductory game is the relatively obscure nature of its subject matter – no Caesar or Napoleon or Panzers…but you do get a Saxon Augustus, pitting his zero rating against the best the Swedes have to offer. On the other hand, you can hardly beat attractive components, short rules, and some easy to handle chunky counters to help the novice/younger player get into the way of things. There is also a two-volume set of essays on diverse aspects of The Great Northern War. Those who own the set speak highly of the content, but it is a seriously expensive work and I suspect you would need to be totally passionate about the era in order to pursue a purchase.
Whatever its small flaws are perceived to be, this is one of the best “simple” wargames I have encountered in some time. Eight battles in the box…you cannot argue with that.
Paul Comben
Game Resources:

Fields of Battle: BGG Page
Fields of Battle Home Page


Nice review. How would you compare the game to Hollandspiele’s Horse and Musket?
First, apologies for a bit of a delay before replying to you.
I haven’t played Horse and Musket so must limit this response somewhat. In essence, Fields of Glory is a well-conceived design, but until/unless there are some companion volumes, it cannot match the scope and ambition of Horse and Musket. Nevertheless, Fields of Glory has a very small footprint and will play very quickly. Beyond those factors, choice will boil down to personal preference.