


Mark Herman’s Novel Way with a “Novice” Game
By Paul Comben:
 When it comes to reviews, I often like to look for interesting and different perspectives as a means of finding my way into the workings of a game. This is the sort of thing that can provide an article with “bite” – not in any aggressive or cynical way, but as a means of engaging the reader immediately with something that is distinctive and vital about the design in question. In this instance, I found the “bite” in one word used by Mark Herman in his own design notes – that this project was about creating a “novice” game.
This resonates with me for a couple of reasons. Firstly, my earliest true wargame was the Avalon Hill 1964 Gettysburg, bought and loved and enthused about when I was a mere lad of twelve. Secondly, I have owned numerous Gettysburg games over the ensuing decades, at least some of which contained or were entirely meant to be introductory/novice systems. But this is where we need to be careful, because I for one see a clear distinction between some definitions of what “introductory” and what counts as “novice,” especially when it comes to relating Mark Herman’s design to models that have preceded it. The 1964 Gettysburg was not purposed, I think, to be an introductory game when it first appeared. It served that function simply because at that time, and for some years after, you could play this uncomplicated game and have the essence of much else that was around – Waterloo, Afrika Korps, D Day, Stalingrad. But as the hobby evolved, the notion of any one game acting as an introduction to how the hobby’s output largely worked steadily diminished. Between the growing levels of complexity and sophistication, the occasional slips and failures, and the sheer diversity of systems that were appearing, the most a game could do was introduce you to whatever else was around of the same ilk – irrespective of how simple or complex that happened to be.
And sometimes things just went plain wrong. Gettysburg ’77 had a basic game that was disappointing in the extreme. To be blunt, I would far rather play the ’64 version than that offering. The 1988 Gettysburg from Avalon Hill was better, and possibly was an exercise in correcting everything that was missing from the ’64 version. But whether this made it a useful introductory game is debatable given that there was precious little else it could be connected to. And this is just my way of saying that I suspect the days of the “introductory” game, a game that opens the door to so much else, are well and truly over.
So, what about this new, novice-friendly, highly innovative Gettysburg? To come straight to the point, if you consider “novice” as implying a want of sophistication, best remind yourself that you simply are not going to get some insipid title from a designer of Mark Herman’s status. Envelopes get widened, approaches get redefined, and new models with new mechanisms spring into life. This Gettysburg has a pretty short set of rules, but they contain challenging concepts that both the novice and grognard are going to have to think hard about. Without getting too overblown in comparisons, there is present a chess-like character to the nature of things here – easy to learn the moves but moving the right thing at the right time to the right place is another matter entirely.
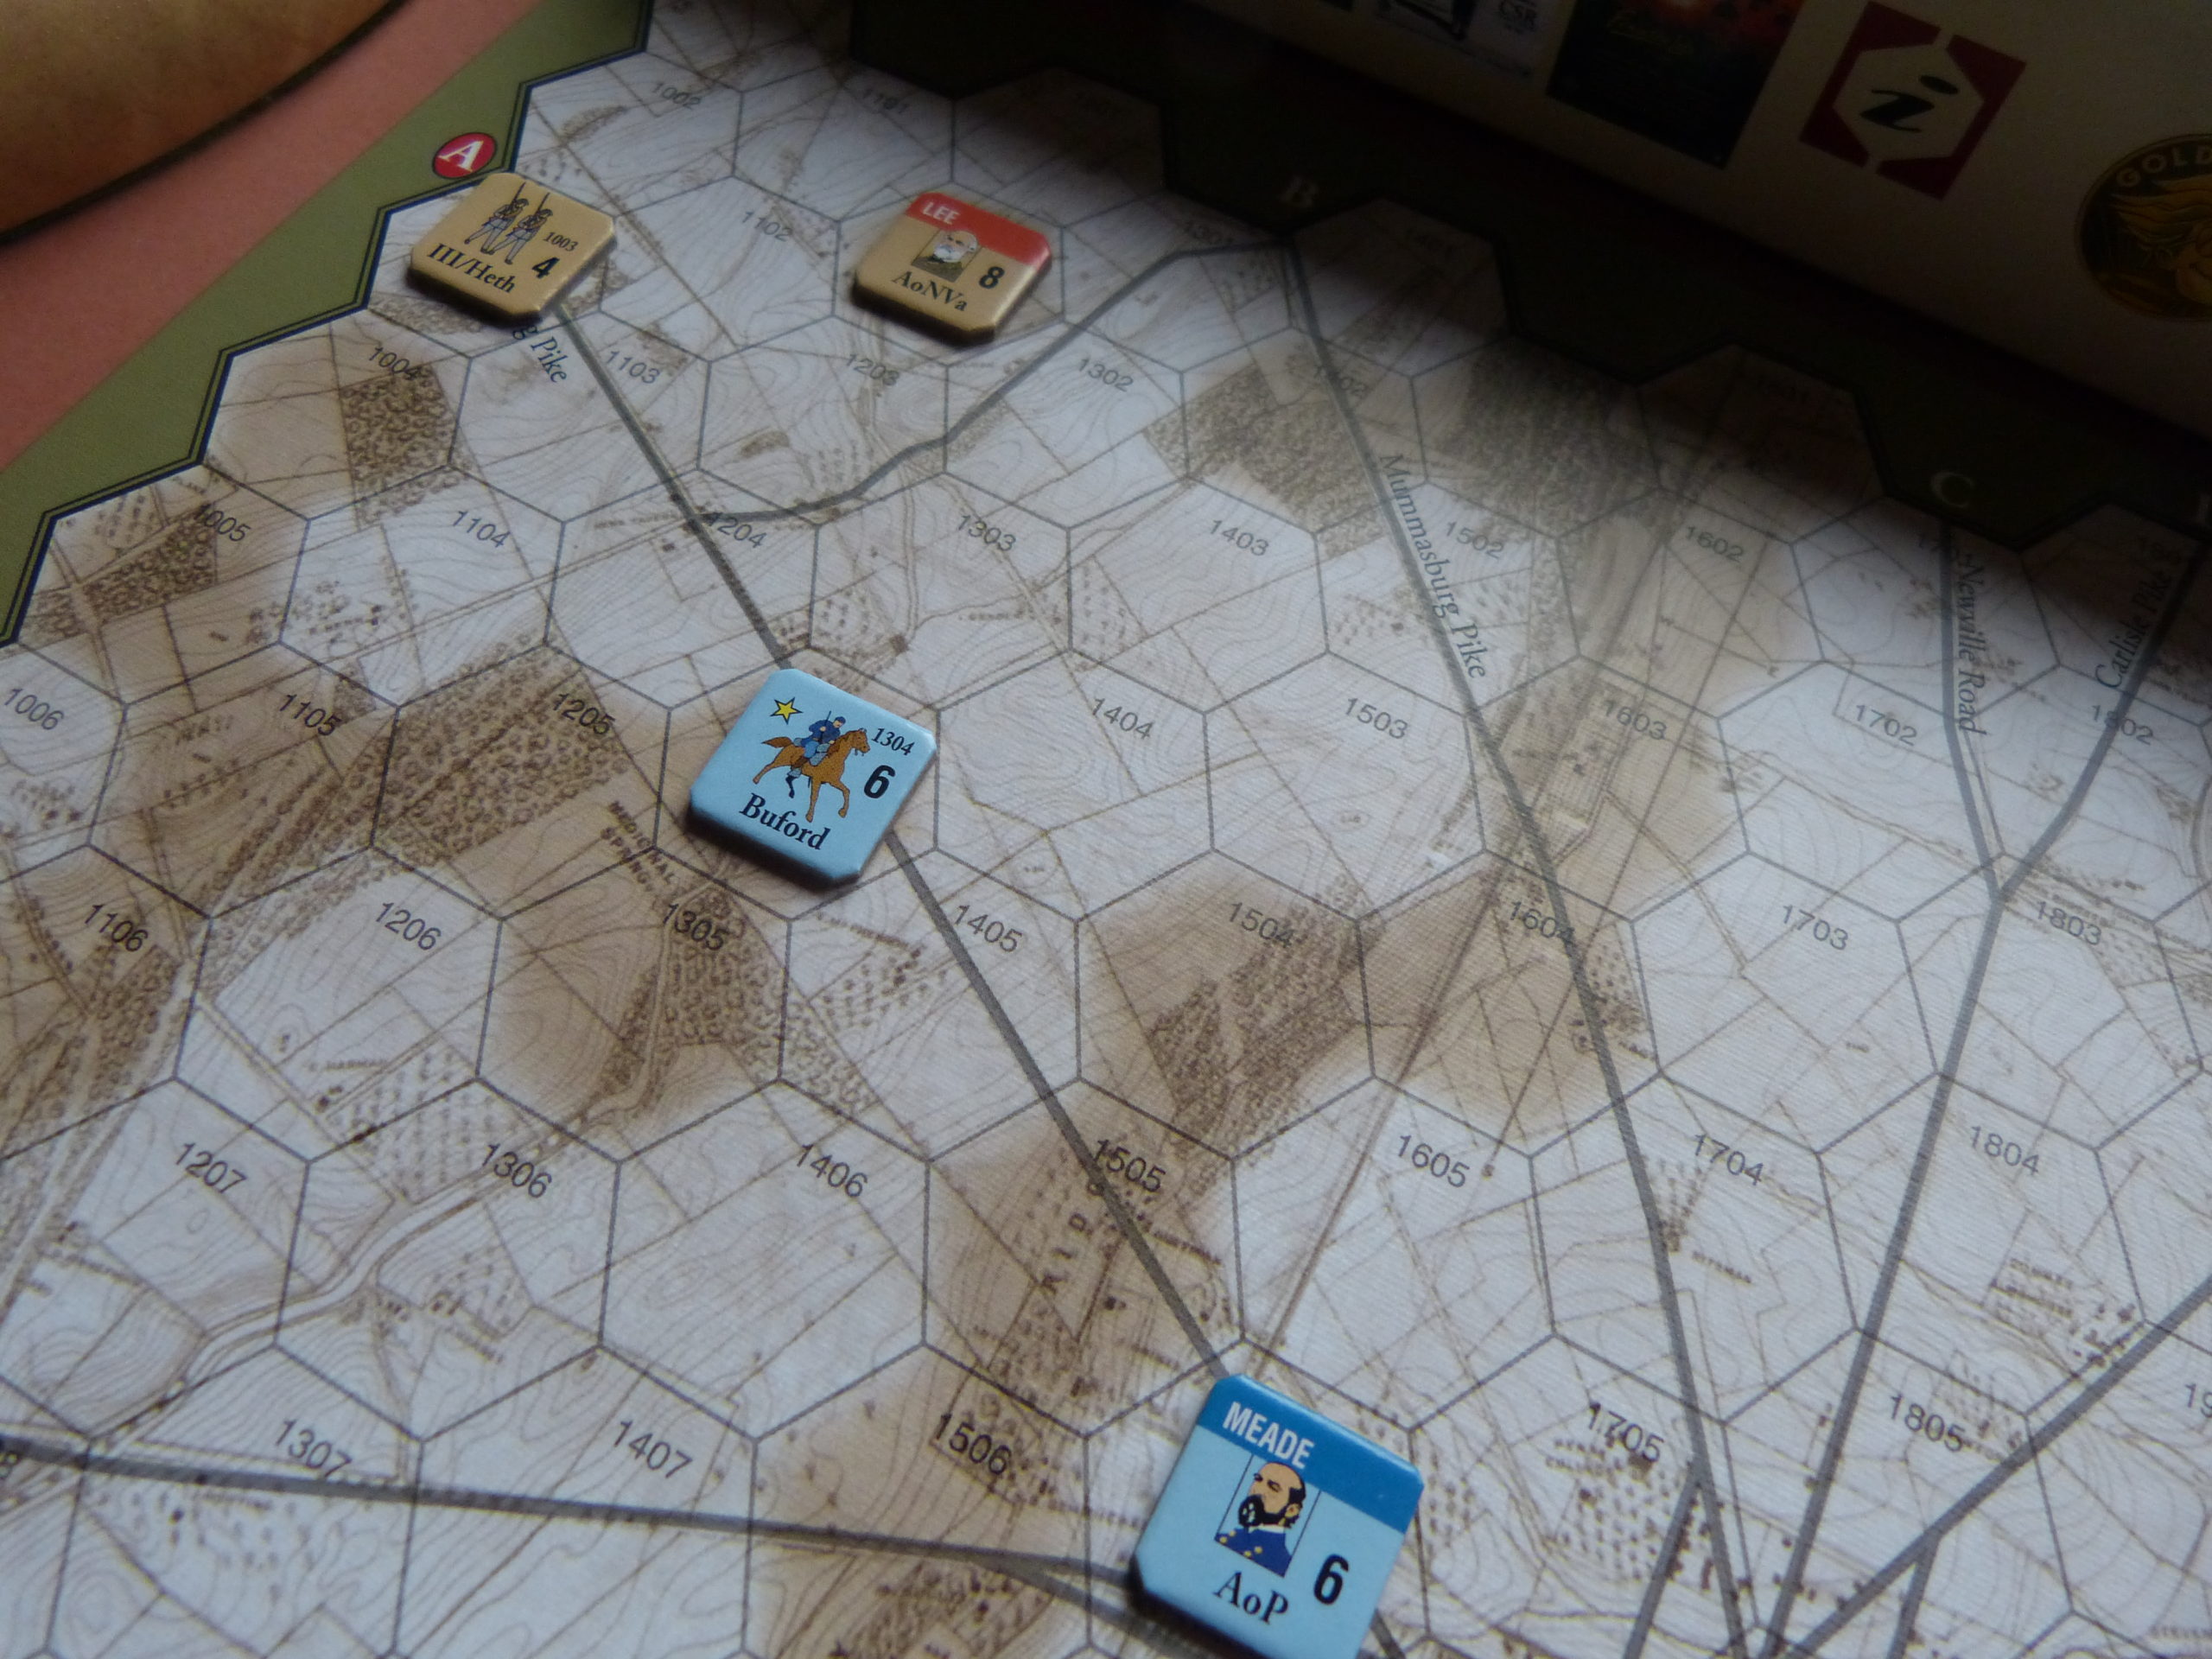
Game Start: The South coming in from the north, and the North from… you know the story!
The Game Armies and How They Work
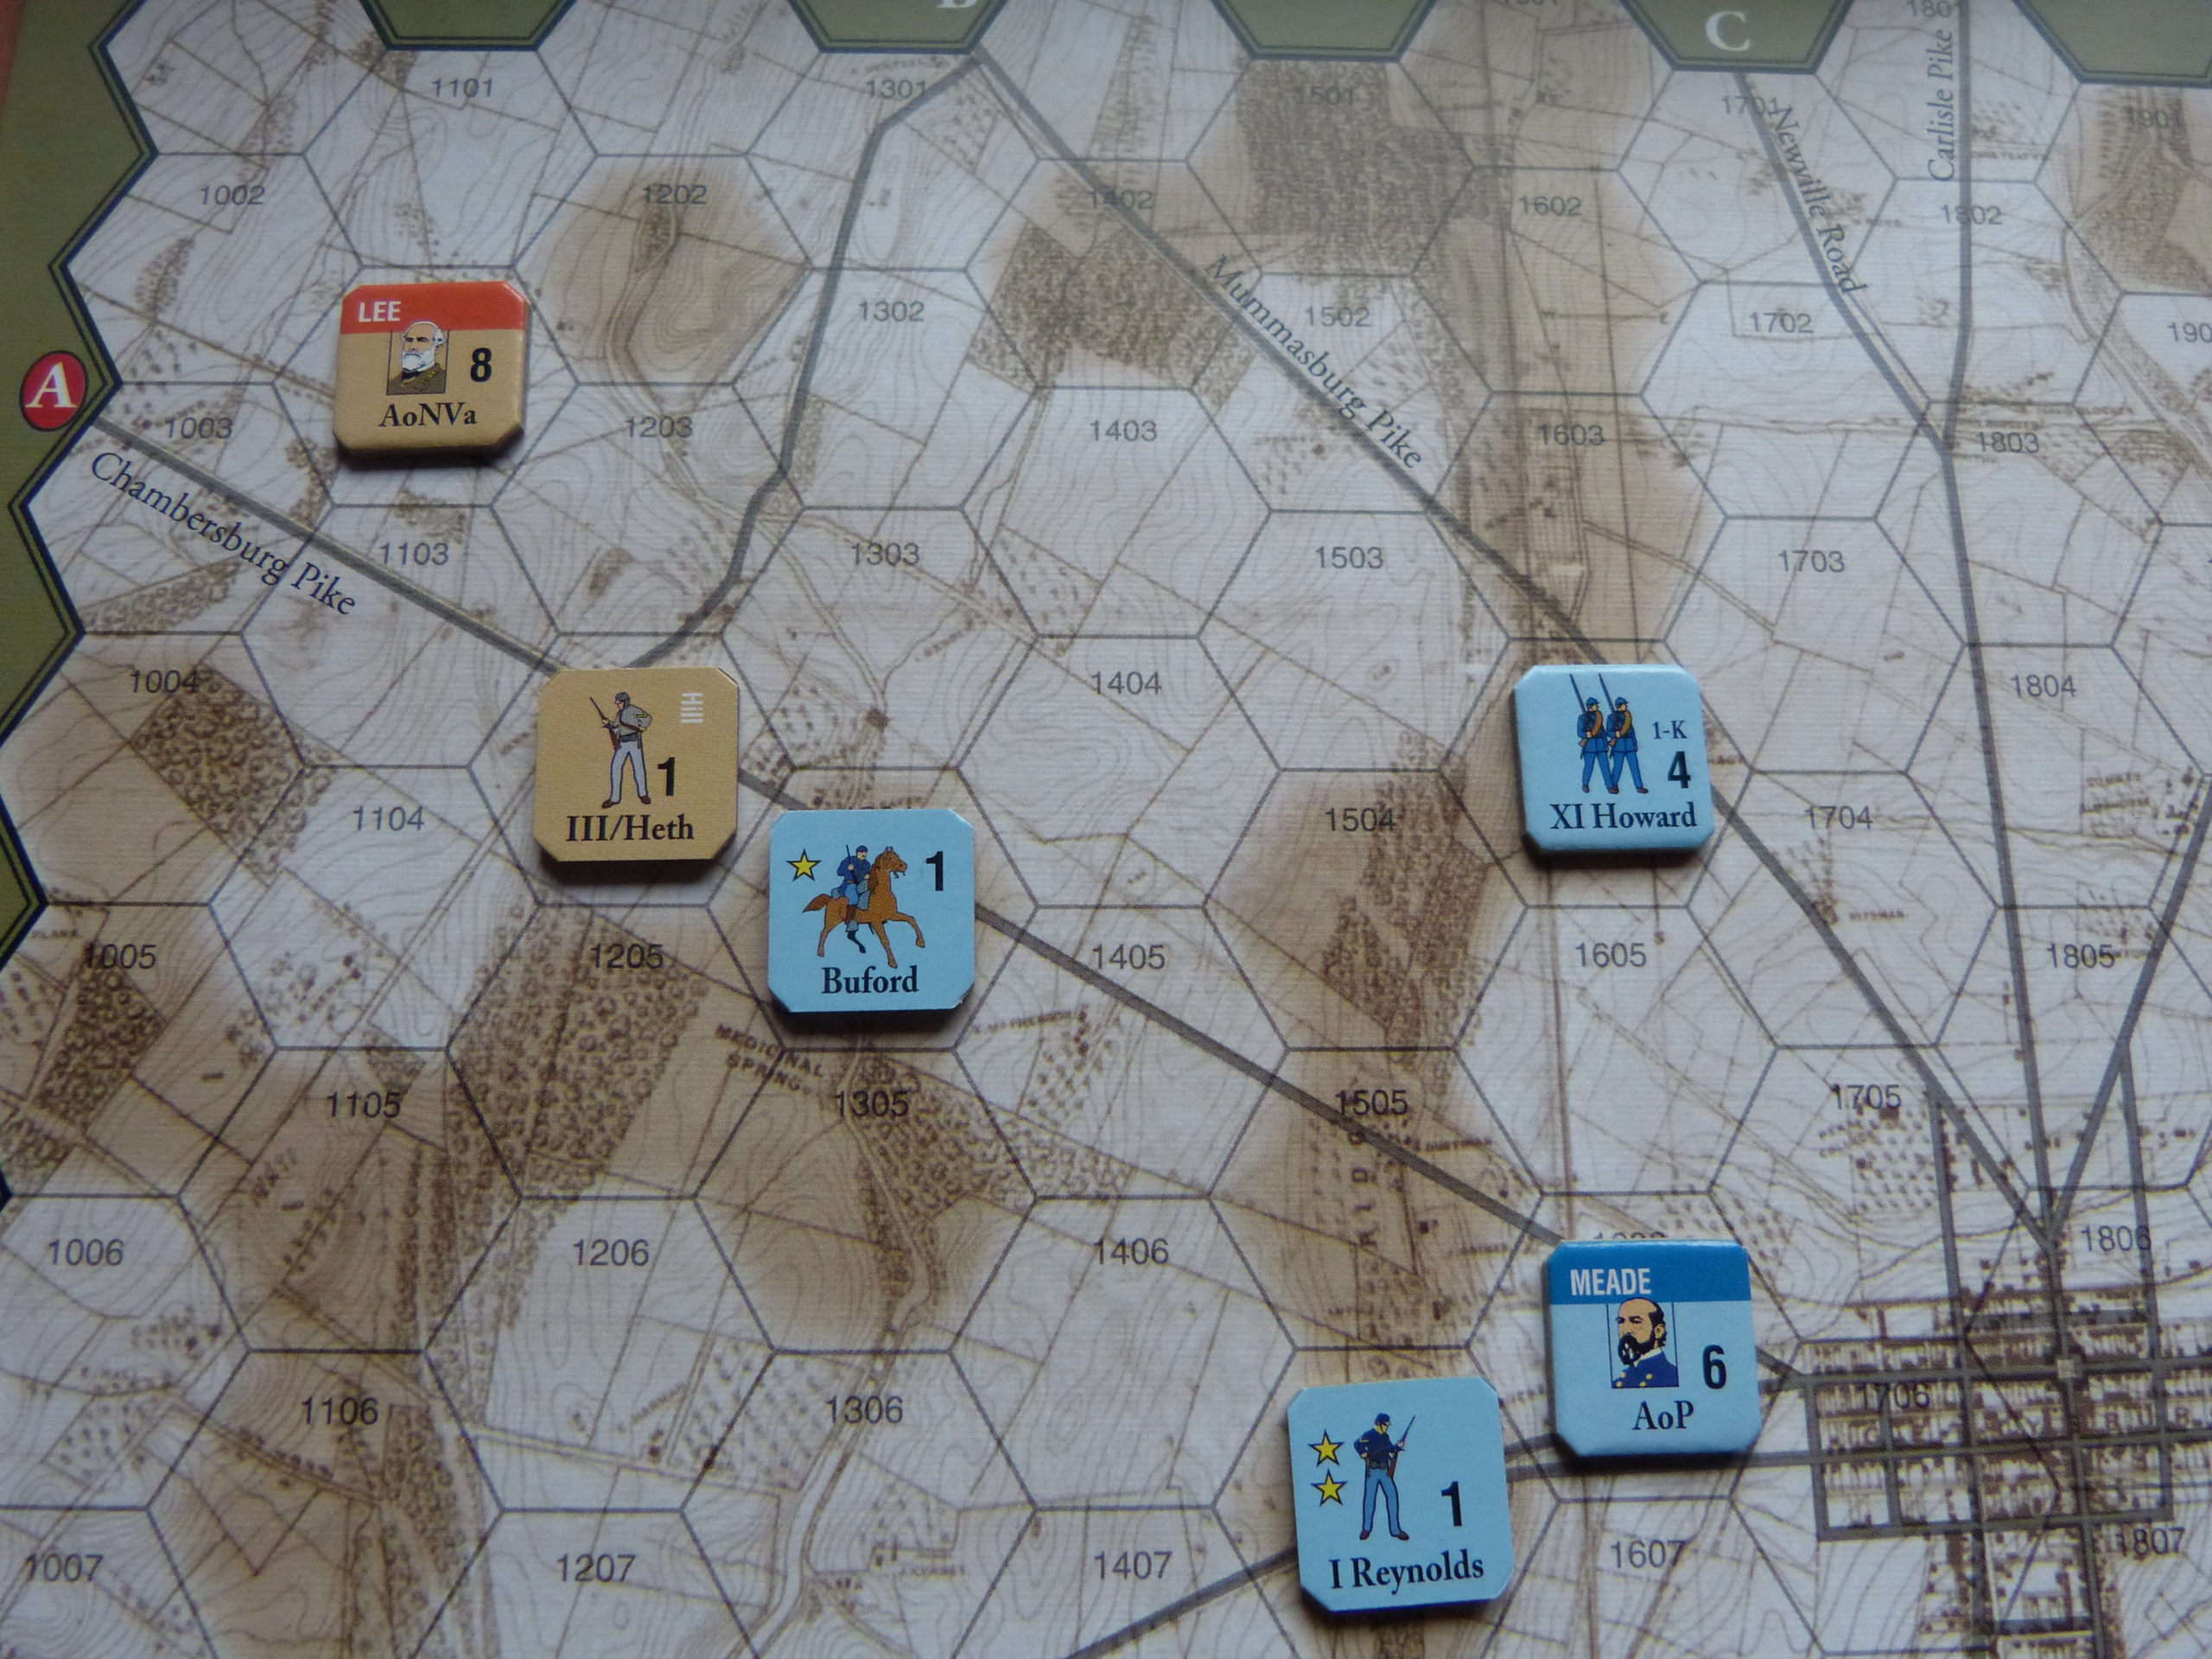
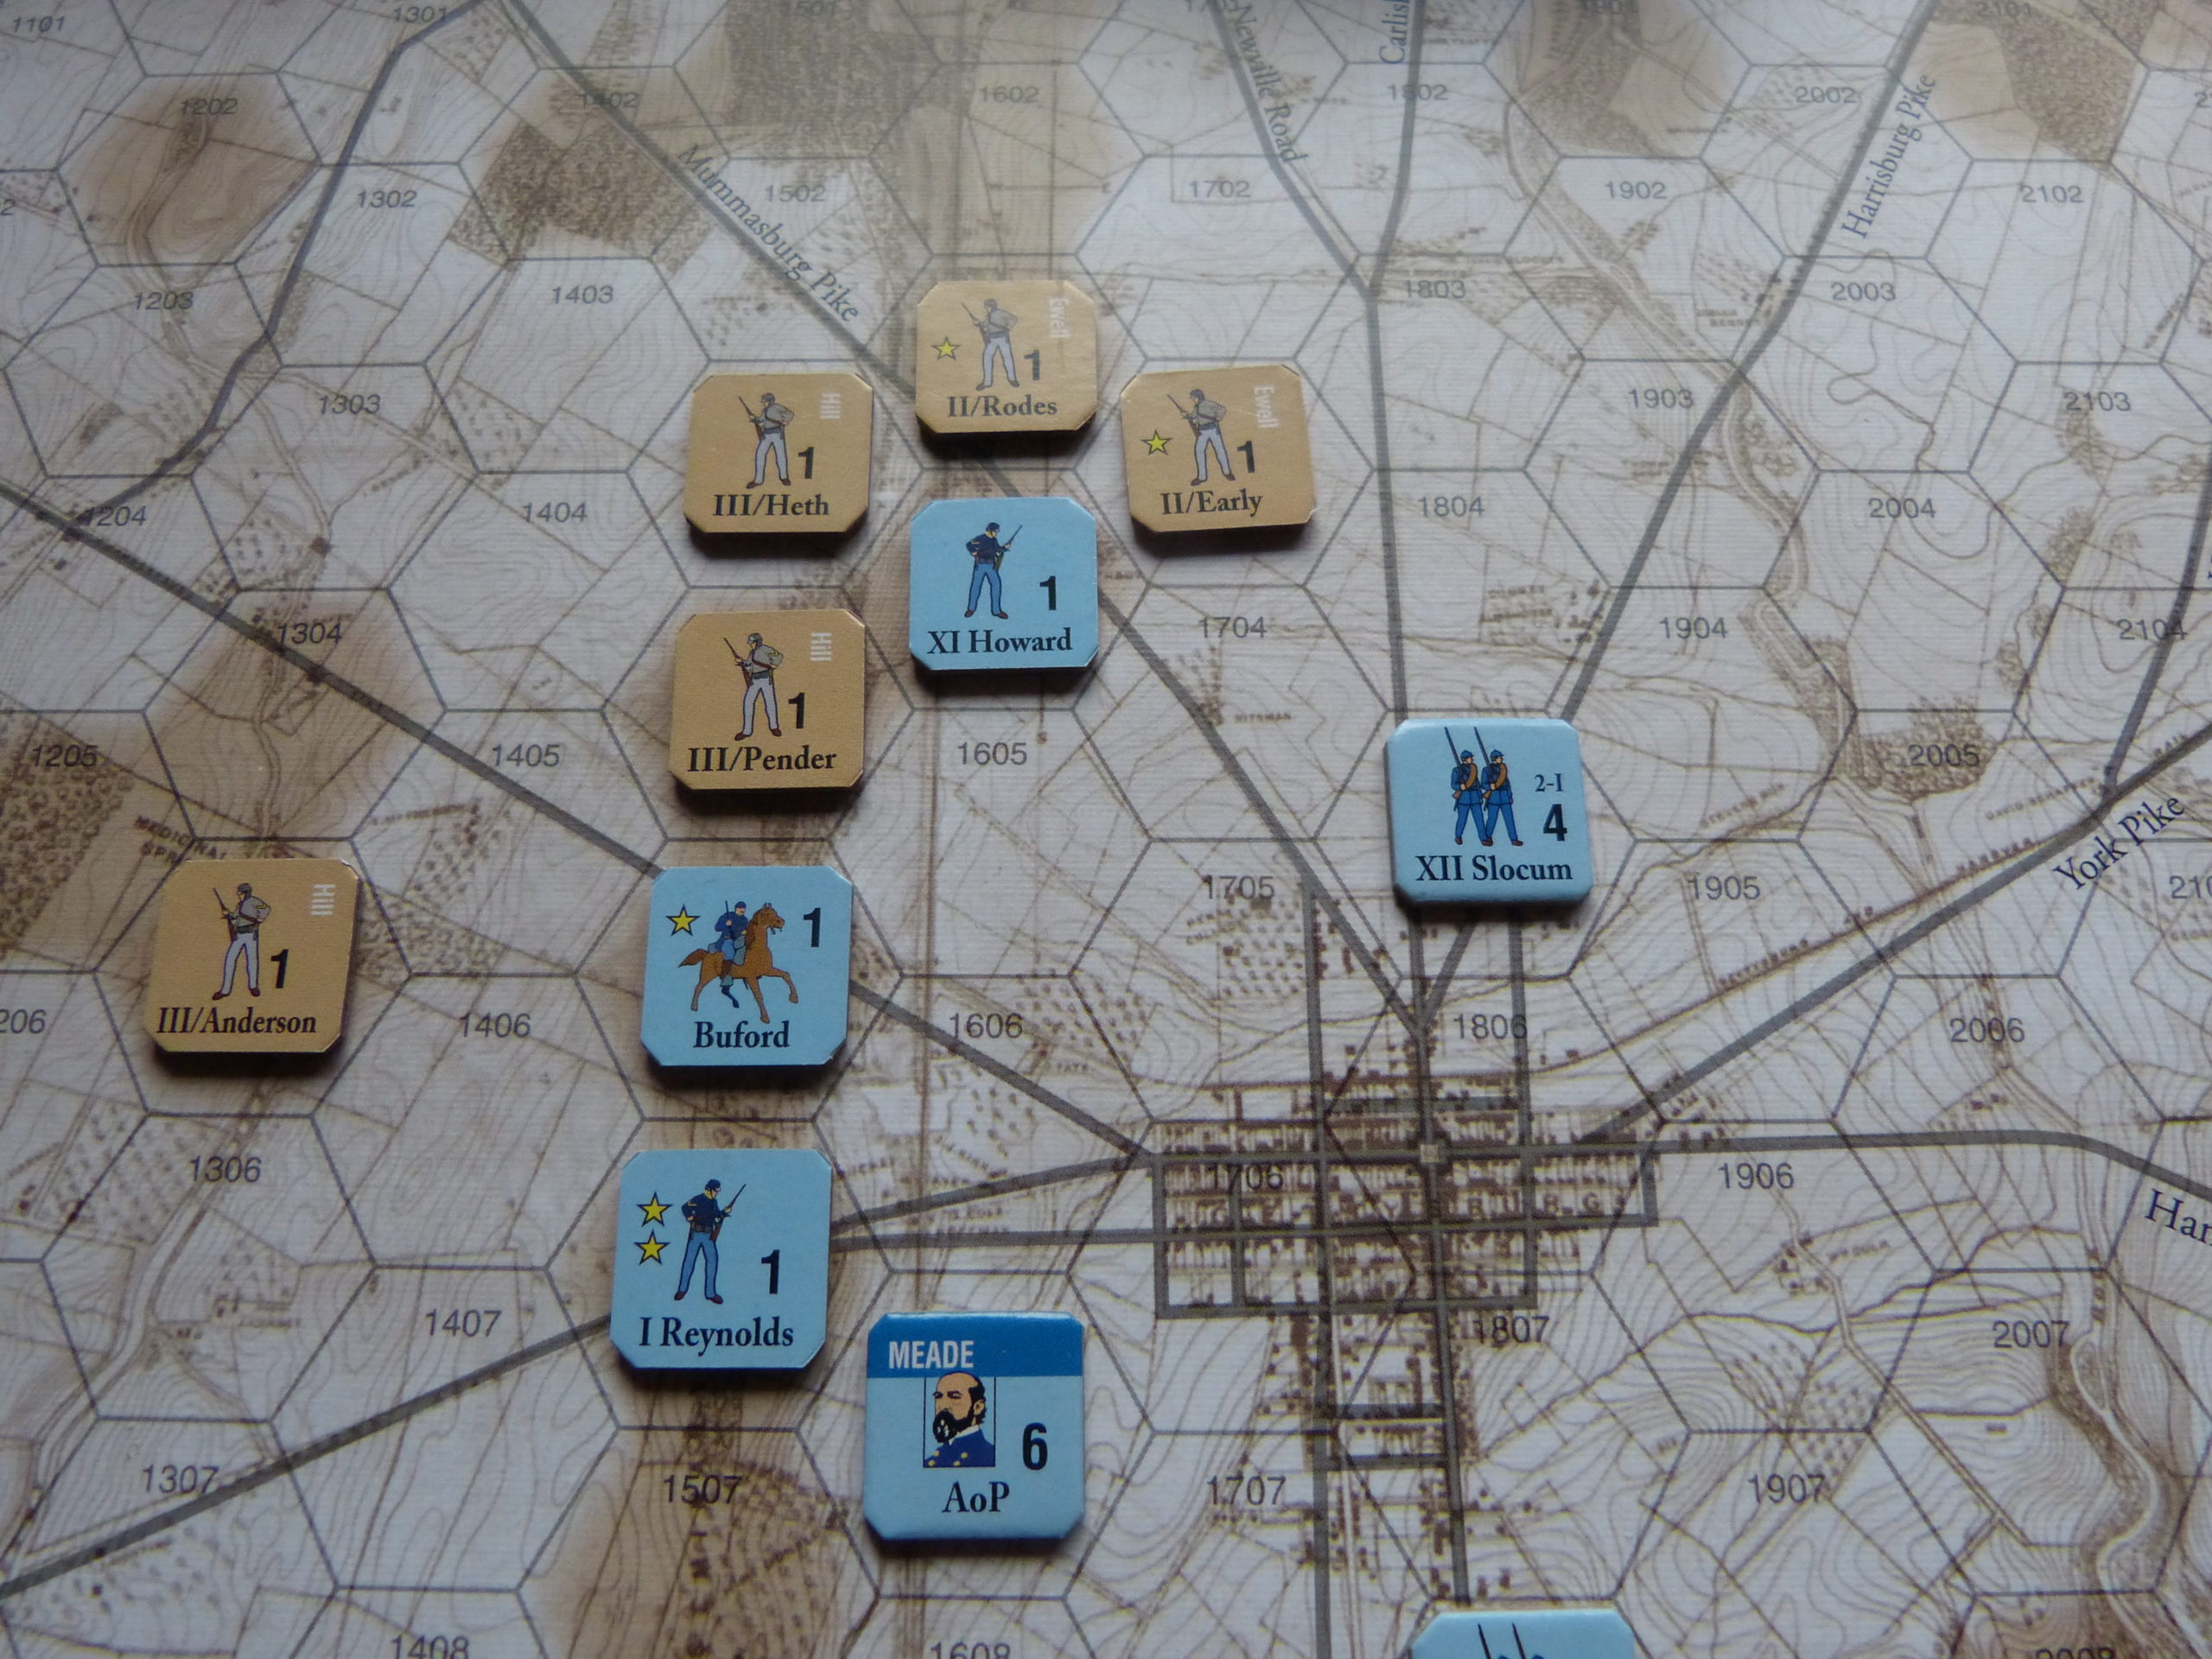
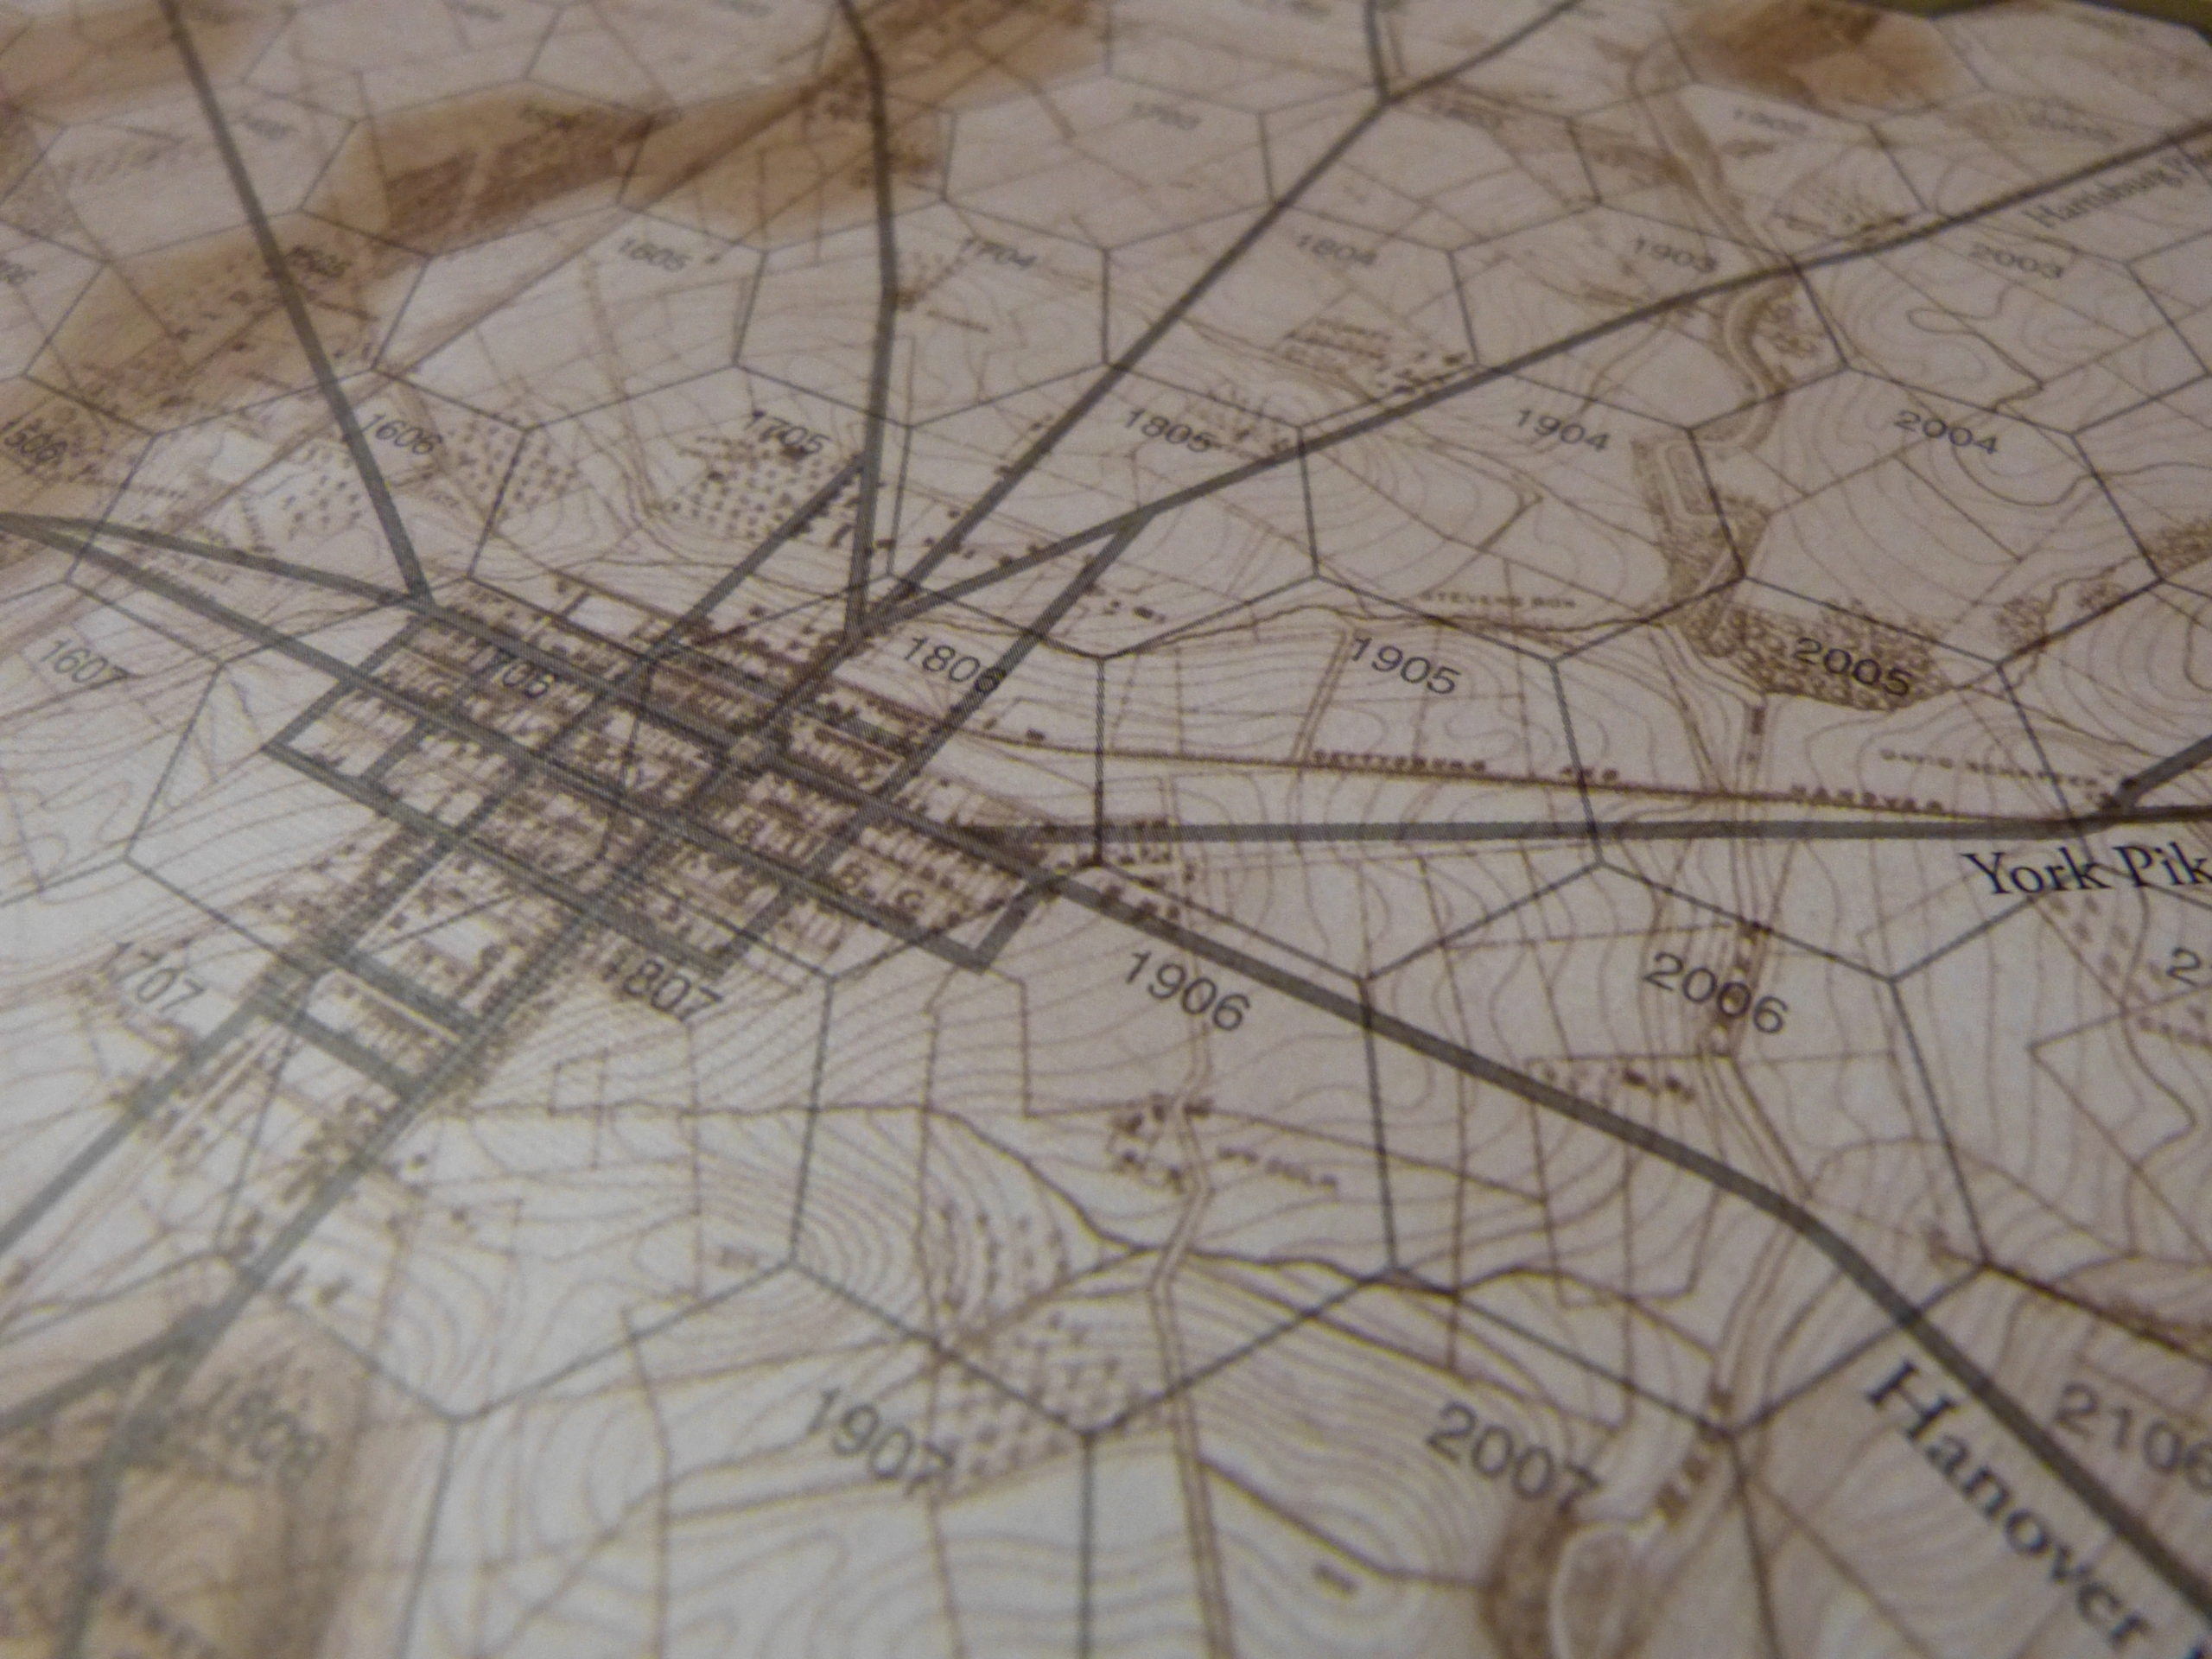
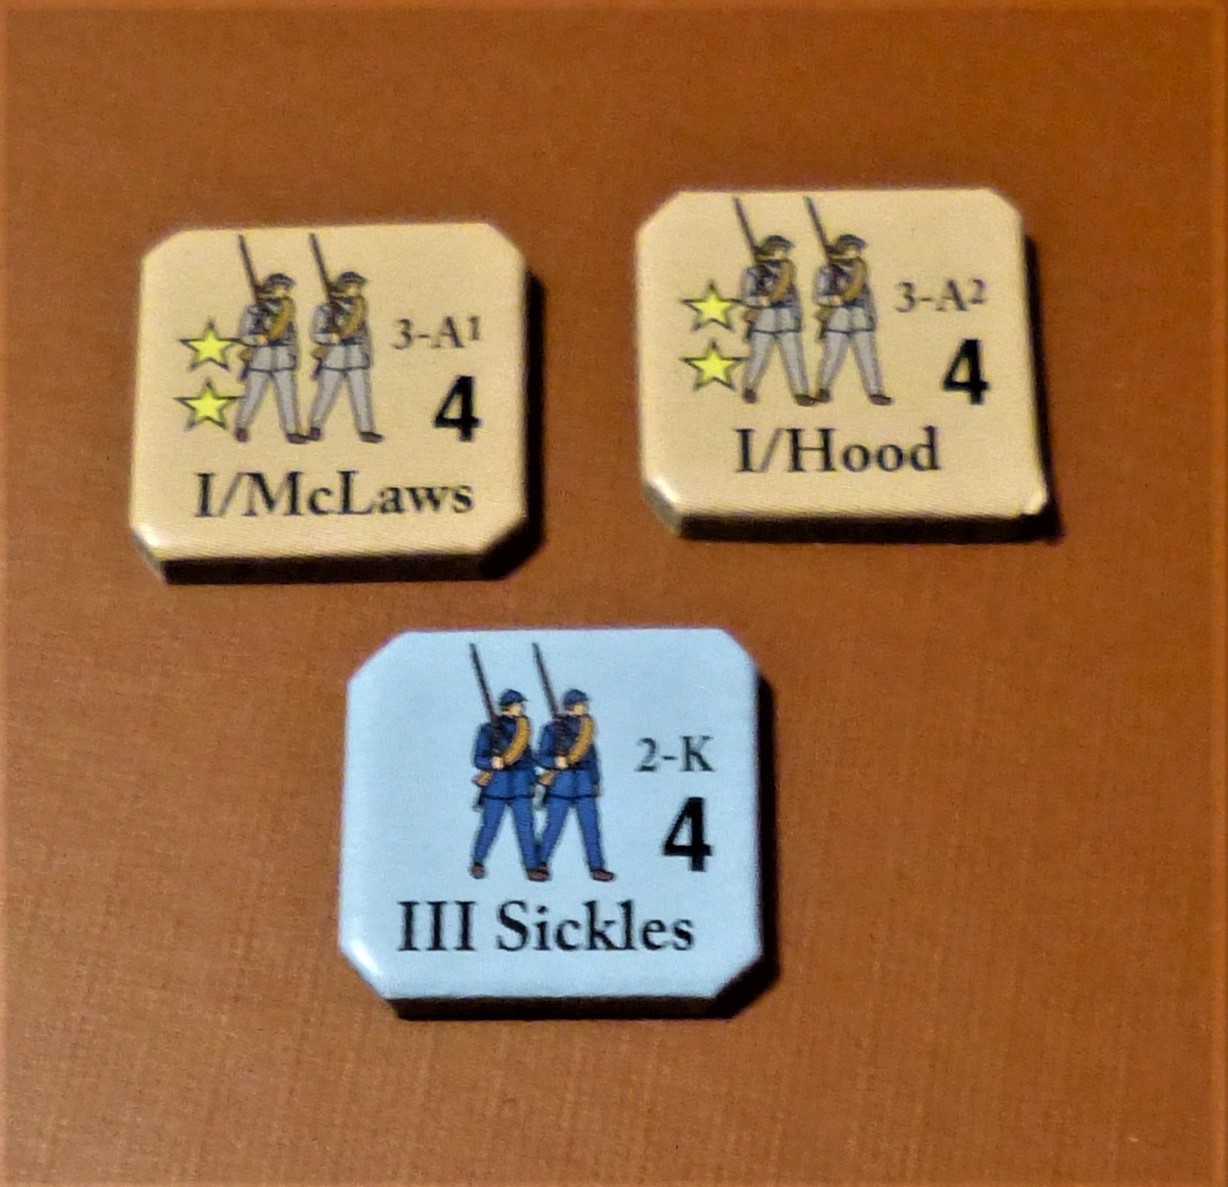
The Army of Northern Virginia is portrayed on-map by nine counters each representing one of its nine infantry divisions. In addition, Jeb Stuart will eventually turn up with a counter representing the cavalry brigades he has been gallivanting around with. The Union Army of The Potomac has seven counters representing its seven infantry corps, plus two cavalry units, portraying the forces of Buford and Pleasanton. As, in raw game terms, Confederate divisions are the fighting equivalent of a Union Corps, readers may perceive some tension between the historical numbers on the ground and how matters of unit scale and (as we will see a little later) timescale present the contesting forces in the game model. For now, it is important to note that actual combat strength in this game is more a matter of accruing modifiers for the quality of the units involved (stars on the counter), having at least two support units (for the attacker), having artillery support, and being in defensible terrain (defender only). The better your modifiers compared to what you are facing, the more chance you have of achieving a die roll total (one d6 each) that will exceed the opponent’s by enough to do them serious harm.
The Union, note, is not without some advantages as this system presents itself. Its starting artillery ammunition level is greater than that of the Confederates – 14 against 11. This translates into having fourteen potential combats that can be supported, against eleven for the Confederates. Given the initial onus on the Confederates to press the attack, eleven potential support missions can soon diminish to next to nothing the harder they press or are pressed in return. Only one side can support a combat, and if both sides want to do so, they have first to win an artillery duel to determine who will get the ensuing modifier – simple comparison of 1d6 scores, with a 6 also causing an extra enemy ammunition point to be expended fruitlessly owing to exploding caissons.
July 1 AM Turn – Heth’s boys well and truly “Get the Dander Up” as they throw Reynolds back and destroy a number of caissons in the process.
Also assisting the Union cause are the “Zone of Influence/Zone of Control” speed bumps that Buford can provide early, aided in due course by the Berdan sharpshooter marker (not a unit but a semi-mobile movement hindrance). And then there is all that handy defensible terrain lurking just beyond the likely Union first positions. It is hard to argue against the Union making a move to those positions while it still can, but for reasons intimately linked to the game mechanisms, you must plan this carefully. Corps stuck in Confederate ZoCs or slowed by a ZoI, may not be able to fall back when the call comes. Added to these is the device of calling a Pass at the apposite moment in the movement phase, something which, if done with skill, can leave the opposing army with too much to do and not enough moves left to do it all with. Again, more on this later.
One final mitigation for the Union is that the game is a little kinder to them in terms of the victory conditions – if out and out losses are traded equally, and Lee has not opened a clear road to Washington by the game’s conclusion (after a maximum of six turns) the Union wins by default – so no actual drawn games.
However, for all the interest that can be directed, understandably, at the corps and divisions of the two armies, and how often their army ordnance can offer support in key combats, I rather suspect the most important elements on the map are the two commanders – Lee and Meade.
At first sight, it might be thought that they do nothing more than we have all seen (novices notwithstanding!) in umpteen games of all descriptions – their own numerical value is an expression of their command range, and units have to keep in that range or move into it if they find themselves adrift. The rules stress that neither marker denotes where Lee or Meade actually is. Rather, they are representative of the armies’ command focus – that part of the field where the flesh and blood commanders are bringing their forces’ weight to bear.
This hardly looks like anything more than “Don’t Move/Can’t Move Out of Range.” But, in reality, the game’s key mechanisms relating to what I dare call “pulse and pass” make this detail much more complicated than it first appears. At the beginning of each turn the players must commit their commander’s focus (his marker) to some portion of the field, within certain deployment restrictions. From then on that marker is fixed until the next turn, so if you read the on-map situation incorrectly, overcommitting to one side of the field, or potentially just as damaging, go too central and limit your forces’ reach to too great a degree as opportunities arise, you can face some serious issues. And that is not the end of it, for as we will see when looking at the timing a Movement Phase pass, that evaluation must involve not only how much your opponent may still be able to move, but how far it can get depending on where the command marker is – remember that until a pass, units potentially have infinite moves providing they stay out of enemy ZoCs and within friendly command range.
All combat units have two sides – one shows them in March Formation, with movement factors being four for infantry and six for cavalry, while the reverse represents them in Battle Formation, with all movement restricted to one hex per activation.
July 1 PM Turn: Howard is in the wrong place at the wrong time.
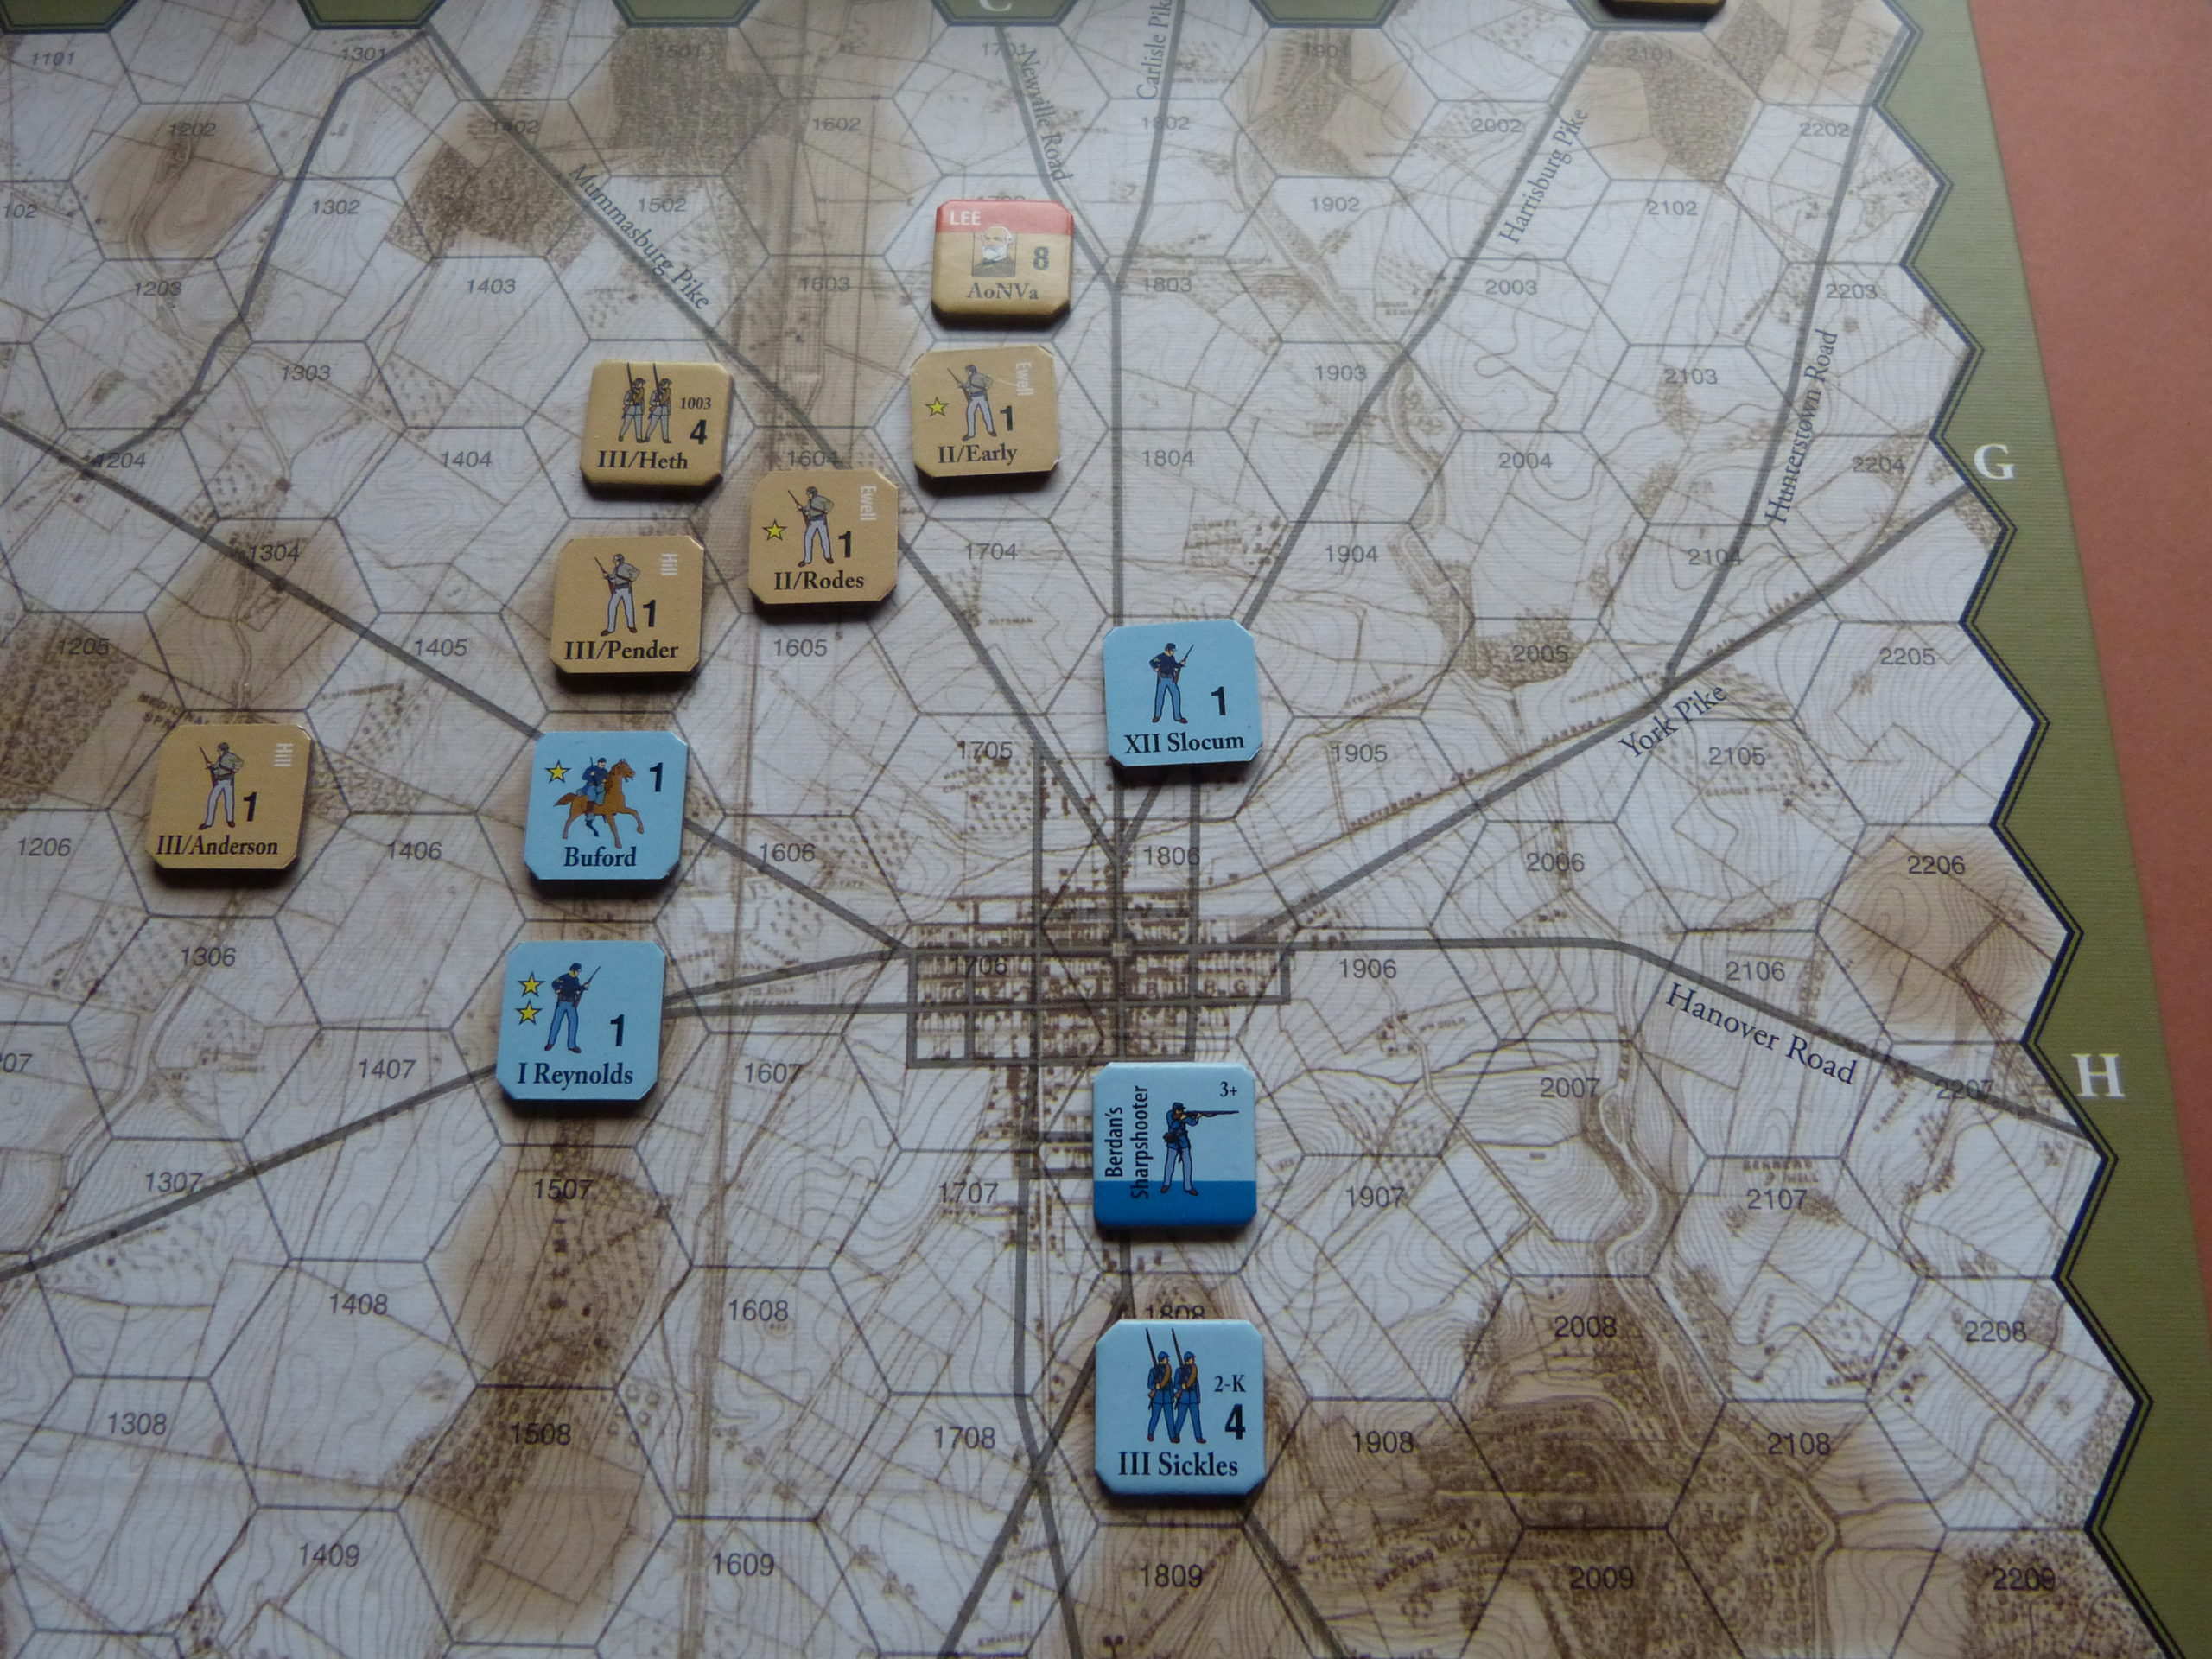
And by the next turn preparation, is off the map, “Blown,” needing a full day before returning.
Battle Formation is entered whenever a unit enters the Zone of Influence of an opposing unit. ZoI is the ring of hexes two out from a unit’s actual location. You cannot attack or defend in March Formation – the swap into Battle Formation is automatic whenever qualifying events occur. The interesting thing here is that, given the alternating pulses of movement, CSA unit then USA unit, there will be a sense of game time slowing in the vicinity of units that have switched to battle-ready status but are still outside of an enemy ZoC, and thus can still move. These units still have the potential to move considerable distances but take “longer” so to do. And as we will see, wanting or not wanting a pass will rather depend on the pace of things at what is judged the key part of the field.
And what does this make the game? Very novel in my opinion, but hardly a pushover for a novice…or a grognard. In all honesty, it is far removed from anything any supposedly novice Gettysburg offered in the past.
Battlefield Timing
Time considerations in the game tend to work at two different levels – which player wants a movement or combat phase to end swiftly (or conversely, carry on), and which player wants to move the turn marker closer to game end? These are not necessarily two sides of the same coin, as a player who wants to close out a movement phase will not necessarily want to hurry up the turn marker. If, in this context, you imagine the Confederates having set up some promising attacks, there will be battlefield circumstances that will see that player wanting to close out the movement portion of the turn before the Union can cause disruption and mischief elsewhere, or perhaps on the flank of those neatly arranged attacks. But that does not mean the Confederates will want to hurry the turn marker along, unless they already have a viable lead in units destroyed and want to run out the clock to victory. A variation on this is if the Confederates are close to clearing the road to Washington but just need time for that extra attack or two.
As intimated earlier, the game begins with the Union in a winning position because a “draw” is a Union win. So, at least to begin with, it is the Confederate player who does not want the game to end, and the Union who would be happy to call it a day. This will inevitably change if the Confederates move to a winning tally of units destroyed. The Union will have to try and extend turns in order to hit back, and while they will be down in the count of fighting units, there is a good chance they will be ahead in artillery supply against an opponent fearing the doom of empty caissons and wanting everything to close down before all those unopposed +2s kick in.
At the level of the movement and combat phases, things are really too complex to make many hard and fast rules about who should blow the whistle first. Clearly, in most circumstances you do not want to be calling a pass in a movement phase if your opponent still has plenty of potential to move stuff around – note: a pass is followed by a die roll modified by how many of the still-active player’s units are out of ZoCs, resulting in a total which is the number of individual moves that player can still make. Pass too early and you could be turned inside out – unless you are very confident of your position.
Units moving into opposing ZoCs fix the opponent in place (as well as themselves). Again, precisely who wants to do the fixing is a complex issue. There is no obligation to attack after entering a ZoC, but you are just plain stuck until either a combat result frees the unit, or the unit engages in a voluntary retreat in a future turn’s Organisation Phase (i.e. at the start of the turn). Thus, moving adjacent can simply limit opponent options as opposed to representing the necessary step prior to launching an attack. But in a phase which is all about alternating action and reaction, you must be careful not to be left one or two units short of a necessary response if the opposition still has units and phases with which to cause mischief.
When a pass is declared in a movement phase, it behooves the player still with moves left to think about what they really need to do or what real opportunities there may be. The last thing this player should be doing is just making moves for the hell of it. Why? Because this is where the matter of command placement for the next turn should be a consideration. Casual moves run the risk of affecting the command balance/focus of the army for the coming turn, especially if you overlook any possibility of the enemy making an abrupt shift of focus to a more compact/advantageously positioned active wing of its own forces.
Passing in the combat phase may seem a less complex process, but with no requirement to pre-declare attacks, it is best to keep your options open until you are reasonably confident that exerting a bit of time pressure (simple die roll to determine remaining attack availability by the active player) is suddenly more important than having some kind of ability to counterattack.
The Deadly July 3rd Turns
Before concluding the matter of timing, there is something nasty lurking around the last two turns of the game, and it pertains to how the combat results work out. At any other point, combat results can lead to nothing happening, units retreating, units becoming blown and needing to have time off the map, and units being directly eliminated and lost for good. Ordinarily, a blown unit is restored after two turns and placed in an empty hex next to its command marker. But on July 3rd any units becoming blown are treated as eliminated. For both sides, this is both a last opportunity to redeem a failing cause, or a danger that victory can still be snatched from your hand.
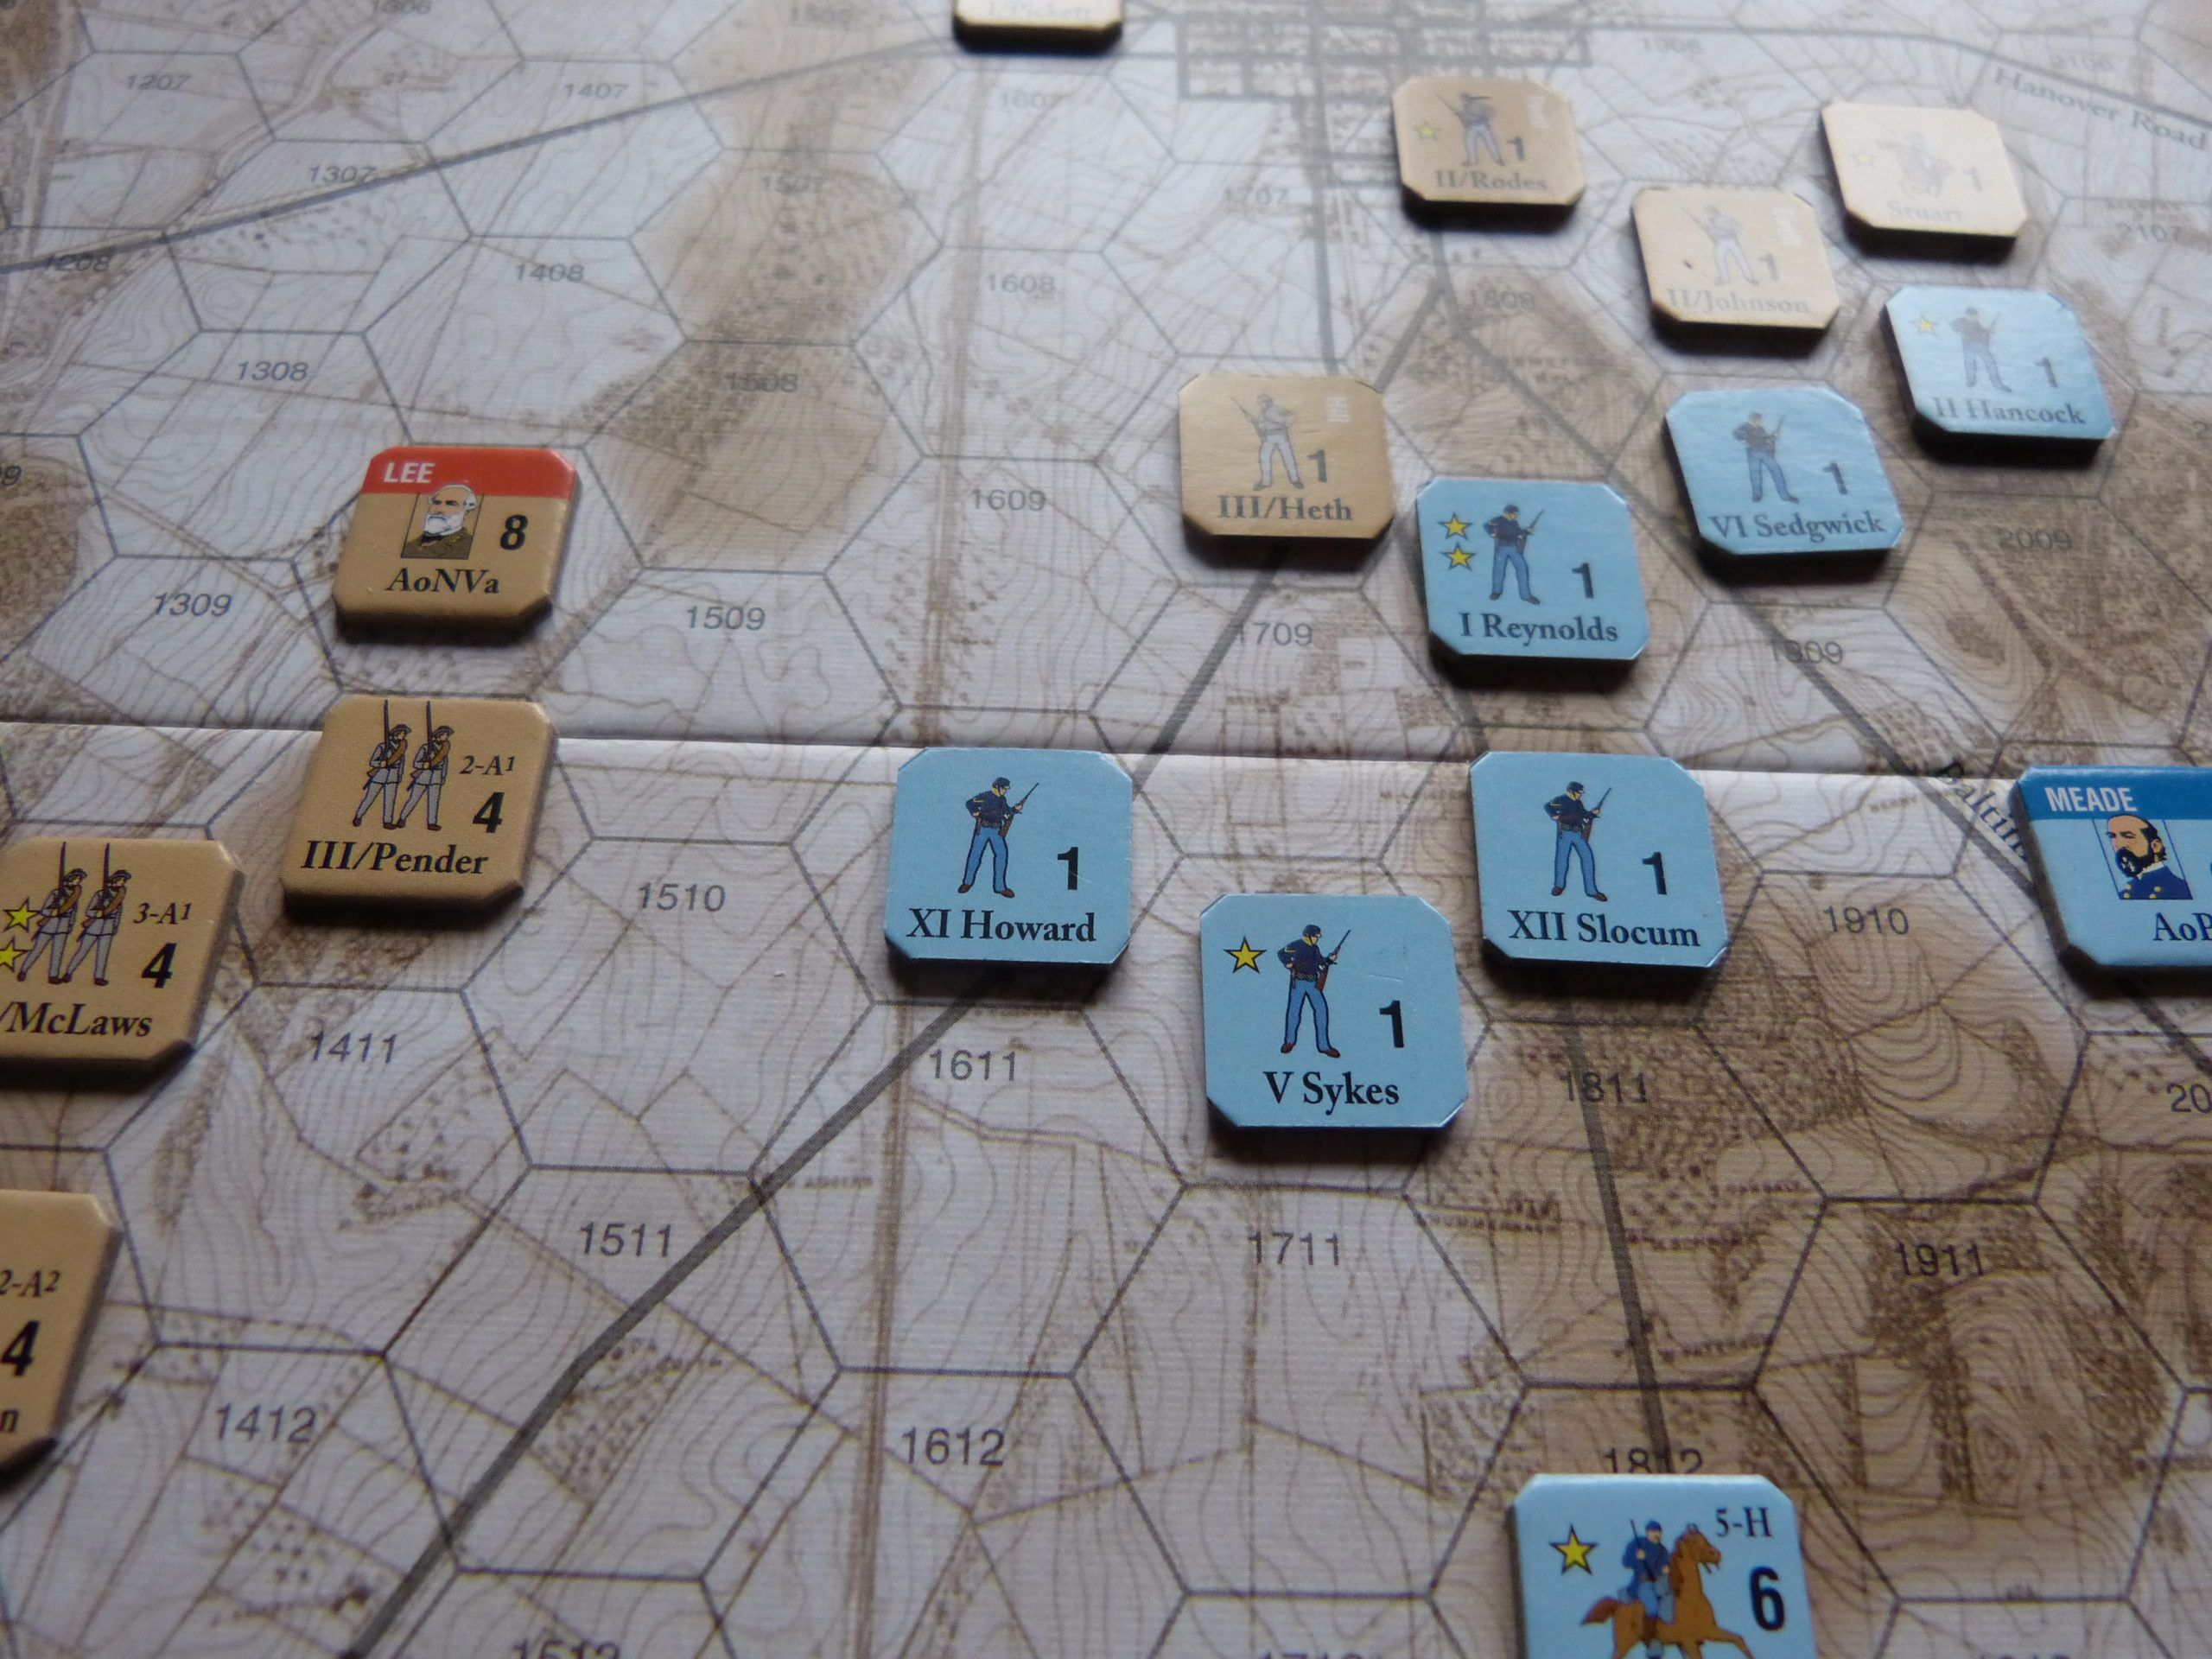
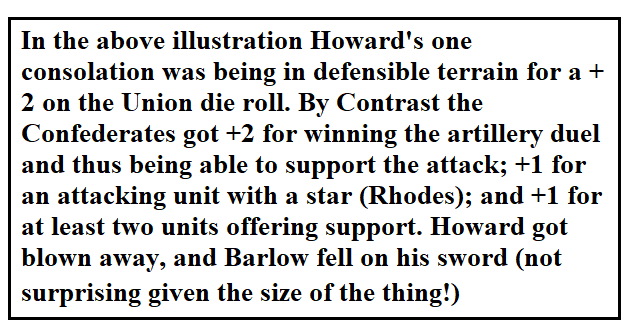
July 3rd PM: This turn’s combat phase began with the Confederates two units up on the Union. However, virtually out of artillery, the CSA was not able to withstand two fully-supported Union attacks which created two blown CSA divisions (transformed into eliminated units), thus equaling the score at two eliminated units each and winning the game for the Union.
It weighs heavily against the Confederates that they are likely to be miserably supplied with artillery ammunition by the beginning of the third day. Unless they have exploded several parks of caissons with some fortuitous hits, or have been able to spare on their own expenditure by being able to target especially vulnerable Union units without needing to bring in every last modifier, they are going to be mismatched against the Union supply. So, if the Union needs to do something to equalise the game on the last day, it is probably best to hunker down in the better terrain and play every trick you can to wind down the clock. But there is no getting away from the fact that this is a dangerous and volatile chapter in the game’s narrative – unless either army is pretty close to being wrecked already. During the last day, a combat only has to be won by +3 or more in order to get a scoring point – and +2 towards that can readily come from a won artillery duel or uncontested artillery support. In the worst-case scenario, if we work with an average Confederate defender (no stars) in defensible terrain but with no artillery to help, they will only have the +2 modifier for terrain to pit against artillery, supporting units and starred formations, giving something like a +4/5 to the result before any dice are rolled. In such cases, the Confederate player might well consider using his Operations Phase retreat option and all subsequent move activations to put a bit of distance between the armies and then call pass as soon as seems prudent. In fact, if either side is ahead as you enter these final chapters, working on opening a bit of space in preparation for a pass should be seriously considered. Of course, the opposing army may get a lot of move activations in such circumstances (lots of unengaged units boosting the die roll for remaining activations), but there is a definite challenge in trying to coordinate an army in these circumstances, given that you will rarely have as many activations as you might desire given that your advancing contingents are going to slow the moment they get into any enemy ZoI.
Ifs, Buts, and Maybes
As at least some readers are likely to be aware, this game has not been without a certain level of criticism directed at aspects of the model. One issue that has been raised is the timing of reinforcements. Players have sometimes been perturbed at seeing the Union 3rd Corps (Sickles), and perhaps to some lesser extent, Slocomb’s 12th Union Corps, marching onto the board while the events of July 1st are still playing out – in other words, the corps of Reynolds and Howard are likely to get some company before something like the historic collapse can be arranged. I can certainly see some legitimacy to this concern though I am inclined to regard it as a design quandary born out of the timescale the game is working at. In this context, given the overall pacing of the game, claims that these forces are coming on too early can be countered by saying that bringing them on the next turn will work out as being too late.
Although a serious amount of action can occur in any game turn, it must be remembered that each day only has an AM and PM turn, and thus you cannot expect fine detail to come into effect when using a very broad brush. If I press just a little further, I would also suggest that this is, arguably, the one area of the game where the subject matter, the Battle of Gettysburg, is not an absolutely perfect fit for the model. At salient points, this model occasionally says to me that it is an operational system, better suited to a campaign in progress than a battle getting underway. For that reason, I strongly suspect that this Mark Herman creation is going to shine brilliantly with the Waterloo campaign it has been adapted to – far bigger map and enough scope elsewhere to iron out distortions.
But having said all that, I am not especially inclined to get that het up about Sickles poking himself into a different deadly salient a day early. The designer does suggest delaying the corps’ arrival by a turn if you wish, but I am not sure that is necessary. For a start, marching into clear terrain north of the town with an indifferent corps (any unit with no stars could be viewed as an accident waiting to happen) can end up merely looking like offering the Confederates an easy target and a first step towards a winning advantage. And if Sickles or Slocomb, both equally mediocre, get fixed north of the town, concerns over “why are they so early?” may well be replaced by “why did I ever put them there?”
And then there is the simple matter of design philosophy. To my mind, the cosy world of Gettysburg renderings was well and truly overturned the moment Rachel Simmons gave us Guns of Gettysburg. That highly original game dispensed with the old notions that this division or that brigade was always going to appear on the same road at the same time as in every other title pertaining to the battle. Instead, within plausible historical contexts, the reality of two dispersed armies hastening towards the place where the roads all meet got a serious reinterpretation and every chance to work to a different narrative.
As for this game, I suppose, as another alternative, the likes of Sickles could be restricted to one activation on the turn of entry, but that can lead to problems depending on what exactly has already happened on the field, and therefore I am not surprised it was all left well alone.
What about what I called (admittedly, somewhat melodramatically) the “Death Day”? Well, there are several ways of interpreting this:
1) It is a bit of a slack rule (hah!)
2) It purposes to give the final day some sense of historical drama.
3) It reflects the condition of two worn armies that are not going to withstand further hurt if suitably heavy blows are struck. three is in effect, and personally I like what these do to the game…intentional or otherwise!
Does “Daring Dan” really want to be hanging around up here…
Personally, I do not buy the notion that option one is in effect here. Instead, I tend to believe that a blend of option two and three is at work.
There are one or two other areas of concern that can be also be highlighted, and which may be perceived as valid depending on a player’s take on things. Firstly, optimum attacks can depend on looking for where the hex grain allows you to bundle into an opponent with one attacker and two units supporting. The obvious response to this is “don’t set your lines up like that way,” and in this regard, it should be pointed out that the historical Union position runs flush with the grain along Cemetery Ridge and only gets its “bumpy sticky-out bits” at either end – which is how it should be.
…when these bad boys are waiting to fix and finish him?
One last aspect where I did have a bit of a pause for thought was the use of the Berdan Sharpshooter marker. Although it becomes active after Sickles enters the map (being part of his corps), that may well be the last they see of each other. The relevant rules simply call for the marker to be repositioned each turn in a free hex adjacent to any Union corps, where it then remains until the same procedure next turn. This struck me as being a little too lenient, and as the marker only really works once there is no Union corps next door doing the same thing as it is meant to do, it can literally end up camping out at a mighty distance from where the rest of the army has decided to form. I am tempted to suggest that the marker should be moved in-turn to keep it no more than two hexes from a Union corps, just to stop it looking like the lost battalion.
So, is It Gettysburg?
Well, what a surprise, the design has a few areas of contention – like just about everything else the hobby has produced. Different people looking for different things in a design are likely to range in perception from ardent fans through to “no thank-you.” Ultimately, I can only answer for myself, and this to the effect that this is a very good Gettysburg design – but ultimately, it is first and foremost an initial presentation of a very good design model. And that is when my eyes turn to its 1815 iteration.
And for all the undoubted innovation, there are perhaps vague suggestions of other models drifting around, and in the placement of a leader to render focus to an army’s efforts I was reminded of an aspect of a very good but not too well known Gettysburg game – the Martin Wallace design, with its use of command blocks placed on the map to become a facility, at that place, for spending the action currency of command disks. Be that as it may, this is a highly original game, and for my money, it captures enough of the Gettysburg quandary to be entirely valid. This is not so much to do with who arrives when, but how armies consolidate or press an advantage when apparent certainties suddenly collapse. The fishhook has obvious attractions for the Union – lots of defensible terrain for those lacklustre corps, besides which Meade’s shorter command span will work better in a tight position. But various game mechanisms make the fishhook susceptible at its extremities – and rightly so. And then, if you, as the Union, have already lost at least one unit to elimination and the CSA has suffered no such loss, hanging onto little rocky hills is not going to do you much good.
An interesting exercise can be made by relating game mechanisms/unit status to actual events by the end of the historical July 1st. Heth is well and truly blown by the end of the day, but it is probably fair enough to say that the other on-map Confederate divisions are still in the fight – damaged in some cases, but still effective. On the Union side of things, while one might argue that at least one of the pairing of 1st and 11th Corps should be considered as eliminated, neither corps was entirely out of the fight, although at least one and probably both should be considered as blown.
Unit elimination is a tricky matter for the game matching historical contexts, as the moment the Union loses anything permanently as the first score of the game, it is also losing the game and will need to get on the move rather than sitting still. That Meade was ready, July 2nd and 3rd, to sit back and await developments must translate in game terms as the affair still being at least tied. If Meade’s army is in deficit, this strategy plain will not work. How one views the story behind the combat results is important. A blown unit will be markedly down in strength, both due to blood casualties and men plain clearing off, but can still be considered viable after a period of recuperation. At his “stay or leave” council of war on the eve of the last day, Meade was told he was down to barely 50,000 effectives – which readily implies that thousands of men were wandering off loose from their units. But previously blown formations, to some degree, remained at least partly useful. And Lee, likewise, still thought he had enough punch for one more effort – Heth was back, maybe one of McLaws or Hood was blown, but that was probably it. For the Confederates, the real hindrance was the lack of artillery ammunition – in game terms, down to two or three points, against maybe six Union points.
Clearly there are abstractions at work here, and in a design with a broad brush at work in places you could hardly expect anything less. But if you run with this take on Gettysburg based on enjoying what it does present rather than looking for what is missing or is less finally detailed, I think you will enjoy it a great deal. I know I did.
Paul Comben
Game Resources:
 Gettysburg – C3i Series Play Sequence with Stipulations V 2
Gettysburg – C31 Series BGG page: