
By Paul Comben
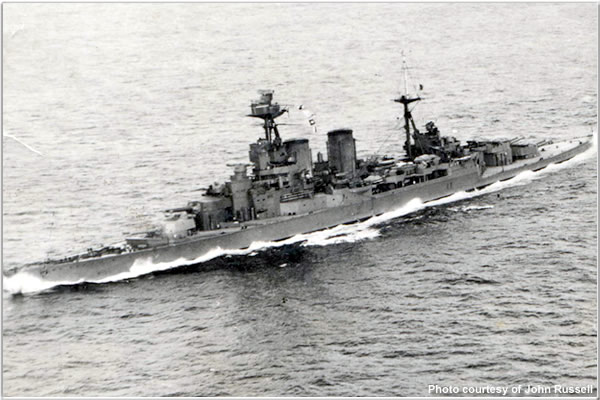
[Note: this article uses material from hmshood.com (in particular, the first photo of Hood at sea in April 1941 and is used with the permission of the HMS Hood Association along with Mr. John Russell who owns the original. – Ed.]
On 26th May 1941, just two days after the loss of HMS Hood, Admiral of the Fleet, Lord Chatfield, had a letter published in The Times. Pulling no punches whatsoever, Chatfield blamed the false economies of successive governments for the loss of the ship and near all its crew – economies which meant that the supposed pride of the Royal Navy had scarcely received more by way of improvement than a fresh coat of paint every once in a awhile. The need for a complete modernisation of the Hood had been put off time and again, and then war had come, and a fresh set of excuses had become available. In short, the Hood was a ship of Great War vintage, put into a fight with a Nazi battleship with seemingly every modern advantage.
Chatfield’s letter pointed to other issues as well. As a veteran of Jutland, where he had captained HMS Lion, he was not convinced the Hood’s mortal bow had come from a hit direct into one of the main magazines astern. He, at least to some degree, suspected the fire around the mainmast, which had been caused by the igniting of smaller calibre ammunition. He suggested that this massive blaze may well have travelled deeper into the ship and brought about the final calamity. But first and foremost, this was a letter about failure in British government, and indeed of the higher echelons of British society as a whole. Time had been found in the 1920s and 30s to send the Hood here, there and everywhere; and her canopied decks had played host to the dances, buffets, and all the other glittering occasions of the imperial elite. But this was of precious little use when she met Schlachtschiff Bismarck in the Denmark Strait, and perhaps it is no exaggeration to say that the last battlecruiser built by Britain had been set upon a path to defeat and destruction from the very moment of her launch.
What precisely had gone wrong?
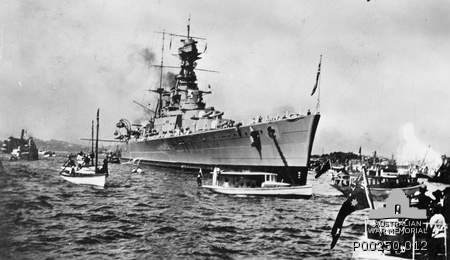
HMS Hood in Sydney Harbour – Wiki
Work on the Hood had commenced in 1916, with the intention that she would be the first of a new “Admiral” class of battlecruiser – intended to be the biggest ships in the fleet, the fastest capital ships, and each armed with eight fifteen-inch guns. The original design concept underwent serious revision after the loss of three battlecruisers at Jutland, but work still began before the end of that same year. However, the companion ships of the class were never much more than a set of drawings and preliminary work, given the intelligence out of Germany that the navy there had abandoned its plans for the “Mackensen” battlecruiser class. The war then ended before the Hood reached completion.
In the immediate aftermath of her triumph, Britain possessed the largest navy in the world and one that was full of ships of the most modern design. In 1914, none of the battleships and battlecruisers in the order of battle had been more than seven or eight years old. The revolution in warship design embodied in HMS Dreadnought saw to that. By 1918, that force had been further augmented by numerous ships launched during the actual war years, including the powerful Queen Elizabeths and the ships of the “R” class. The older ships had also had certain revisions – among which were the addition of extra armour, more director systems, aircraft launch platforms, and trims to forward funnels to cut down on smoke interfering with the control tops.
Just a few years later, a considerable number of these ships were gone – scrapped or about to be scrapped; used as training ships; used as target ships; and thus in one shape, form or another, no longer in active use.
Part of the reason for this was economy, and what one might see from a certain perspective as the possessor of the greatest empire in world history supposedly being short of the money to pay for a fleet of commensurate strength and presence. But the other reason was the naval treaties, starting with Washington, which the British government dutifully signed up to, kept to, tied itself up in knots to maintain, and this whilst at least some powers (guess who) were looking to do nothing but paying lip service towards.
For the British, this playing of the game strictly according to the rules was the other reason why the Royal Navy entered the second war in 1939 with a battle fleet largely made up of relics and retreads. The scrapped ships were not replaced – instead, Britain took her best ships from 1914-18, took some stuff out, added new bits here and there, and sent them out to do battle in 1939 with the semblance of modernity; although their speed, certainly in the case of the “R” class, was far from adequate. There were also issues with the guns, which were all fifteen-inch, but by 1939 were outclassed by the calibres being fitted to the new ships either under construction or already out of the yards in other parts of the world.
And what of any new ships? In truth, outside of the carrier fleet, there were precious few, and what there was bore all the marks of being designed by the remits of treaty obligations rather than the necessities of keeping pace with cutting edge of naval science. In the 1920s Britain added just two ships to her battleship fleet, the sister ships Nelson and Rodney. Whilst seeking to conform to treaty obligations over displacement, and put the maximum amount of armour in place, and get the maximum use out of that armour…and fit the biggest possible guns, the two ships had the bridge pushed way back towards the stern, whilst the three main turrets were all forward of that, more or less mid-ships, where the magazines and shell handling chambers were protected by the thickest section of the armoured belt. Although this made the ships look positively ugly and ungainly, it was a reasonable enough concept, and the ships handled better at sea than their appearance might have suggested. On the other hand, they were not fast ships, and the “pack it in and squeeze it round” approach to their design led to some almost comical results. Both ships were quite capable of damaging themselves, albeit not too seriously, when firing their nine sixteen-inch guns on a broadside angle anywhere near the bridge. And then, there were the events which might have come straight from Dean Wormer in Animal House – every time these guns fire, the toilets explode.
What had this to do with the Hood? Actually, quite a lot. Apart from Nelson and Rodney, the British built no more new battleships until the end of the 1930s; and these, King George V and Prince of Wales as the first completed, but both well after the commencement of hostilities, were the only ships with the right sort of speed and power to tackle a fully functioning Bismarck, Scharnhorst or Gneisenau. As for the Hood, it had the speed, but the firepower and protection were distinctly iffy. So it was that with a lack of ships to hand, (most in spring 1941 were here and there on convoy duty), and certainly a lack of ships to hand that could catch up with the Nazis’ fast brutes, the Hood had to be dispatched to meet Bismarck alongside a ship so new it was full of workmen, and with its crew still getting acquainted with the equipment, and the turrets and guns in a distinctly unreliable state.
And there was one other problem: Hood had had her original armour layout revised as part of the Jutland review, resulting in her carrying more weight than the original design had catered for. This, alongside god knows how much paint that had been lavished on the old girl over the years, meant she sat very low in the water. Along with other British ships that had been putting weight on, it was an aspect of their nature which could provide plenty of spectacular imagery as spray went everywhere in even moderate seas, but was hardly conducive to getting accurate readings from the forward rangefinders. On May 24th 1941, the Hood, coming in at a tight angle on Bismarck, had those forward rangefinders blinded by spray, whilst the rear turrets had nothing to see or shoot at until it was too late. This also probably played a part in Hood being slow in realising it was firing at the wrong ship (Prinz Eugen), whereas Prince of Wales corrected the same error quickly.
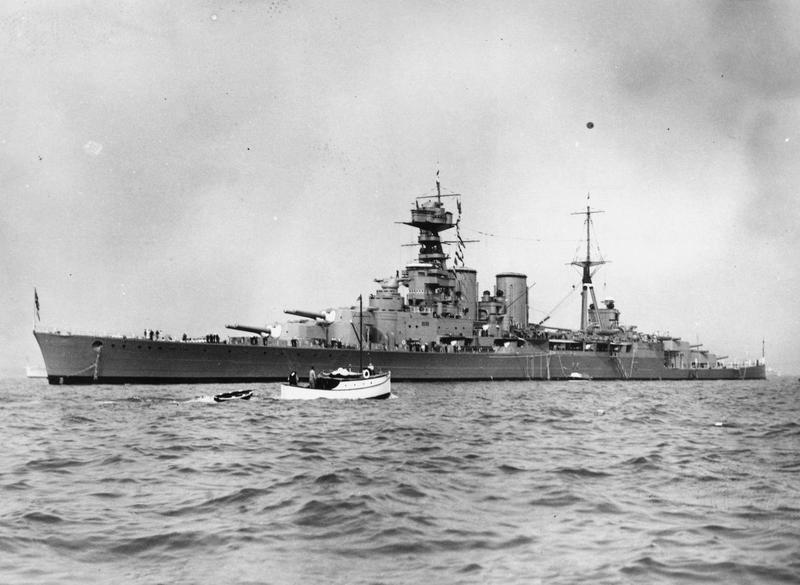
HMS Hood as seen from the HMS Repulse – Wiki
Nevertheless, the pride of the Royal Navy was a fine looking ship – yet one only has to look at the last great ships built by Britain, such as Vanguard, to see just how far behind the state of the art Hood was by 1940-41. She was the travelling emblem of the empire; but post-1918, the empire was looking distinctly uncertain about itself. British high-ups and well-to-dos filled the government offices and hotels of Africa and Asia, but in truth, they were becoming like that sort of guest who is in danger of outstaying their welcome, and in sensing they should go, still cannot quite make up their minds to do so. The Hood bore witness to all of this, and not so much, with retrospect, as a symbol of the empire, but symbolization of much that was unravelling in Britain and the empire – the Downtown Abbey classes in charge of everything, with little technical application, but rather with a predilection for the ethos of the amateur gentleman against the players, a mindset barely dragged past Waterloo, and the fond hope that playing it by the rules and with refined phrases somehow compensated for, in the words of one British historian, keeping a large chunk of the population “artificially stupid.”
What is so frustrating about much of this is that, had the Hood been brought as far up to date as she could have been, and if some swifter decision-making had brought Prince of Wales into service just a tad earlier, the Bismarck’s encounter with these two vessels would have ended with the German ship wrecked and sunk. The Bismarck was indeed another Nazi “rush job” – her supposedly invincible armour had not been extended to cover fuel tanks, main electrical installations, or the damage control centres. Furthermore, it had been discovered late that she could not be steered by engines alone, but that had been dismissed as something not worth bothering about; and as the final bit of icing on the cake, the first time she fired her main armament at an enemy ship (one of the shadowing British heavy cruisers) her radar packed in. This latter event did have one unforeseen consequence – for with Prinz Eugen sent ahead to cover the progress of the two German ships with some sort of radar facility, the similar profile of the two vessels at long range helped cause that initial British error of firing at the wrong target.
Just as problematic for the German Kriegsmarine as pinning their hopes on eight modern guns sitting on a heavily disguised Great War hull, was the overall operational plan. Rheinubung (Rhine manoeuvre) was originally envisaged as sending Bismarck with Scharnhorst, Gneisenau and some heavy cruisers out to attack British convoys. But the two German battlecruisers were far away as time moved on, the Tirpitz was not completed, and thus the only available ship to partner Bismarck was Prinz Eugen. On paper this still looked like a nasty threat to Britain’s overseas lifelines, but again things were not quite how they first appeared. Bismarck really did not have the range to go sailing, and hitting and hiding, around the Atlantic; and as the cancellation of the main part of the plan revealed after Bismarck was hit by Prince of Wales, there was no slack in the plan at all. Bismarck could not dare to raid with any sort of notable damage – she was essentially on her own and the risks were too great. And that was certainly the mindset of the admiral on board, Gunther Lutjens, who appeared to be as depressed and melancholic about the chances of Rheinubung as Molkte the Younger had been about the Schlieffen Plan.
So it was, that with decent intelligence as to Bismarck’s course and intentions in that May of 1941, the British Admiralty made to intercept her. Leading that effort was Admiral Launcelot Holland, who flew his flag from the Hood itself. Just what kind of man he was is a trifle difficult to ascertain, although there is some suggestion that he was too inflexible in his tactical approach to this battle; and that was perhaps sensed by Tovey, commander of the Home Fleet, who admitted in the aftermath of the battle that he had been on the verge of telling Holland to go against Bismarck with the better armoured Prince of Wales leading, but had refrained from so doing because of his dislike for telling such a senior figure as Holland how to fight his battle.
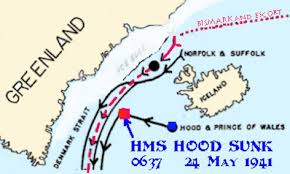
Holland’s intention had been to get across Bismarck’s bow at first light, essentially slamming the door in Bismarck’s face as far as advancing further into the Atlantic was concerned, and while his two capital ships engaged the main enemy, the cruisers Norfolk and Suffolk would take on Prinz Eugen. Holland also had a small number of destroyers with him, and these he hoped to use to both scout ahead and attack Bismarck as opportunity presented itself. As a plan, this was all quite sound, but certain of the details were not. Holland was leading with Hood, and therefore she was going to be attracting the heaviest fire immediately. Furthermore, Prince of Wales had been ordered to hold formation with Hood and was thus not free to fight her own battle as Rodney and King George V would do only a few days later. In mitigation, it must be said that Holland would have been fully aware of his other ship’s copious teething problems, and may not have wanted the two ships to get too far apart for that reason. Nevertheless, keeping Prince of Wales so close meant Bismarck soon found her range after dealing with Hood.
One other criticism of Holland was that he left it too late to launch the Walrus seaplane on Prince of Wales, and thus lost the chance of having the plane spotting the fall of shot as the battle got going. Again, mitigation can be offered, in that Holland was seeking to approach the battle entirely undetected – the radar was off on both big ships, communication was down to a minimum, and therefore, as battle neared, having the Germans catch sight of a seaplane and wonder where it had come from was not the ideal situation to precede what was meant to be an ambush.

Nevertheless, Holland’s cautious advance did cause problems, and in the end, helped lose him the advantage he had tried to gain. Around midnight 23rd/24th May Norfolk and Suffolk reported that they had lost contact with Bismarck. Given the difficult conditions, that was not much of a surprise; but Holland then broke from his intercept course in what appears to have been a mix of double-guessing his foe’s intentions and simply marking time in the hope of the cruisers re-establishing contact. That they eventually did, but by then Hood and Prince of Wales were off bearing (basically, chasing after the enemy) and Holland’s door had partly come off its hinges. Far from engaging in some abrupt manoeuvre, Bismarck had stayed on the same course the whole time, and Holland had conned himself into forfeiting a position which, at first light, would have initially placed his broadsides against just the bow guns of Bismarck.
But the interception was still very much on, and whatever the senior British officers felt by way of disappointment in having lost position, this was nothing compared to what was being felt by Lutjens. Expecting and certainly hoping for nothing more bothersome than a few trailing cruisers, in that early morning light he saw the Hood and what he assumed to be the fully operational King George V fast approaching. There can be no doubt that, in response, he froze in panic. Instead of choosing either to try and reverse course or face up to battle, he only managed a couple of orders to try and maintain distance, even though he had the pack ice off the Greenland coast dangerously close to where he was drifting. Even with the first salvoes from the British ships leaving their muzzles, he still did not give the order to fire back; and in the end, it was left to Bismarck’s captain, Ernest Lindeman, to protest that he was not about to let his ship be blown from under his backside, before giving the order to open fire himself.
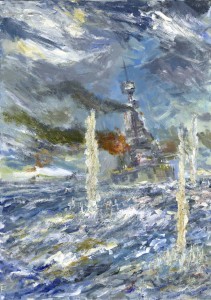
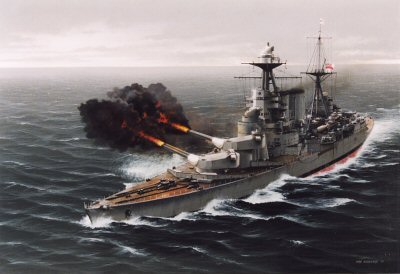
H.M.S. Hood’s Last Moment by the author Paul Comben
What we know of the Hood in these moments comes from what was seen from the Prince of Wales, and especially by her captain; and alongside that, most importantly, from the testimony of Ted Briggs, a young sailor whose duties placed him on the bridge of the Hood that morning. Briggs saw Admiral Holland seated in the admiral’s chair, with his binoculars pointed towards the enemy. In Roskill’s history of the Second World War at sea, there is doubt expressed as to whether Hood ever switched targets from the misidentified Prinz Eugen to Bismarck. But Briggs appears to have heard Holland order “switch target right,” in which case the error was clearly identified and was acted upon.
The challenge for the admiral at this stage of the battle was simply to get into a range where Hood’s serious vulnerability to plunging shell could be avoided. Getting this done as quickly as possible, coupled with the misfortunes of the night before, meant that both British ships could only fire their forward armament; and on Prince of Wales, one of her six forward fourteen-inch guns was not working at all. Ted Briggs believed he saw one hit on Bismarck, possibly from Hood, at this time; but what is without doubt is that the return fire from German ships was very accurate. Hood was first hit by an eight-inch shell from Prinz Eugen, and this might just have been the fatal blow. Certainly, it caused a very large fire around the mainmast, with explosions as the ready use four-inch ammunition lockers blew up. It was, of course, Chatfield’s suspicion that this fire reached other magazines, including the torpedo warheads, and prompted the subsequent catastrophe. To a certain extent, this can be corroborated by the inability of the damage control teams to get near the fire as ammunition shot off with lethal effect. In fact, the teams were told to keep away until the worst of the explosions were over. By then it may have already been too late.
In the meantime, the Hood pressed on, receiving a second hit soon after, and this from Bismarck. That hit smashed into her control platform and had the grisly effect of causing mutilated body parts to fall onto the open areas around the admiral’s bridge. At about that moment, Holland, judging Hood close to the safer range band, ordered a hard turn to port in order to bring his full broadside to bear. Three of the four turrets opened fire – Y turret remained silent, and while no one knows why it is tempting to wonder if the conflagration had already done harm in that direction.
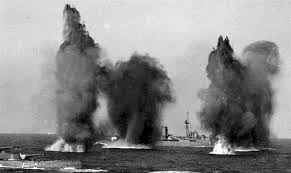
HMS Hood and Valiant under attack
And then Hood was hit by Bismarck again. Briggs reported that those standing on the bridge were knocked off their feet and that this massive jolt was accompanied by a blinding flash which swept past outside. There was then a report over the intercom: “Steering’s gone, sir.” To this, the Hood’s captain replied: “Very good. Switch to emergency steering.” For the next few moments, no one on the bridge was aware that a massive, volcanic pillar of smoke and flame was erupting from about the mainmast, and that the ship was in the process of being torn in two. When realization did come that the ship was doomed, Briggs was given first opportunity to leave the bridge, with an officer by name of Warrender stepping out of his way and waving him through. Turning as he descended from the exit, the teenage sailor saw Admiral Holland slumped in his chair, the captain beside him, utterly motionless and with a look of defeat and dejection on his face.
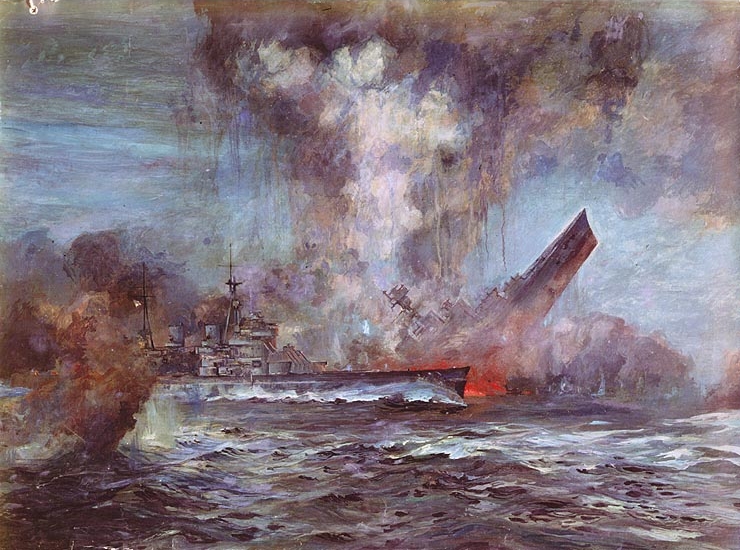
Sinking of the HMS Hood by J.C. Schmitz-Westerholt. Public Domain as a U.S. Naval Historical Center Photograph – Wiki
Captain Leach, on Prince of Wales, gave his own account of that killer explosion on Hood; and, in fact, the ship was gone in such short time that Prince of Wales was already skirting the final wreckage as she passed the spot only a minute or so later. Prince of Wales then engaged Bismarck alone, with Norfolk and Suffolk still not in place to contribute anything. The brand new warship scored two hits on Bismarck and drove a nail straight into the coffin of the Bismarck and Rheinubung as she holed her forward fuel tanks. She was hit several times in return, including a direct hit on the bridge, which killed near everyone except Leach. Despite these hits, Leach would have kept slugging it out with Bismarck had it not been for the total failure of Prince of Wales’ after turret. With fifty percent of his main armament not working, however, he chose to withdraw – not into the blue, but at a distance where he could effect repairs and continue to shadow the German squadron. His actions, although perfectly sensible, did not stop him being slated by Churchill, who, with depressing predictability, lapsed into yet another of his eloquent diatribes on a subject he knew nothing about.

From the original Italian: “Mappa dell’Operazione Rheinübung e delle operazioni della Royal Navy contro la nave da battaglia tedesca Bismarck” – Wiki [For those that need a translation, I’d say it means “A map of the operation Rheinübung and the operation of the Royal Navy against the German battleship Bismarck. – Ed]
But perhaps Churchill was suffering from shock. Tens of thousands of British lives had already been lost; the Nazis were twenty one miles away from the guesthouses and fishing huts of Dover; much of the east and the centre of London were wrecked, much of Coventry devastated; the nation was short of food; the armed forces short of everything; but worse than all of this, if only for a few hours on that day in May 1941, the loss of The Mighty Hood, together with all but three of its fourteen hundred compliment, told out the harshest blow. The men of Glasgow had built the hull and the heart of the ship; the men of Barrow-in-Furness had given her the guns – both had expected the call to make her stronger; but while they waited in those ordinary terraced streets, bereft of every social advantage save their own sense of community, the worthy had promenaded on her decks like she was some special seaside attraction, and danced and dined and laughed and toasted the King and the genteel semblance of things until the barrage sounded and it was all too late.
End of Part I.
In Part II, the Battle of the Denmark Strait will be refought using Avalon Hill’s 1978 Bismarck, Quarterdeck Games’ Royal Navy, and the Denmark Strait battle scenario from Avalanche’s Bismarck title in their Second World War at Sea series.
Resources:

What Happened to the Hood (Part II) – An Analysis
What Happened to the Hood – The Replays


Can’t wait for What Happened to the HOOD Part Two. The whole HOOD/BISMARCK episode must be one of the most interesting and pivotal moments of WWII. Looking forward to reading the gaming versions.
Thanks for posting. I’m looking forward to part 2 also.
My grandad served on the hood and was moved to the king George v because they were short of crew,so they picked the first person with the first letter in the alphabet in there second name,he lost all his friends on that ship,he was my hero
I can only guess at your grandfather’s range of emotions in the aftermath of such a thing. I have heard it said that the death of a great ship is one of the most appalling events in war. I do not doubt it.
You are probably aware that the man destined to become the third Doctor Who, Jon Pertwee, left the Hood only hours before she departed on her final mission.
And for all the technical and historical analysis we might do, all linked to why things happen, chance and the slips of fate always have some remarkable story to tell.
Good read.
Even given the British errors, it was a nearer run thing than it might first appear. There is no denying Hood experienced some bad luck. Had Holland had a little more time the battle might have turned out rather differently.
It’s been my experience when war gaming Denmark Strait that Bismarck tends to lose more often than it wins. Hood and POW represented a superior force.
The first alert I ever got that this situation was not as the films and popular opinion had it was when I played a decent enough PC version of the battle and saw the Bismarck reduced to a blazing ruin.
It’s hard to look past some massive fluke in the historical outcome, although those issues around inadequately stored AA rockets and torpedo warheads still linger.
For me, the issues around the Hood’s loss remain interesting – Chatfield’s letter, the repeated failures to modernise the ship, the bad habit of putting pomp and show ahead of fighting efficiency. Looking at the present debate about the UK’s shrinking defence budget, these issues are hardly a thing of the past.
Nice write-up, but I notice you’ve used material from hmshood.com (very first photo of Hood at sea in April 1941). Please acknowledge/cite the HMS Hood Association along with Mr John Russell who owns the original. Many thanks.
Thanks for pointing out my inadvertent error. I’ll be glad to update the article shortly. – Fred