By Fred Manzo
A “Strike of the Eagle” southern strategy
 Introduction
One of the many strong points in Strike of the Eagle (SotE) is its ability to provide each player with his own set of tactical problems, which evolve as the game progresses. For example, the initial problem for the southern Polish commander is how to create a healthy surplus of Victory Points before the strategic situation changes with the appearance of the Soviet cavalry army. Accordingly, I’d like to present a plan for the Southern Polish commander’s opening moves in a campaign game of SotE. This article sets out to solve the Polish dilemma through the creation and elimination of Out-of-Supply units and the capture of Kiev. It’s my hope that future Boardgaming Way articles will cover some of the other problems players struggle with in this remarkable game.
The Intel
“If you know your enemies and know yourself, you need not fear the result of a hundred battles. If you know yourself but not the enemy, for every victory gained you will also suffer a defeat. If you know neither the enemy nor yourself, you will succumb in every battle.” – Sun Tzu “Never be certain of anything. It’s a sure sign of weakness.” – Dr. Who
Overview:
After setting up the Campaign scenario it is advisable that the southern front Polish commander take a moment to review his situation. If he does, he will undoubtedly notice that most of his units have 3 Strength Points (SPs), while nearly all of the Soviet forces have only 2. That is, he controls 14 Polish units worth 37 SPs, plus one general worth 1 SP, while he faces 12 Soviet units worth 25 SPs for a total force-on-force ratio of 38 to 25. (i.e., per unit his forces are 50 percent stronger than their Soviet counterparts). He will also notice that he holds the initiative, although for how long is an open question. It is advisable that he make the most of these advantages while they last.

Note: Units with black squares are infantry, those with white squares are cavalry and those with green squares are allied infantry.
It is also important that he keep in mind the break points on the Combat Value Chart. Forces inflict 1 hit when attacking with 4 SPs, they inflict 2 hits when attacking with 7 SPs, and they inflict 3 hits when attacking with 10 SPs. Therefore, hand cards shouldn’t be used to increase a force’s total SPs if the new figure remains within the same range. For instance, when bringing 7 SPs to a battle, there is no good reason to use a hand card to raise the total to 9 SPs. Yes, once in a while this will result in a missed damage level, but, in general, the hand cards saved are worth far more than the occasional damage level lost.
In any event, due to a severe shortage of maneuver orders, it is never prudent to play a hand card for anything other than orders or to decisively affect a critical situation. Moreover, the Polish commander should be aware of what Combat Modifiers the cards in his deck will produce. There are 55 cards in the Polish deck:
Strike of the Eagle Combat Modifier Chart
| Combat Modifiers on a Card | Number of Cards | Percentage |
|---|---|---|
| 0 | 6 | 6 out of 55 or 10.9% will have a “0” Combat Modifier |
| 1 | 6 | 22 out of 55 or 40% will have a “1 or less” Combat Modifier |
| 2 | 16 | 38 out of 55 or 69.1% will have a “2 or less” Combat Modifier |
| 3 | 10 | 17 out of 55 or 30.9% will have a “3 or more” Combat Modifier |
| 4 | 7 | 7 out of 55 or 12.7% will have a “4” Combat Modifier |
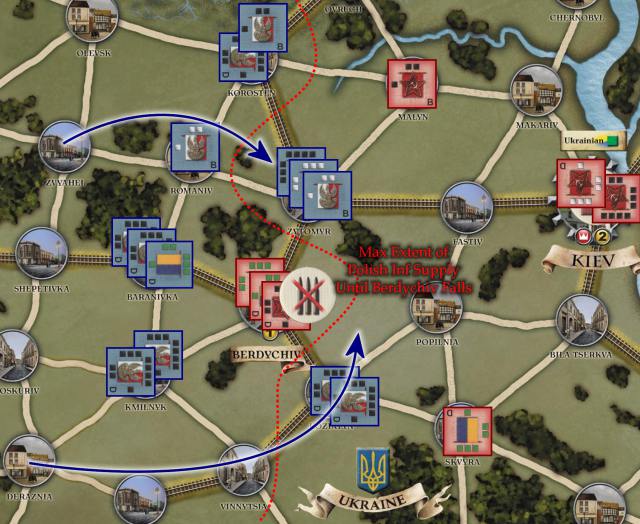
It is also vital for him to keep in mind that only 4 blocks may move along a single road or be located in a city at the end of an Operational Phase (rule 7.33). This limitation is critical when 5 or more enemy defenders are in any two adjacent cities. In such situations the attacker may be able to use a combination of stacking limits, supply line length limitations (rule 7.7) and, if necessary, detachments (rule 2.2) to place a defeated enemy force in a “no retreat” or “Out-of Supply” situation, which is the easiest way to generate extra Victory Points. As per rule 7.42, “The blocks may not retreat along a road or rail blocked by enemy blocks. Blocks with no area to retreat to are eliminated and are permanently removed from the game. A player receives 1 VP for each of his opponent’s blocks eliminated due to not being able to retreat.” In addition, the Polish general must be stationed with a friendly 2-strength unit in order to prevent his capture by roving “Soviet Partisans”, an event card that allows the Soviets to eliminate 2 Polish SPs in any city on the appropriate front. However, the main Polish problem at this stage of the game will be Soviet “Force March To” orders being placed behind their lines. To counter this, the Polish commander may find it worthwhile to Force March first, in order to pin fleeing Soviet units. Objectives: The southern Polish forces have the initiative, and they should use it. They ought to maximize the number of orders issued during the initial Operational Phase (O.P.) of the first turn. Even so, owing to a shortage of orders their commander must focus his initial offensive operations either north of Berdychiv or south of it. The northern section of this Soviet front is manned by 4 blocks, in 4 spaces, with 9 SPs. Running from north to south they are a 2 SP infantry at Ovruch, a 2 SP infantry at Korosten, a 2 SP cavalry unit at Romaniv and a 3 SP Infantry division at Baranivka. This is a total of 4 blocks, with an average strength of 2.25 SP each. South of Berdychiv there are 6 blocks in three spaces, with 12 SPs. Therefore, the Soviet forces south of the city are 33 percent stronger in total than their counterparts north of Berdychiv, but more importantly they are on the far end of the only Soviet rail line running through the area. Capturing their end of the Soviet Main Line of Resistance (MLR) won’t stop RR deliveries into the Berdychiv Pocket, while breaking through their lines north of the city will. As a result the Pole should strike north of Berdychiv.
Conclusions:
The Poles ought to generate enough orders in Ops Phase 1 to break the Soviet lines north of Berdychiv. Along this portion of the front their Schwerpunkt should be the rail center of Zytomyr. Their secondary goals are the elimination of the sole Russian cavalry unit facing them and, at a minimum, the reduction of the only 3 SP infantry division in the area. (Cavalry is good at flanking, so the Soviet cavalry must be knocked out immediately and the Polish cavalry protected. That is, when given the choice the Poles must always take casualties from their infantry units.) We would also recommend that the Polish commander begin with the supposition that the Soviets will be retreating, in general, for most of the first turn. However, they will also attempt to hold the key supply city of Berdychiv for as long as possible. In our opinion, this will force them to set up their Main Line of Resistance somewhere in the area of the Zytomyr – Berdychiv – Koziatyn road. Fortunately, these contradictory imperatives may leave the Soviet commander open to defeat in detail.
The Operational Plan
“No battle can take place unless by mutual consent” – Carl Von Clausewitz 1st Down: “Power Sweep Left”
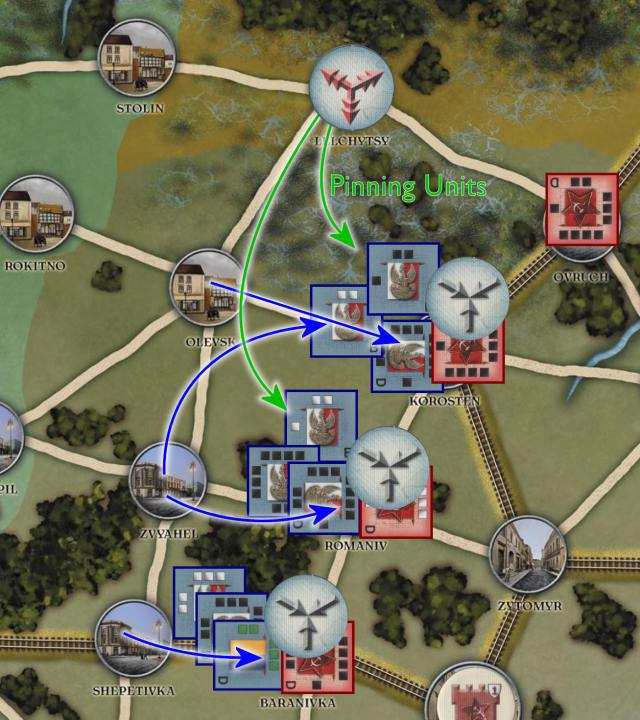 This plan requires 5 orders in Ops Phase 1, the mandatory recon order, a “Force March Out,” and 3 “Move Here” orders. It utilizes a well-positioned “Force March” out order to pin the two critical Russian front line units that are being targeting north of Berdychiv. The Polish commander places the “Force March Out” order in Lelchytsy and then locates the 3 “Move Here” orders at Korosten, Romaniv and Baranivka. The “Force March Out” order at Lelchytsy is used to move the 2 SP infantry unit to Korosten, pinning the Soviet infantry there, and to move the 2 SP cavalry unit to Romaniv pinning the Soviet cavalry. Baranivka is attacked by the Polish forces at Shepetivka for a total of an 8 SP attack, for 1 damage level if its defenders are under withdraw orders or 2 damage levels if they are under any type of move orders (assuming the Poles force march first and move first).
The reason Baranivka and Kmilnyk may be under withdrawal orders is because the unit at Baranivka is one of the strongest unit the Poles will face and the forces at Kmilnyk are the greatest concentration of enemy forces anywhere along the front. Attacking Baranivka would then result in reducing its defenders to an average 2 SPs at no cost to the Poles if they are under a withdrawal order, and assuming the Soviet forces at Kmilnyk are also under withdrawal orders, bypassing them during Ops Phase 1 will leave them in an exposed position for Ops Phase 2.
Of course, they may be under Force March orders, in which case the Poles will probably be able to advance adjacent to Berdychiv unhindered. The “Move Here” orders at Korosten and Romaniv, allow Korosten to be attacked by the 3 SP Infantry division at Olevsk, and the 2 SP cavalry unit at Zvyahel, plus the FM pinning unit mentioned above for a total of 6 attack points (1 damage level) and if the Polish commander now draws anything but a “0” strength Combat Modifier from his deck (an 89.1% chance), the total attacking strength will be 7 (2 damage levels). Finally, Romaniv is attacked by both infantry divisions at Zvyahel plus the FM cavalry pinning unit mentioned above for a total of 8 SP (again 2 damage levels). This portion of the initial Polish plan will probably result in the Soviets losing 5 SPs, out of the 12 that start on this portion of the front, for a 41.6% casualty rate (or a 20% overall casualty rate for the southern front). It cost 5 orders and possible 1 or 2 Strength Points. Therefore at the end of Ops Phase 1 the strength point ratio along this front should improve to 36 to 20.
The next Operational Phase ought then to open with a weakened Soviet MLR and a strategic threat to the key city of Berdychiv along its northern flank. In addition, by destroying the sole Russian cavalry unit and assuming, one way or the other, the 3 SP infantry unit at Baranivka takes a one SP lose, the Polish commander has now made his Intel gathering much more effective for the rest of the turn. He now knows for certain that all the Russian blocks he’s facing are infantry and all of them, or practically all of them, are 2 SP units. (The Russian southern commander started with 2 SP infantry units exclusively except for the cavalry unit just destroyed and two 3 SP infantry units, one of which was probably just reduced to a 2 SP unit, and a lone one Strength Point infantry unit.) So from now on, or at least for most of first turn, in order to get a quick and dirty estimate of the maximum Russian strength in any city all the Polish commander has to do is multiply the total number of blocks there by 2.
2nd Down: “Three Yards and a Cloud of Dust” “If you aren’t fired with enhusiasm, you’ll be fired with enthusiasm.” – Vince Lombardi
During the second and third Ops phase the Polish southern front commander has a number of possibilities. While he should concentrate on destroying as many of the Soviet units defending the critically important city of Berdychiv as possible, how to best go about this remains an open question. As Helmuth von Moltke the Elder said, “Strategy is a system of expedients.”
If the Polish forces during Operational Phase 2 are in a position to attack Berdychiv directly with enough strength to capture it (keeping in mind that it has no permanent fortifications), then they should consider doing so. But that might not be possible or even preferable. Just consider that Zytomyr, the northern key to Berdychiv, might be occupied by the Soviets during the second Ops Phase because, although the two blocks usually assigned to defend it were already destroyed, the Russian commander may have felt compelled to rush additional units there on the basis of it being the northern end of his MLR.
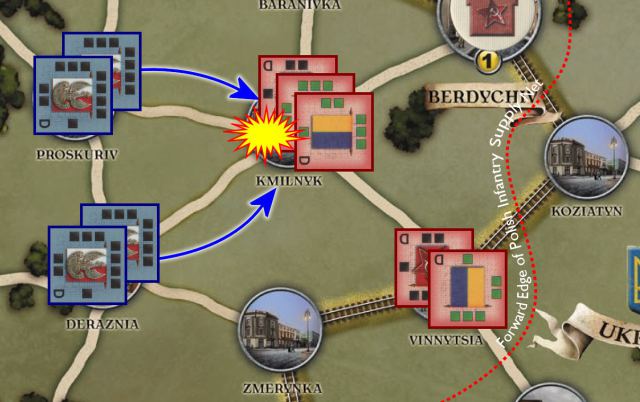
However, after studying how best to capture Zytomyr the Polish commander might also find it profitable to redirect his focus further south. In particular, if the Soviet concentration at Kmilnyk was under an un-triggered withdrawal order during Ops Phase 1, they will still be there, and partially surrounded. “Force March To” and “Move To” orders at Kmilnyk combined with the ability to Force March first might then result in three additional Soviet units being eliminated. Of course, these units may be under yet another withdrawal order. Although it is more likely they will be under Force March orders so that they may be depended upon to fall back into Berdychiv.
On the other hand, the Soviets south of Berdychiv face problems too. If the Soviets anchor their Main Line of Resistance at Koziatyn they may have inadvertently shut down one of the only two escape routes out of Berdychiv, due to overstacking problems. But, if the Soviet’s decided instead on a forward defensive strategy and run their MLR through Vinnytsia, all they’ve done is to clear their path of retreat out of Berdychiv at the expense of extending their left flank into the Pole’s supply net. Either way the Soviet’s southern anchor is in serious trouble. Conclusion: Before attacking in Ops Phase 2 it may be wise for the Polish commander to determine exactly where the Soviet’s have concentrated or perhaps over-concentrated. An attack towards the middle of their line may destroy fleeing Soviet units due to an inability to find a valid path of retreat, while attacking the end of their MLR may allow for a concentration of Polish forces and the use of flanking attacks. In either case, it is to the Polish commander’s advantage to pocket the maximum number of units before the Russian commander decides it is his duty to save Kiev at the expense of Berdychiv. 3rd Down: “Power Sweep Right” “Winning is not a sometime thing; it’s an all time thing. You don’t win once in a while, you don’t do things right once in a while, you do them right all the time. Winning is a habit. Unfortunately, so is losing.” – Vince Lombardi
Now, working out an initial strategic plan this far into an operation is little more than an intellectual exercise. But it should give commanders a suggestion of what actions are in their best interests. For example, even if the Soviets appear to have created a strong position at Berdychiv, it probably only consists of 3 two strength blocks and the sole remaining 3 strength infantry block for 9 SPs, plus a 1 SP garrison, for a total of 10 SPs on defense. Also, if the Russians are doing everything they can to hold Berdychiv, as this deployment suggests, any single order placed there will probably be a defend order. As a result, the Soviets there will probably not be capable of fighting their way out of a pocket once it closes around them. If, however, there are two orders placed in Berdychiv they are likely a “Defend” order and a “Move To” order, which is being used in an effort to cancel flank attack effects. (Not an overly wise strategy considering that their original plan was to defend Kiev at all costs. Remember, units lost in the defense of Berdychiv are not available for the defense of Kiev.)
——————————————————————————————————————————–