Part VIII
By Josef Tham
Verdun Road – Blame The Guard!
 Neither Forton’s 3rd nor Wilhelm’s 6th Cav could reach the road in the dark. The OOC Prussian Guard horse artillery promptly withdrew off the map (Withdraw!), leaving the exit hex empty. DuBarail (light green) thanked the Fates and took possession, gaining the French a Control Marker that would give them a Minor Victory unless he was somehow ousted.
Rheinbaben’s 5th Cavalry Division, its light cavalry brigade knowing the French were at the end of the road, simply followed it in order to assault DuBarail when running into him. Alas, they were too hesitant in their advance and failed to make contact (couldn’t Engage due to a Command Initiative chit changing their Posture to Defensive).
The 5th Cav finally assaulted, using the Prussian CIC chit, and weathered some inaccurate French horse artillery fire but rolled poorly and failed to push the French cavalry off the road…
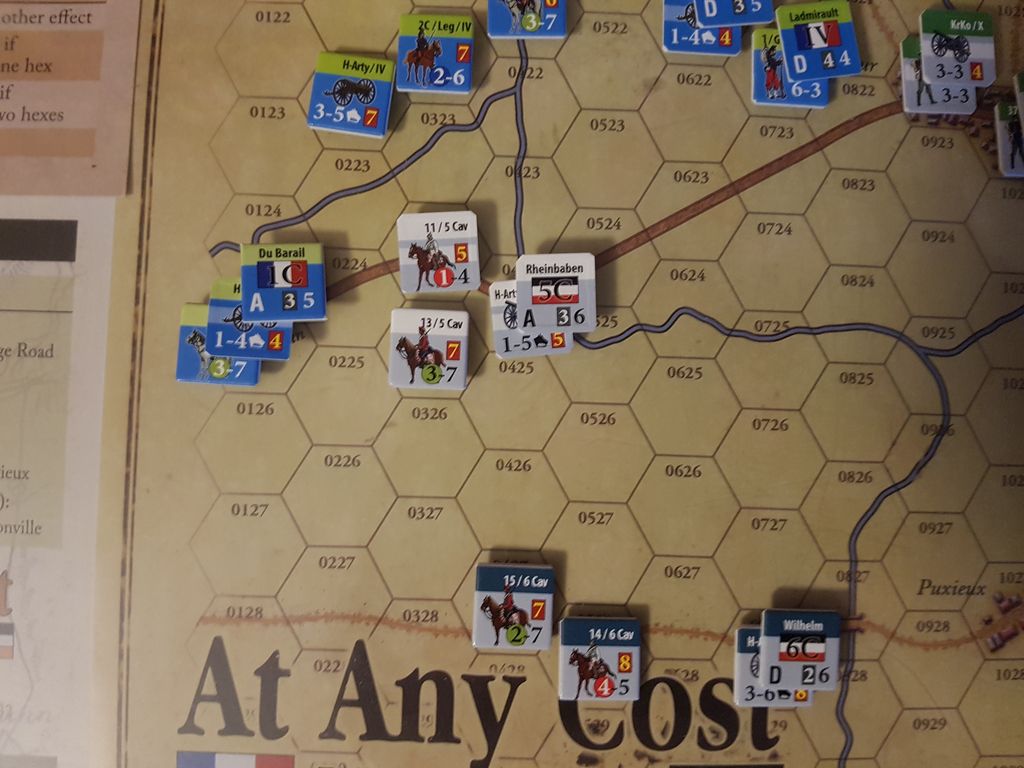
Despite brave attempts by Rheinbaben’s Uhlans and Cuirassiers (white), they failed to clear the road of French Chasseurs from DuBarail’s gallant 1st Reserve Cavalry Division, and thus the day was decided…
The Prussian Aggressive Tactics chit was drawn late and easily negated with a roll on the fully loaded Prussian Aggressiveness track.

A view of the battlefield as the Dusk 9 pm turn ended and darkness fell…
Final Results
And so the battle ends with a French Minor Victory! Both sides hold their Mandatory hexes (Mars-la-Tour and Puxieux for the Prussians, Jarny and Rezonville for the French) so neither side won a Major Victory. The French hold three of the Minor Victory hexes (Bruville, Vionville, and the Verdun Road) to the Prussians’ two (Tronville and Flavigny).
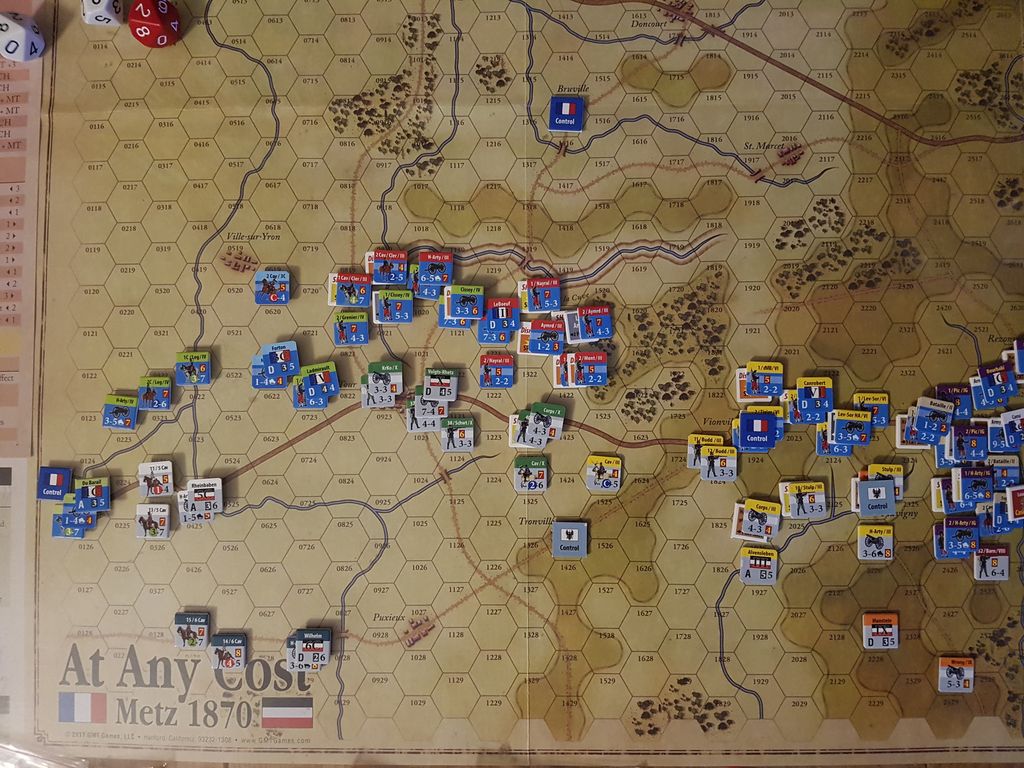
The Control Markers for the Minor Victory count – the French have (from left to right) the Verdun Road exit hex, Bruville, and Vionville; the Prussians have Tronville and Flavigny.
Man, the Prussian side has a tough job! Getting hold of Vionville and Flavigny early, probably partly because I activated the distant IV Corps (green) as the first French formation rather than the closer II (khaki) or VI (yellow) Corps, the Prussians still failed to hold on to both hexes against mounting French pressure. The loss of the Verdun Road could possibly have been avoided if I had redirected the Prussian cavalry earlier, but at the time, the Flavigny line still looked terribly vulnerable and in need of all the help, it could get.
Minor Analysis
 I took a long time before attempting this scenario, guessing I would find it terribly frustrating trying to counter the huge mass of French with mere cavalry. I didn’t count on the French formations moving so terribly slowly, even without delays by Bazaine’s Malaise (which failed to do anything up until late in the session), though I did give a lot of thought to maneuver space to avoid the French corps crowding each other. Once battleworn the French units are fairly crawling forward!
Prussian artillery is a killer! The French losses quickly grew to hideous proportions, the Krupp guns just hammering them whenever they came within effective range! The French Chassepots are also deadly but the French find themselves handicapped by their smaller brigades who really need some mitrailleuses to put the hurt on those stubborn fortified Prussian positions. The French artillery also really needs to form proper artillery stacks to be effective but that robs the infantry brigades of those valuable mitrailleuses. The low TCR of French artillery also makes them vulnerable, as demonstrated by the huge artillery losses in this battle.

The Broken non-rebuilt units at the end. The numbers include eight (!) French divisional artillery units and one French Corps Artillery unit.
So yeah, I understand players who say the Prussians are overpowered, but their objectives are so hard to achieve, which makes for a really tense interesting game. As the French you simply have to count on everything taking a lot of time, planning well in advance, taking the time to suppress those scary Prussians properly before even thinking of getting into Defensive Fire range. The variety found between the two Full Battle Scenarios, this one and Bloody Thursday (where the French are on the defense but will have a hard time winning without counterattacking), is wonderful!
What could I have done differently?
1) Well, a different sequence of activation for the French corps, most obviously! What if I had first activated Frossard (khaki), who could then have taken Flavigny quickly, then LeBoeuf (red), who could then have reached Mars-la-Tour first, and only after them Ladmirault (green), who probably wouldn’t have reached Mars-la-Tour but could have been sent to help out in the center.
2) Sent the French Imperial Guard west quicker, actually giving them time enough to assault.
3) I don’t know if I could have been more patient setting up the French attacks, giving more time to suppressing Prussian defenders before assaulting, because every moment my French infantry brigades spent waiting was another chance for the Prussian artillery to wreak havoc.
4) As far as the Prussians go, I have no clue! They were glorious! I spent a ton of chits on trying to prevent Prussian Aggressive Tactics from working and on the Prussian Reinforcements track, which feels like the right decision. They were simply unlucky with Bazaine’s Malaise failing to affect French formations right up until the very last turns.
Well, actually there are a couple of things… I definitely should have sent the Prussian cavalry west to protect the Verdun Road earlier! And if Voigts-Rhetz’s X Corps (green) had faced only a single French corps at Mars-la-Tour I may have tried sending at least part of one division to the east to help holding (or retaking) Vionville. I’d have to leave his HQ on the road to make sure both the Mars-la-Tour and Vionville units stayed in Command Range but Voigts-Rhetz has one of the best Command Ratings in the game (and road hexes count only half a hex for Command Range purposes). If necessary I could have used his corps cavalry or split one brigade into detachments to maintain contact.
Most Valuable Playing-Piece
For the Prussians, without a doubt Wilhelm’s glorious 6th Cavalry Division (dark green), holding Flavigny against overwhelming odds for long enough to get relieved!
For the French, without a doubt, Canrobert’s VI Corps (yellow), consistently hammering Prussian formations, taking Vionville, and right up until the very end trying to have a go at Flavigny as well!
Comparison to Historical Outcome
In this session, the Prussians got to both Vionville and Flavigny first, where historically Frossard’s II Corps (khaki) occupied them first, although the Prussians took them later in the day. Canrobert was much quicker off the starting line and much more effective on my table than in reality. I easily recognize the descriptions of Prussian units going all offensive and getting hammered by French Chassepots, as this is what happened to several of my Prussian units. The difference that most stood out is on the operational/strategic side, with my French formations marching quickly and getting into the action fast. It was only toward the end that repeated failures on both the tactical and operational level stumped them. Historically, the French seemed far more hesitant, delaying and dawdling time and time again.
The collision between the French and the Prussian X Corps (green) at Mars-la-Tour wasn’t quite as dramatic as historically where the fall of the town had seemed imminent, even though the later French attacks by III (red) and IV (green) Corps were considerably more determined in my game.
I never tried a proper attack on Rezonville, in which historically Manstein’s (orange) and Goeben’s (brown) formations suffered heavy casualties.
The cavalry in my session was hotly involved at first, with some magnificent charges, but no real “Bredow’s Deathrides” took place in my game.
French casualties in my session were simply immense! With the exception of the Imperial Guard (purple) and Ladmirault’s IV Corps (green), three entire French corps and two cavalry divisions were bled out, unable to continue offensive operations.
Was this minor French victory worth the price? Would the taking of the Verdun Road encourage Bazaine to pull his battered army west, out of the trap that is Metz?
Game Resources:
 At Any Cost: Metz 1870: BGG Page
At Any Cost: Metz 1870 Home Page