By Josef Tham (with permission)
Part I
A Day of Battle – Long Session Report
 Right, my very first solo attempt at the “A Day of Battle” scenario, after my three sessions of “Bloody Thursday!” And it’s a loooong AAR!
As usual, I write this assuming the reader either doesn’t have the Playbook at hand or hasn’t yet played the game and/or scenario, so there’ll be a bit of explaining regarding the map, victory conditions, etc before the action commences.
Short Scenario Background
Victory Conditions
Forces Involved
Situation At Set-Up
French and Prussian Plans
The Battle, 8 am to 9 pm
Final Results
Analysis
Comparison to Historical Outcome
Short Scenario Background
 Prussian cavalry runs into what they think is a rearguard of French forces escaping from Metz to join up with other forces at Verdun to the west, but instead stumble headlong into essentially the whole main French army. Marching to the sound of the guns, further Prussian units attack against impossible odds as they arrive, trying to cut off the French escape route.
In this game, formations activate in random order, decided by the draw of chits from a cup containing both chits for activations as well as chits representing battlefield events, the fog of war (FOW) and the various unique characteristics of the two armies. The Prussians have better infantry but totally inferior rifles, far superior artillery and a tendency toward aggressive tactics that can be highly effective (as in Auftragstaktik chit drawn) or just plain suicidal (as in Prussian Aggressive Tactics chit drawn). The French march slowly, suffer from inferior staff work (the French CIC chit allows for an extra activation on the part of nearby units from the same division, but will have to be played immediately, unlike the Prussian CIC chit which can be saved and played at just the right moment, plus the French will have to invest chits on the French Offensive Spirit track during any turn to even gain access to their CIC chit at all during the following turn) and have an army commander who hesitates too much (the Bazaine’s Malaise chit can immobilize an entire corps for an entire turn unless other chits have first been invested on the Bazaine’s Leadership Command Event Track).
Units first take Morale Hits (first becoming Shaken, then Disrupted) which reduce their morale and cohesion (Tactical Cohesion Rating, TCR) as well as their firepower (Strength Points, SP). Further Morale Hits flip the unit counter over to its “battleworn” side with reduced TCR, SP and movement allowance (MA) compared to its “fresh” side, representing heavy casualties. Some rolls on the Combat Result Table (CRT) makes it possible to take Casualty Hits (CH, getting flipped to the battleworn side) without first taking Morale Hits. A unit which is both Disrupted and Battleworn becomes Broken if it takes another Morale Hit (or if a Battleworn unit takes another CH), making a roll for whether or not it routs from the field (removing the counter, but it can be Rebuilt later during the Rally Phases), retreats or actually stays in position.
Units from a formation will have to stay in Command Range or end up Out of Command (OOC), acting randomly (a special OOC chit is drawn to determine what they do). Command Range depends on the quality of the formation’s commander but also on what Posture the formation’s HQ takes, which can be either Aggressive or Defensive. Prussian HQs have a better rating when Aggressive, the French when Defensive. Posture also determines what the units in the formation can do; in Aggressive Posture they may Engage (move adjacent to an enemy unit) and conduct Assaults, while in Defensive Posture they may move faster while marching on Major Roads and may also Rally (remove Morale Hits) and replenish ammunition (remove Low Ammo and Rationed Ammo markers) unless they are adjacent to an enemy unit, or even rebuild Broken units (who then appear close to the HQ).
Victory Conditions
What the French are trying to do is to gain and maintain control of the main roads from Gravelotte (to the east) to Verdun (off-map to the west), so they can break out and evacuate their main army from Metz (off-map to the east) to join with other French forces further west. If the Prussians gain Gravelotte it’d completely panic the French as they’d be cut off from their supplies and trains still back at Metz. Therefore the Control Markers in this scenario tend to be placed on towns controlling important points along the French escape paths. Historically the French ended up pulling back to Metz…
An immediate Overwhelming Victory for either side is unlikely but involves either the Prussians entering Gravelotte far to the right/east or the French controlling all the road exit hexes on the southern map-edge.
Preventing the other side from controlling their two Mandatory Victory Hexes can result in a Major Victory. For the Prussians, those are Mars-la-Tour (the two-hex town on the south-western part of the map) and Puxieux (the town five hexes south of Mars-la-Tour). For the French, those are Rezonville (the town hex about one-third of the way along the Major Road from Gravelotte to Mars-la-Tour) and Jarny about a third of the map north of Mars-la-Tour.
If both sides maintain control of those hexes you count Minor Victory Control Markers for the five hexes of Bruville (town between Mars-la-Tour and Jarny, slightly to the east), Vionville (town hex on the Major Road between Mars-la-Tour and Rezonville), Tronville (town hex between Vionville and Puxieux), Flavigny (town hex between Vionville and Rezonville, slightly to the south) and the “To Verdun” hex (the Major Road exit hex near the south-western map-corner).
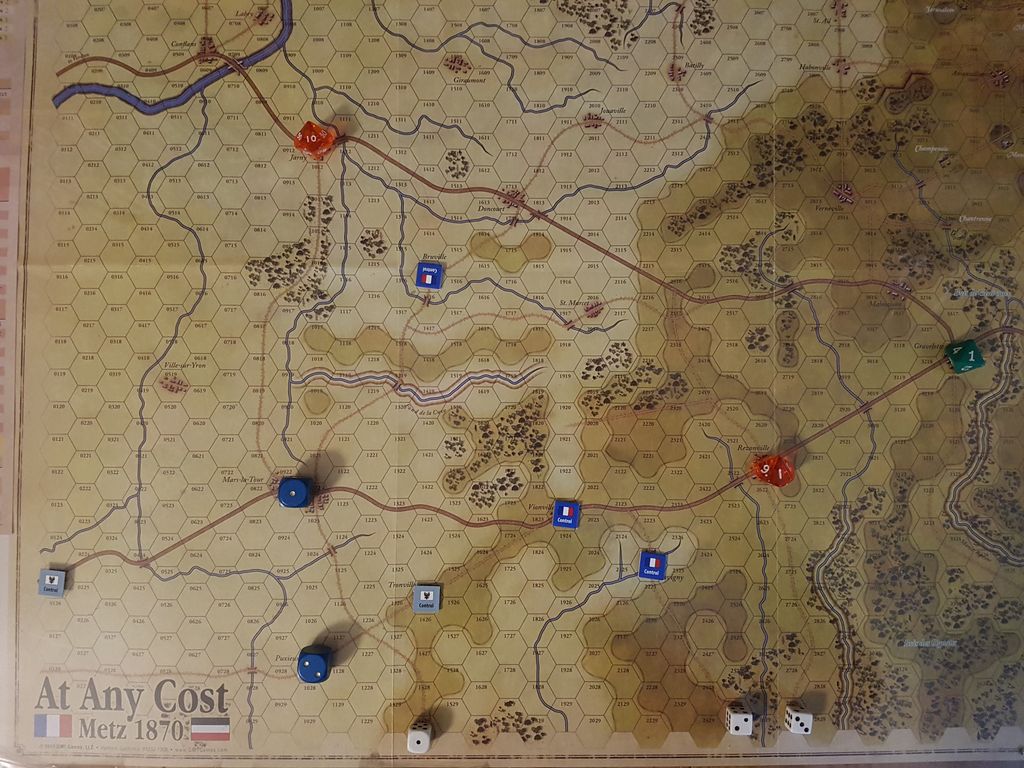
Control Markers are Minor Victory hexes, from left to right, the Verdun Road exit hex, Bruville, Tronville, Vionville, and Flavigny. Blue dice are the Prussian Mandatory Hexes, Mars-la-Tour (actually two hexes) and Puxieux. Orange dice are the French Mandatory Hexes, Jarny and Rezonville. White dice are the southern road exit hexes (control of all means an instant Overwhelming French Victory), while the green die is Gravelotte (control of which means an instant Overwhelming Prussian Victory).To better understand the placement and importance of these markers, you need to understand that Metz, the French fortress and supply base that the French actually wanted to evacuate, is off-map just to the east (right) while the two Major Roads (the solid dark brown roads) lead to Verdun off to the west (left), where they hoped to join up with another French army which was being formed. The Prussian army is to the south (bottom, off-map) and had actually expected the French to be well on their way by now; thus believing they had actually encountered a rearguard rather than the flank of the enemy army. The Prussian intent is to cut off the French retreat. Bazaine, on the other hand, believed he was about to be cut off from Metz, where most of his trains and supplies were still located, slowed by massive traffic jams.
Forces Involved
The first picture shows the forces on-map at the start of the first turn.
Prussian Forces:
The only Prussian formation to begin the battle on-map is Rheinbaben’s 5th Cavalry Division, consisting of three cavalry units (two of them heavy/cuirassiers) and two horse artillery units. The first turn is a surprise turn in which the French do not get to activate at all so Rheinbaben can do quite a bit of damage to the breakfasting French cavalry nearby.

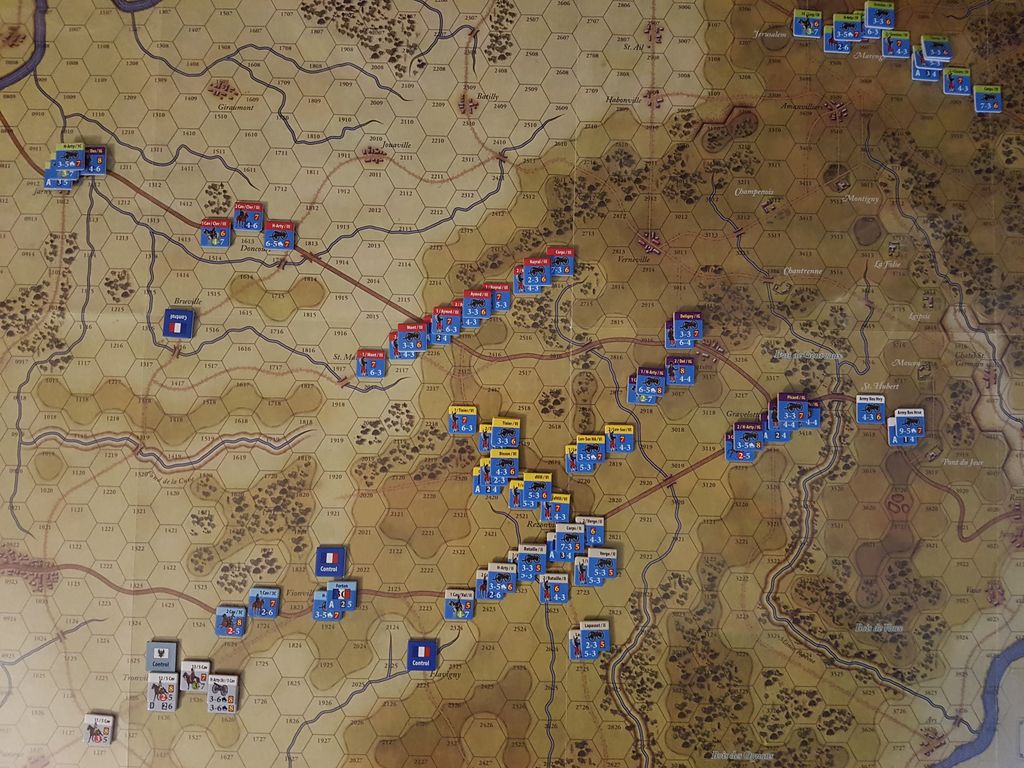
As the day progresses further Prussian formations will make an appearance, coming on in groups sorted by their hour of arrival and parent formation. Investing chits on the Prussian Reinforcements track during the turns and then making successful die rolls (depending on how many chits were invested) during the End Phases will allow a single group of reinforcements at a time to be moved on-map one hour earlier than the default arrival time.
At 10 am, Wilhelm’s 6th Cavalry Division (dark green) and Stulpnagel’s division from Alvensleben’s III Corps (yellow) will arrive from the south. The 6th Cav is weaker than Rheinbaben’s 5th Cav (white), with only two cavalry and one horse artillery unit. Stulpnagel’s division, consisting of two strong brigades and the usual excellent Prussian divisional artillery, isn’t accompanied by the III Corps HQ and so will end up Out of Command (OOC) during next turn.
At 11 am, the remainder of Alvensleben’s III Corps (including the HQ) will arrive, with Buddenbrock’s infantry division (two medium-strong infantry brigades and divisional artillery), the Corps Artillery and a medium cavalry unit with horse artillery…
Read More Here:
Game Resources:
 At Any Cost: Metz 1870 BGG Page
At Any Cost: Metz 1870 Home Page
At Any Cost: Metz 1870 BGG article – version 1.0