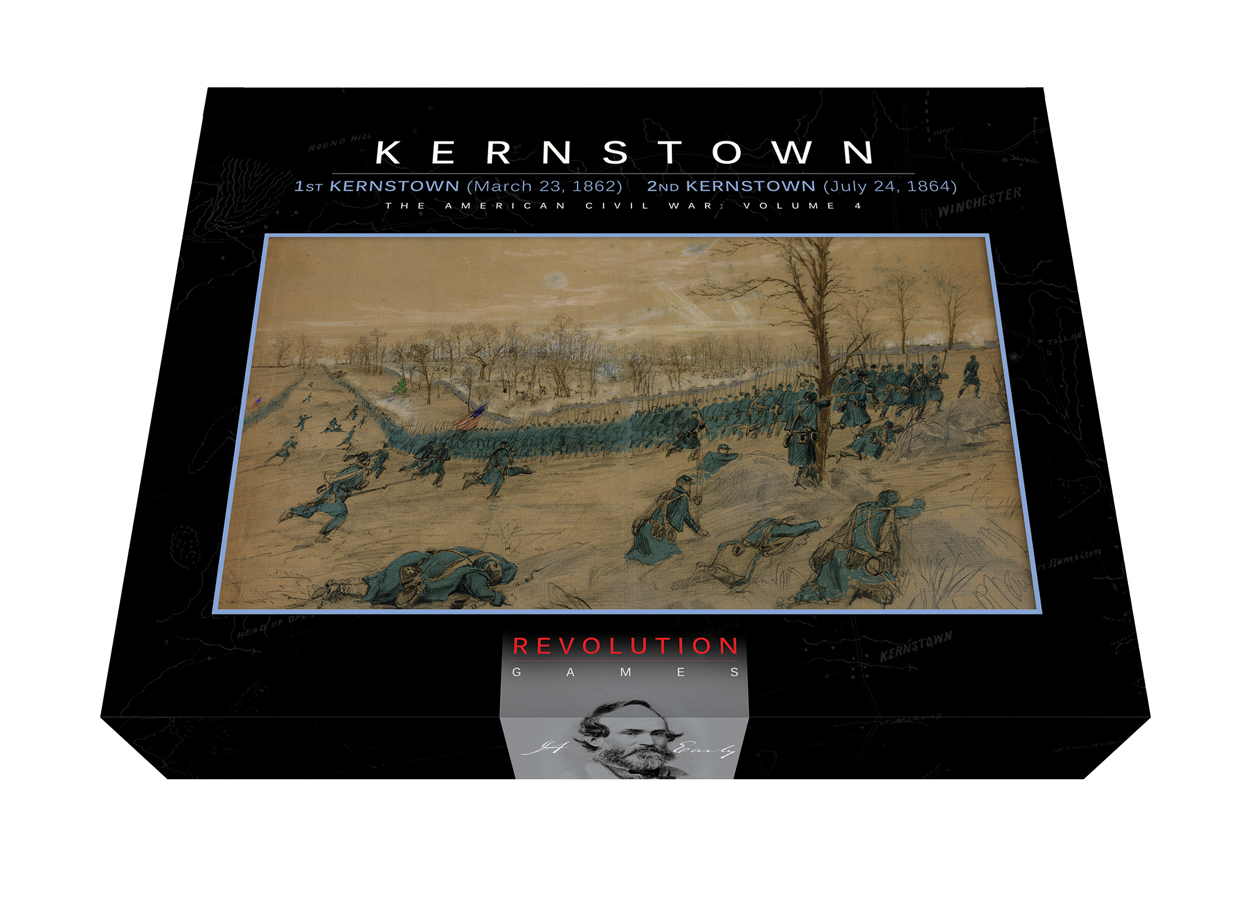
By Claude Whalen:
[Editor’s Note: Claude Whalen is the designer of the upcoming Revolution Games “First and Second Kernstown” in their “Blind Swords” series. He was also one of the main playtesters for Revolution’s “The Devil’s to Pay” and “Longstreet Attacks: The First Day at Gettysburg” among his other accomplishments. Claude knows “Blind Swords.”]
Though most American Civil War players have heard of 1st Kernstown, due to Stonewall Jackson’s participation, Jubal Early’s victory at 2nd Kernstown is a much lesser-known battle. In Revolution Games forthcoming game “Kernstown,” players have the ability to fight the battle a few different ways. First, they can tackle the “Breckinridge Attacks” scenario. Union Commander Crook has decided to teach the Rebels a lesson and in attempting to do so, has placed his troops in a horrid position. Breckinridge is in position to launch his crushing attack and the game can potentially turn into a rout quickly. Yes, it is “historic” but no sane player is ever going to get himself into such a bad position.
The “Historic 2nd Kernstown” scenario starts earlier in the day and includes the potential of either Crook becoming aware of his situation quickly or Breckinridge getting his chance at a “special attack”. The Union has two goals in this scenario: hold Pritchard’s Hill for as long as possible; and, get the army away in order to fight another day. The Confederates have to capture Pritchard’s Hill, break as much of the Union army as possible, clear the map and minimize their losses. If Crook becomes “aware” quickly and Breckinridge is slow to get his “special attack,” the Union has a good chance of winning the game on points. The scenario starts at Noon after the morning skirmishing is done and the Union already has 15 Victory Points for holding Pritchard’s Hill. The Union has a slight manpower advantage until 1 pm so if Crook can get moving, the Confederates can take some damage early. Let the serious fighting commence!
I had the Union go on the offensive with Ely, Wells, and Johnson (the Union reserve) all advancing from the right of the Union line. The Union would then try to hold the Confederates off at Pritchard’s Hill while Sandy Ridge would be swept clear of Rebel troops. The Union attack would then try to draw some of Gordon’s troops off from his Pritchard’s Hill attack in order to stop the attempt to roll up the Confederates’ left flank.
The Union got off to a good start with the Rebel brigades of William Lowther “Mudwall” Jackson, Johnston, and Lewis all getting forced back. As Lewis went to Jackson’s aid, his men got shot up by Wells’ very large brigade. The Confederates looked like they were going to have their hands full on both Sandy Ridge and the Middle Road area. Early had Vaughn’s dismounted cavalry attack and rout Higgin’s Union cavalry and suddenly Crook had something to think about. Actually Crook had lots of things to think about, he just didn’t know it yet. In this scenario, each player has to decide if they want to use the FIRST event chit they pull as a Common event. If you use it as a “Common Event”, you get to make a roll at the end of the turn for Crook’s awareness or Breckinridge’s attack. If you use it, you lose the ability to roll for the special event this turn. At Noon, Early decided to use the first Confederate chit pulled (Rebel Yell) therefore Breckinridge did NOT roll for his special attack. On the 12:20 pm turn though, Early saved the chit, Breckinridge rolled and, voila, he got his special attack. He maneuvered his troops during the 12:40 pm turn and then launched his attack out of the woods at 1 pm.
Though Tibbitts had come up in support of Hayes’ Union brigade, the attack sent half of Hayes’ men reeling away. A “Rebel Yell” chit helped Patton’s Rebel brigade smash another regiment and suddenly the Union left flank was in worse shape than the Confederates’ left! Crook managed to roll a “1” and make his command roll, which helped stabilize things for the moment. Yet Gordon picked up the action once he heard the fighting and he activated both Terry and Evan’s brigades in an attack on the Pritchard House at the base of the hill. Some nice rolling allowed the Rebels to quickly sweep the House and Stone Wall area clear of the boys in blue.
At 1:20 pm, another “Rebel Yell” caused Hayes’ remaining shaken units to panic and so Wells’ Union brigade suddenly had to race to the support of Pritchard’s Hill. With the help of a brigade activation and the “Brigade Reserve Movement” chit, some of Wells’ units made it. Unfortunately, those units were either battleworn or shaken, as Wells stronger units were just too far away. His fresh units had to stop at the western slope of Pritchard’s Hill and that was all that Breckinridge’s men needed. Smith’s Rebel brigade got up the hill and suddenly the Rebels were behind Wells’ position on Pritchard’s Hill. When Forsberg was able to get his men on top of the hill in support of Smith, Crook had to make a major decision.
At 1:40 pm, Crook ordered his artillery off of the hill and that left Wells’ weakened units in a tight spot. While Patton finished off Hayes’ Union brigade and sent the future US President off to rally his troops, the Rebel brigades of Crook and Grimes came racing up the Valley Turnpike and destroyed Harris’ Union brigade. The Union had to retreat as fast as possible and hope that they can rally farther back on the field. If they cannot rally enough troops by 3 pm, they probably have to concede Pritchard’s Hill and try to save themselves!
Things looked bad for the Union as they had to switch from offensive action to a fighting withdrawal. It was at that time that Union Commander Crook made his “Awareness” roll and suddenly had his Command Roll increase from a “1” to a “4”. Once he became aware, he managed to make all of his command rolls until his army was safely off the field.
The scenario ended with the map cleared of Union troops and the Victory Point totals ended up as follows:
Union VPs:
33 VP for holding Pritchard’s Hill
19 VP for CSA casualties
14 VP for Union strength points retreated off the map.
19 VP for CSA casualties
14 VP for Union strength points retreated off the map.
66 VP Union Total
Confederate VPs:
12 VP for the time they held Pritchard’s Hill
58.5 VP for Union casualties on the Break Track or eliminated
70.5 VP Confederate Total
So in the end, what happened?
Once Breckinridge got his “surprise attack” on his first roll, the game was probably going to be a short one. He smashed the Union left which caused Wells and Johnson to abandon the Union attack and rush towards Pritchard’s Hill. Breckinridge got to the top of the hill first, going up the eastern slope about halfway down the length of the hill. The Rebels cut off Harris, Linton, and part of Ely’s men.
In cutting off the Union troops where he did though, Breckinridge didn’t get behind all of Crook’s army so it was possible for the Union to set up a strong delaying force. Wells and Johnson’s Union regiments were able to fight their way back to the north edge of the map while Harris, Linton, and Ely fought hard but eventually, they were unsuccessful in their escape attempts.
Crook eventually became ‘Aware” and then never missed a roll till the Union troops were off the map. With Crook’s help, a large portion of his army was able to escape (very true to History). Breckinridge’s rush up Pritchard’s Hill actually made the game closer than it should have been. The Union came close to winning on points and that means only one thing, set it up again!