By Fred Manzo
Detailed Rules Summary
Player’s Aid # 1
Introduction
Glossary of Terms
1.0 The Game Map
1.1 Terrain: A hex containing more than one type of terrain is considered to contain only the single terrain type listed here first: Woods, Rough, Broken, Mixed and Clear.
2.0 The Playing Pieces
3.0 Sequence of Play:
1. Weather Phase.
2. Resupply Phase.
3. Allied Air Phase.
4. Allied Command Phase.
A. Remove Allied Attacker Disrupted (AD) Markers.
B. Assign Unit Modes.
C. Begin Bridge Repair and Position Construction.
5. Allied Movement Phase.
6. Allied Fire Phase.
7. Allied Communication Phase
A. Remove Allied Defender Disrupted (DD) Markers
B. Check Allied Lines of Communication.
C. Complete this turns Stream Bridge Repair.
8. German Air Phase.
9. German Command Phase.
A. Remove German Attacker Disrupted (AD) markers.
B. Assign Unit Modes.
C. Rewire Intact Bridges and Begin Position Construction.
10. German Movement Phase.
11. German Fire Phase.
12. German Communication Phase.
A. Remove German Defender Disrupted (DD) Markers.
B. Check German Lines of Communication.
C. Complete this Turns Prepared Position Construction if Combat
Engineers (CE) involved.
4.0 Unit Modes: Combat vs. Travel Modes
4.1 Combat Mode: Is cross-country movement when ready for combat.
4.2 Entering Travel Mode: Units must be on a road. Allied Airborne Artillery or Recce units may not be in Travel Mode the turn they land.
4.3 Leaving Travel Mode: A unit may drop out of Travel Mode in its Command Phase in any terrain it may enter in Combat Mode. A unit in Travel Mode also drops into Combat Mode if it becomes Disrupted.
4.4 Effects of Travel Mode: The road bonus movement, for motorized units when not expecting combat, can be infinity. Artillery and flak only move in Travel Mode.
5.0 Controlling Hexes: Heavy Vs Light.
5.1 Heavy Control: Exerted by units with Heavy Weapons. See counter. It stops movement. Turns into Light Control in a city. Exception: A flak unit with Heavy Weapons exerts Light Control. When first moving, it cost 3 MP to leave Heavy control if in Combat Mode.
5.2 Light Control: Exerted by units without Heavy Weapons. Cost 2 MPs to leave if in Combat Mode.
5.3 No Control: Artillery, Flak W/O Heavy Weapons, Garrison, HQ, Disrupted or Travel Mode Units.
6.0 Movement: Units in Combat Mode have a M.A. of “6.” Units have 0, 6 or an infinity number of movement points.
6.1 Movement Costs: The cost of entering various hexes changes due to the unit type, mode of travel and terrain type.
6.2 Movement Restrictions: Disrupted, static and garrison units have a “0” M.A.
6.3 Combat Mode Movement: Must stop when entering Heavy Control.
6.4 Travel Mode Movement: Moving along a road in column. Watch out for traffic congestion on minor roads. It costs 2 MPs to leave Light Control. See the Terrain Effects chart under Travel Mode for lower costs. A travelling motorized unit has an unlimited Movement Allowance.
6.5 Motorized Exploitation Movement: When adjacent to an enemy-occupied hex, which is connected by road, during friendly fire phase may be allowed an exploitation move if the enemy unit retreat or is eliminated. An exploitation column in an uninterrupted chain has unlimited movement.
7.0 Stacking: A hex may contain one or two units, but never more than 5 steps. Check the chit for the number of steps in a unit with the number of triangles across the top of a counter represents the number of steps in a unit. Older editions use * on a counter to signify its steps.
8.0 Fire Combat: Direct Vs Indirect fire. Direct Fire is Close Assault. Indirect Fire is artillery/mortar fire.
8.1 General Fire Restrictions: Units in Travel Mode, Disrupted Units, Static Units W/O Heavy Weapons, HQs, Units that already fired may not fire. Artillery units may not fire directly.
8.2 Declaring Offensive Fire: Pick Defending Target hex.
A. Declare who will use Direct Fire, which is possible for adjacent units who may cross the hexside and enter the hex in combat mode.
B. Declare who will use Indirect Fire, which has Heavy Weapons (artillery and non-
artillery units may be involved) A non-artillery unit with Heavy Weapons must be adjacent
and an Artillery unit must be in range not in an enemy controlled hex and must be able to
spot the target.
C. Declare use of any HQ engineer or Anti-Tank support for the attack. There must be one
direct fire unit from that formation in range of the HQ for this support.
D. Calculate whether the attack will be considered an Indirect or Direct attack. If more than
half the declared units are using Indirect Fire, the entire attack is Indirect.
8.3 Declaring Defensive Fire: Any attacking unit may be a target of Defensive Fire.
A. Declare which defenders will attack which attackers. Defensive Fire may be used by any unit under attack. They each attack one unit. This may be the same unit if that’s the only choice.
B. Declare which units other then the defending one, who will conduct Direct Defensive Fire (I.E. flank attackers). It also has to be adjacent to the attacking unit, the attacker must be in terrain the defender could move into in combat mode and the hexside must be crossable for this unit in Combat Mode.
C. Declare which units will conduct Indirect Fire (I.E., They have Heavy Weapons). Non-artillery units must not be under attack and must be adjacent. An Artillery unit must have a spotted target, within range, and not itself be in an enemy controlled hex.
8.4 Resolving Defensive Fire: One fire at a time.
A. Add up the Fire Strength of all the inactive units firing at the attacking target unit.
B. If at least half of these UNITS are conducting direct fire consider this Direct Defensive fire. If more than half the units are conducting Indirect Fire at the attacking unit consider this Indirect Defensive fire.
C. Consult the Fire Modifier Table to determine the total modifiers.
D. Roll a die and add the total modifiers to it. Cross-refer the Fire Strength total with the modified die roll. The attacker applies this result to the attacking unit immediately.
E. Repeat this procedure for each attacking unit that is being fire upon.
8.5 Resolving Offensive Fire: All the surviving units together conduct one fire at the defending target.
A. Total the fire strength of all attacking units firing at the defending target hex. Disrupted or eliminated attackers do not count.
B. Determine if this is Direct or Indirect Fire. If this attack was determined to be a Direct attack it remains a direct attack as long as at least one direct attacking unit remains involved.
C. Check the Fire Modification table.
D. Roll a die and add the modifiers. Cross-refer the Fire Strength Total with the modified die roll. The defender applies the result to the defending target units immediately.
8.6 Fire Modifiers: Check the Terrain Effects Chart to find the basic fire modifier. The defender declares which type of the defenders will be used on this chart. Include the other modifiers. A unit conducting direct offensive fire across a bridge or stream hexside is considered in clear terrain if it is the target of any type of defensive fire.
9.0 Fire Results: (-) No effect, “D:” loss a step or become disrupted. “1” or “2:” Lose this number of steps or retreat 1 hex and loss the balance in steps.
9.1 Disruption: May not move, may not fire, exerts no control and may not spot for artillery. Simply update the disruption markers for any disrupted unit that again become disrupted.
9.2 Step Loss: Invert or replace the unit’s chit so that the chit reflects the total steps remaining.
9.3 Retreat: Static units, units already disrupted prior to combat, units in Travel Mode, artillery and flak units, an attacking unit and a garrison unit may not retreat.
9.4 Advance-After-Combat: One or two attacking units that used direct fire may advance into the vacated hex.
10.0 Artillery: Exerts no control, may not move in Combat Mode, may never retreat, may not conduct direct fire, but does conduct ranged fire, becomes disrupted whenever it fires. Remember the range of an Artillery Unit on a hilltop is increased by one.
10.1 Artillery Fire Requirements: The target must be spotted. There are 4 ways to spot a target.
– The artillery unit itself can spot the target
– The artillery unit can spot an eligible unit in the same Command that, in turn, can spot the target unit.
– The artillery unit is in communication with an eligible HQ unit that is, in turn in fire
communication with a friendly unit that can spot the target.
– The artillery unit is independent and is in communication with an independent unit in the same
Command that can spot the target.
10.2 Spotting: A unit that is not disrupted nor in Travel Mode can spot another unit if it is adjacent to the unit it wishes to spot or it occupies a hilltop hex within 2 hexes of the unit it wishes to spot.
10.3 Artillery Communications: Independent units in the same command may trace artillery communication directly to each other. If either the artillery or the spotting unit is in a formation, an HQ must be used to trace communication.
10.4 Artillery Disruption: Each time an artillery unit fires it become disrupted.
10.5 Self-Propelled Artillery: SP artillery is regular artillery when not adjacent and regular armor when adjacent (I.E., it’s not disrupted).
11.0 Headquarters Units: Exerts no control, may not stop an enemy unit entering its hex, has one step for stacking, may never be targeted by enemy fire and may no fire, may become depleted or suppressed.
11.1 HQ Capabilities: Must not be disrupted. Has a range of from 1 to 3 hexes when helping units in
its formation. An HQ capability with no range may only use in that hex. HQ capacities may be
lent out to units in range and in its formation.
11.2 Combat Engineers: Combat Bonus, Entrenching/Preparing Position Bonus, Repair Bridge and for German’s Re-wire Demolition. Using Combat Engineers may cost supply points.
A. Negates Prepare or Entrenched position during Direct Offensive fire. Costs 1 Supply Point.
B. Direct Offensive Fire Bonus. Costs 1 Supply Point.
C. Defensive Combat Bonus. Costs 1 Supply Point.
D. Aids in Prepared Position Construction at No Cost.
E. Constructs Entrenchment. Costs 1 Supply point.
F. Repairs a Stream Bridge for Allies Only. Costs 1 Supply point.
G. Rewire a bridge for Demolition for Germans only at no cost.
11.3 Bridge Engineers: All 3 Allied HQ’s in XXX Corp contain bridge engineers.
A. Repairs a Stream or Canal bridge.
B. Allows Allied Non-Motorized Infantry to cross an Unbridged River or Canal. Only one HQ may perform this function per game-turn.
C. Cross-River or Cross-Canal Evacuation.
11.4 Anti-Tank Weapons: A Max of +1 for Anti-Tank Support. May only use either Anti-Tank support Bonus or the Direct Attack Combat Engineer (CE) Bonus – Not Both.
o HQ Flak: Two German HQs have Flack.
o HQ’s in Combat: An unmodifed roll of 6 may affect enemy HQs if it’s lending support.
11.5 HQ Flak: Two German HQ units possess flak, which may be used to hamper the use of Allied Tactical Air Points, Airlandings, and air resupply.
11.6 Headquarters in Combat: An HQ that occupies a hex with a defending target unit that becomes disrupted as a result of enemy fire does not become disrupted.
11.7 HQ Depletion and Suppression: A depleted HQ can’t trace supply to a source. It can’t help in Combat.
11.8 Catastrophic Loss: When this level of losses are met the formation’s HQ is immediately eliminated from play and Allied Airborne units become isolated if they can’t trace supply via XXX Corp.
12.0 Supply: A unit is in supply if it can trace communication to a valid supply source hex, and that source has at least one Supply Point. Some units are “isolated,” some are “out of supply.” An Out-of-Supply unit risks losing steps when it fires. A depleted HQ (one that cannot issue Supply Points) may not use its HQ capabilities. A Suppressed HQ is a Depleted HQ which cannot trace communication to any unit in its formation. A Suppressed HQ may not perform any game function.
12. 1 Supply Sources: For Allies – Supply Heads, Command HQ, hex 0113 or any road that leads to it. For Germans – It’s an Access Area Hex.
12.2 Supply Points: Each Command expends Supply Points when an HQ uses certain capabilities and when a 6 is rolled when conducting any type of fire.
12.3 Spending Supply Points for Fire: When an unmodified “6” is rolled a Supply Point must be spent for each non-artillery unit and one for each artillery step that actually fired. 12.4 Spending Steps for Fire: When there are no Supply Points available a unit may lose a step in its place when rolling a 6.
12.5 Isolated Forces: These forces do not have to be out-of-supply. They can have their own supplies.
12.6 XXX Corps Supply: It doesn’t use supply points. It has them in order to assign them to any of its units that become isolated.
12.7 Air Re-supply: The Allied player uses the Air Re-supply Table to re-supply his airborne forces.
13.0 Prepared and Entrenched Positions: During the game either player’s motorized Infantry, Infantry, or Anti-Tank Units may improve their defensive abilities.
13.1 Building a Prepared Position: If Combat Engineers are used the position is completed in the same turn.
13.2 Building an Entrenched position: It cost a Supply point. One per command limit.
13.3 Properties of Prepared and Entrenched Positions: Its effects may be cancelled by Combat Engineers. Use the Entrenched row of the TEC instead of the unit type row to find the Basic Fire Modifier.
14.0 Bridge Demolition and Repair: All bridges start intact.
14.1 Bridge Demolition: A Major Road Bridge over a River may not be Demolished.
14.2 Bridge Repair: A Destroyed River Bridge or Ferry may not be Repaired.
14.3 Rewiring a Crossing: The German player may use Combat Engineers to rewire an intact cross for another Demolition attempt.
15.0 Airpower: No Air Points are available during Night Turns.
15.1 Air Strikes: The Allied player may airstrike any German unit within 10 hexes of any HQ of XXX Corp Command with TAC Air Points.
15.2 Flak: The total number of German Flak Points exerted into one hex modifies air operations on the appropriate table.
15.3 Interdiction: Any hex within 20 hexes of any HQ of XXX Corp Command may be interdicted.
An interdicted hex costs 3 additional MPs.
16.0 German Reserves: German Units on the map may exit the map and also become reserves.
16.1 Reserve Movement: From any connected box to another or from the TR Box to any hex of the Access Area matching the TR Box.
16.2 Reserve Box Restrictions: A unit may never move from a reserve Box in one Command to the Reserve Box in another Command.
16.3 Exiting the Map: A German unit may move off the hexfield from an Access Area to a TR Box.
17.0 Allied Reinforcements: All units of XXX Corps Command are ground units and enter via the south mapedge. All other Allied units are airborne reinforcements and enter play by airlanding.
17.1 Allied Ground Reinforcements: Up to 6 available ground reinforcement units may be brought into play each game-turn.
17.2 Initial Allied Airlandings: During his Air Phase of Game Turn 1, 3 Supply Head markers are placed on the map and 40 airborne units airland. Each airborne unit lands in the hex on its chit or any adjacent hex. See the Airlanding Procedure rule 17.4.
17.3 Allied Airlandings During Play: Start as during Game-Turn 3. Each Airlanding Point allows him to land one available airborne reinforcement unit.
17.4 Airlanding Procedure: Once all units airland they are considered in-play and, if not disrupted, may move and fire normally during their airlanding turn.
17.5 Changing Drop Zones: Become possible on or after Game-Turn 6.
18.0 Playing the Scenarios
18.1 German Initial Set-Up
18.2 Allied Initial Set-Up
18.3 Special Game-Turn 1 Rules
18.4 Victory Points (VPs)
19.0 XXX Corps Breakout
20.0 The Besieged
21.0 Operation Market-Garden Campaign Scenarios
Order of Battle
Notes:
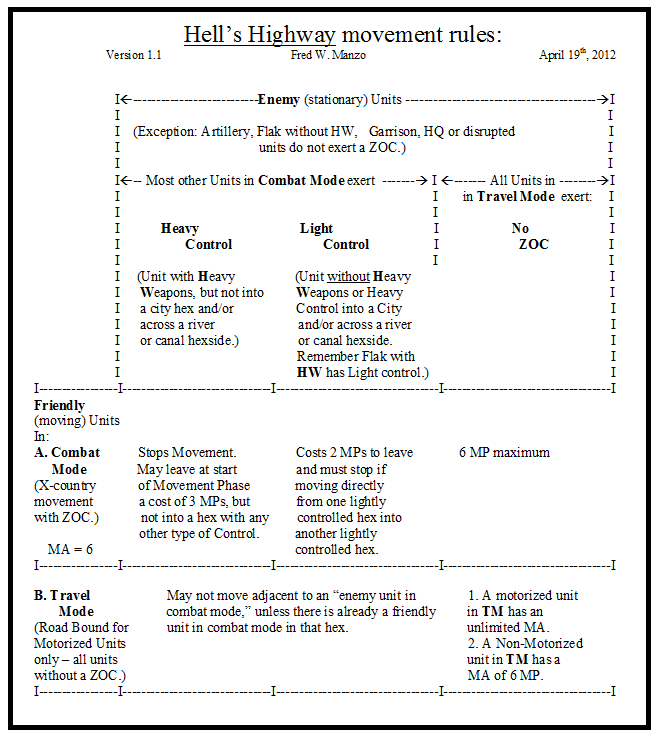
1. Disrupted, static and garrison units have a MA = 0.
2. A unit, when adjacent to an enemy-occupied hex, which is connected by a road, during a friendly fire phase may be allowed an exploitation move if the enemy unit retreats or is eliminated. An exploitation column in an uninterrupted chain has unlimited movement on Major Roads.
3. See the Terrain Effects Chart under Travel Mode for lower travel costs.
4. A unit may not move directly from a light control hex to a heavy control hex.
Player Aid #2: Movement Rules
Player Aid #5: Direct vs Indirect Fire?
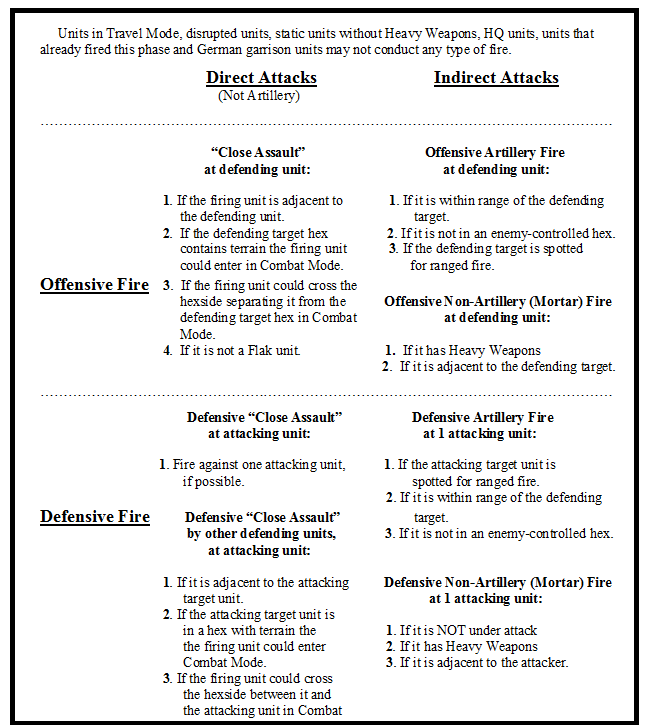
Direct Fire:
Advantages:
- Combat Engineers may give a Direct Offensive Fire Attack Bonus of + 1to the die roll if a defending target does not have engineer support also.
2. Direct Fire has fire modifiers from 1 to 3 points higher than Indirect Fire on the Terrain Effects Chart.
- There is a -1 modifier if one or more units conducting direct offensive or defensive fire are antitank types, have anti-tank capability or are receiving anti-tank support from a HQ, and the target is any armored type.
- There is a +1 modifier for Direct Fire when the defending target is in Travel Mode from a hex not connected to the target by a road.
- There is a +2 modifier for Allied Direct Fire conducted against a German unit that is isolated at the moment of fire. This modifier does not apply if the isolated unit is a SS unit north of the Neder Rijn river.
- When a hex is vacated by a defending target that retreats or is eliminated, one or two attacking units that conducted direct fire in the attack may immediately advance into the hex.
- There is a +1 modifier if the direct fire is conducted from a hilltop.
Disadvantages:
1. A unit conducting Direct Offensive Fire across a bridge or stream hexside is considered in clear terrain if it is the target of any type of Defensive Fire.
2. Anti-tank units may not conduct Direct Fire at non-armored units.
3. The defenders can always return fire.
4. Artillery cannot conduct Direct Fire.
Indirect Fire:
Advantages:
1. If the attack consists of Indirect Fire alone and the attacking units are not adjacent to the defending units, the defenders cannot fire back if they lack Heavy Weapons.
2. There is a – 1 modifier for Offensive Indirect Fire when the defender is in Travel Mode.
3. Non-adjacent units Heavy Weapons may come into play.
Disadvantages:
1. Indirect fire units may not advance–after-combat.
2. Each time an artillery unit fires it becomes Disrupted.
Remember, when combining Direct Fire units with Indirect Fire units the fire is considered to be Direct if more than half the units fire Directly.
Games Resources:
Player Aids for Hell’s Highway
This downloadable PDF file contains Player Aids that may come in handy when playing Victory Games’ classic board game: Hell’s Highway. The following Player Aids are included in the PDF file:
Player Aid Sheet Contents
- Player Aid #1: Rules Outline (as above).
- Player Aid #2: Movement Rules.
- Player Aid #3: Fire Rules – Offensive vs Defensive Fire.
- Player Aid #4: Direct Vs Indirect, Offensive Vs Defensive Fire.
- Player Aid #5: Direct vs. Indirect Fire?
- Player Aid #6: Terrain Effects Chart: Movement Point Costs and Fire Modifiers.
Games Resources
Complete Rules to Hell’s Highway